Query results
Overview
After entering your search criteria, either a single request or a results in grid displays.
If no requests are retrieved then an error stating, "Your search did not retrieve any requests. Please try again" will appear.
If more than 500 requests are retrieved then an error stating, "Your query found more than the maximum number of requests that can be retrieved. Please refine your search and try again" will appear.
By default, the maximum number of requests retrieved is 500. It is possible to configure this number.
Note:
When working in a shared system, staff at the requesting library and at the current supplying library are the only ones that are allowed to update requests. Staff from other libraries may query and view the request and have the option to add a note.
Single request retrieved
When the search you entered retrieves only one request then only this request displays. You can now see the constant request information, the tabs, and the request history. See Display of a request for more information.
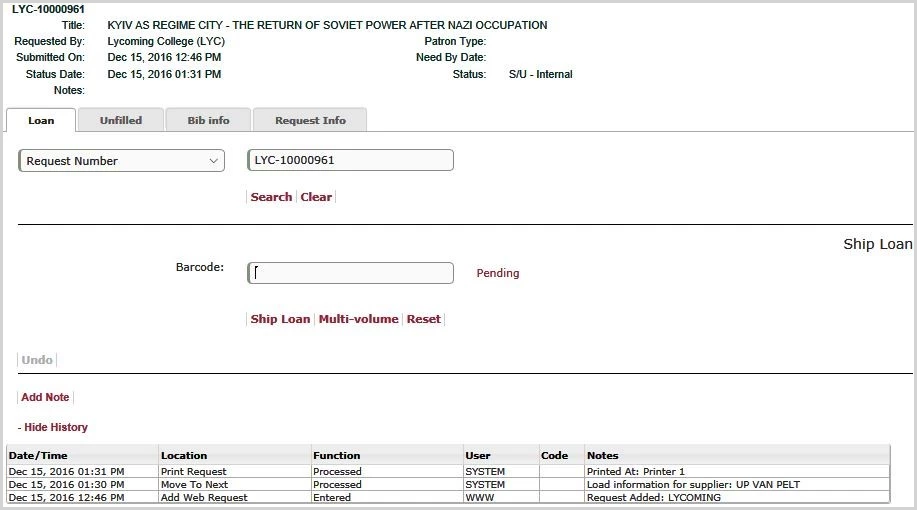
At the top of the tab, the Exact Query dropdown and the input box display. This streamlines processing for a batch of requests where you have an exact number readily available. As soon as the current request is updated, you can enter the next number.
Results grid
When the search you entered retrieves more than one request then a grid displays the results.
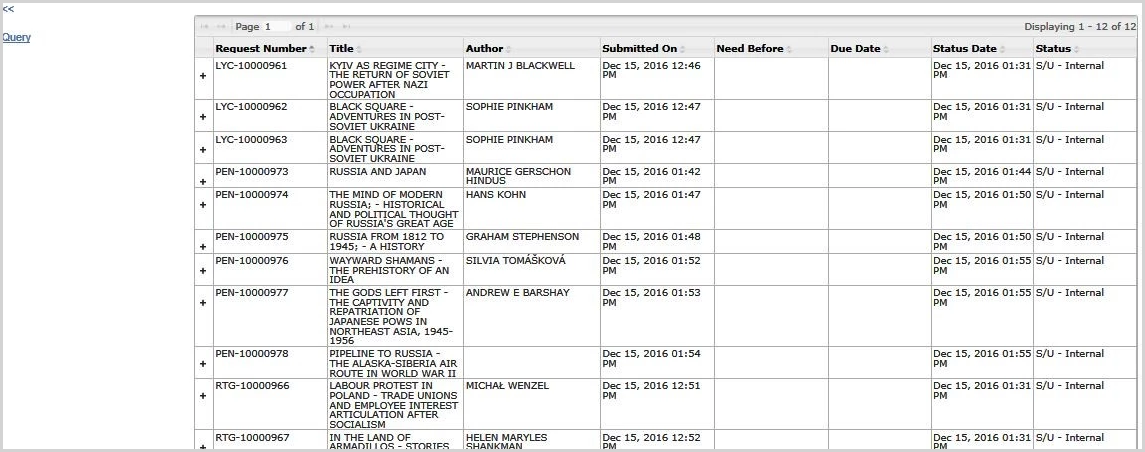
The following columns display:
- Request Number: Relais request number
- Title: Title of the publication, e.g., book title
- Author: Author of the publication
- Submitted On: Date the request was submitted
- Need Before: Need by date if provided by the requester
- Hidden by default
- Due Date: If the request has been updated as a loan, the due date
- Status Date: Date and time of the current status
- Status: Current status
It is possible to configure the grid, for example by hiding columns and changing the names of the column headings.
The number of requests retrieved displays in the upper right of the grid.

By default up to 100 requests display on a single page. The maximum number of requests per page is configurable.
- If there are more than 100 requests, then you can navigate to other pages using the arrows. The number of pages displays in the upper left of the grid.

Sorting the results
Columns can be sorted in ascending and descending order.
- To sort the results, click on the column heading.
For example, the following results grid has been sorted on the Title column.
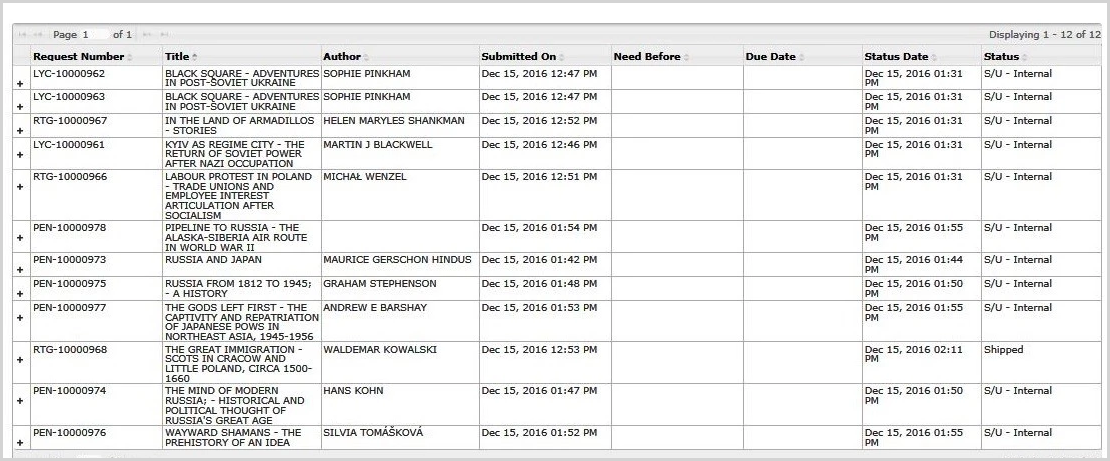
Note: When sorting results that span multiple pages, all the results are sorted, not just the page currently displayed.
Exporting requests

An option to Export requests can be configured to display in the top right-hand corner of the page above the request grid. This option allows staff to export the request data to a comma-delimited CSV file.
After clicking on Export requests, the staff member is prompted to indicate what fields from the requests to include in the file of requests.
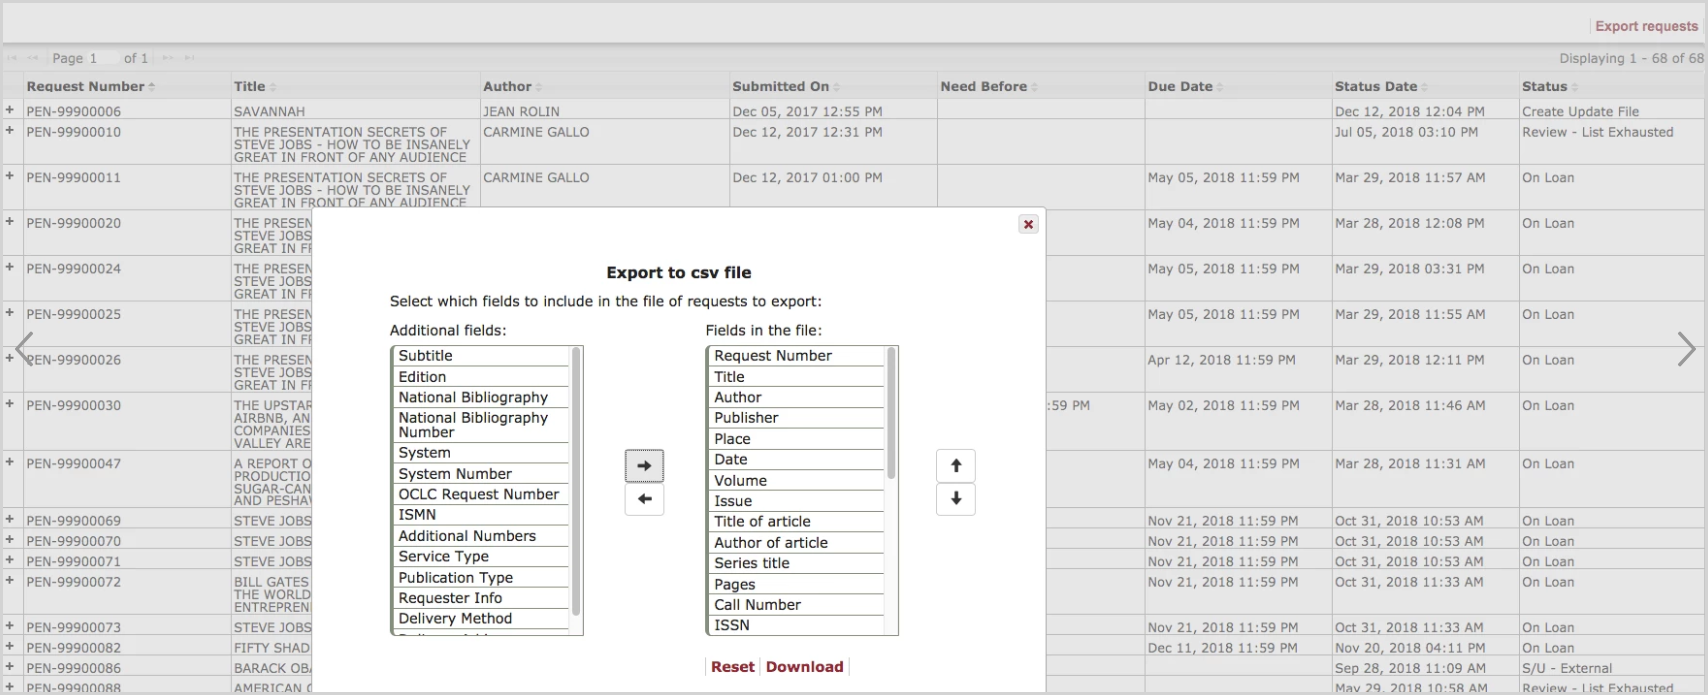
Two columns display:
- The right-hand side lists the fields to include in the file by default
- The left-hand side lists the remaining fields which may be selected
Use to add more fields to the file.
Use  to remove fields from the file
Use  to change the order in which the field is placed in the file
Click Reset to display the original defaults in the left and right-hand columns.
Click Download to create and export the comma-delimited CSV file.
View a specific request
- To view a specific request, click on the request in the grid, anywhere in the row. You can now see the constant request information, the tabs, and the request history. See Display of a request for more information.
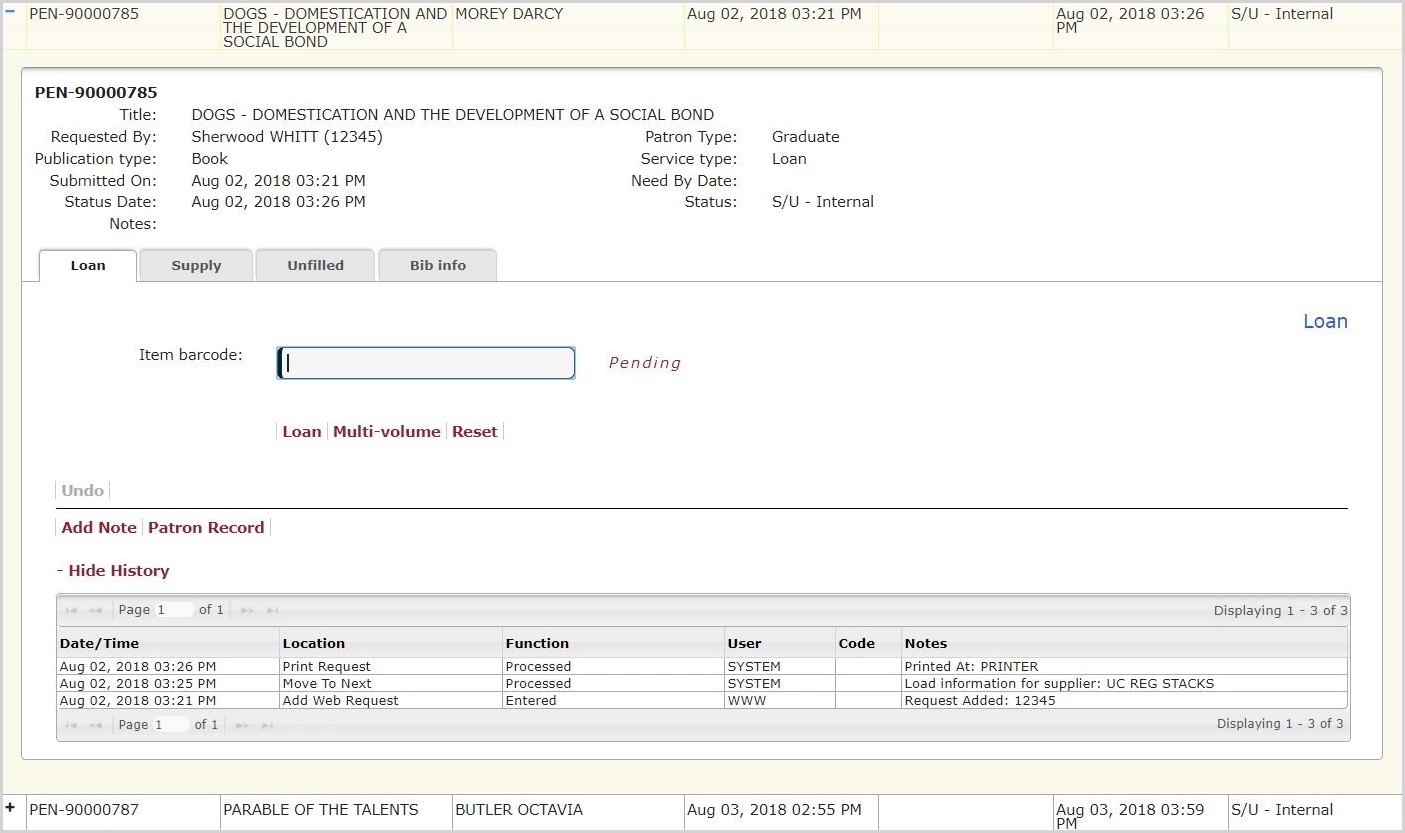
- To close this request, click on the minus sign or click on another request.
Caution: Each time you open a request, Relais checks the current status and updates it accordingly, and determines which tab or tabs to display.
For example:
If you update a request as a loan, then the status that is displayed remains at scan or updated until the next time you open the request. The request history is not updated until the next time you open the request.
Display of a request
There are three components to the display
- Constant request information
- A tab or a set of tabs
- The request history
Lock and Unlock a request
Requests can be automatically locked to staff viewing the request and unlocked automatically when staff moves on from the displayed request.
Use the Unlock a Request link to manually unlock a request that is currently locked for processing by someone else.
Constant request information
The following information displays:
- Request from your patron

- Request from another library

The table below defines the fields available from the Constant request screen.
| Field | Definition |
|---|---|
| Request Number | The Relais request number. |
| Bibliographic information | The Title, Author, Publication date, Call number, and Volume/Issue for the item, in addition to any Notes provided by the requestor. |
| Requested By |
|
| Publication type | The publication type of the item. |
| Service type | The request's service type (e.g., Loan). |
| Preferred format | The requestor's preferred format for the item. |
| Submitted on | The date the request was submitted. |
| Need by date | The date the request is needed by. |
| Due date | The date the request is due. |
| Status date | The date and time of the current status. |
| Status | The current status of the request. |
| Label | |
| Additional Resource(s) | Additional search resources can be added if the catalog supports URL parameters. The link will be based on the search result format and constructed using the information in the search result record. Additional search resources include, but are not limited to:
To access an additional resource:
|
Request status
The current status for each request is determined when the request is retrieved as a single request or when the request is opened in the results grid.
Note: The label used for request statuses can be customized to suit local requirements. Contact OCLC Support and indicate the status label(s) you would like to modify and what you would prefer to use instead.
The status depends on a number of factors, including:
| Status | Used when |
|---|---|
|
Name of the current RequestFlow queue. For example:
|
Requests
|
| Shipped | The request has been updated using the Ship Loan tab |
| On Loan | The request has been updated using the Loan tab |
| Sent Back | The request has been updated using the Send Back tab |
| Returned | The request has been updated using the Return tab |
| Unfilled |
The request has been updated with a Reason Unfilled, e.g. Not on the shelf, No locations found, and a message sent to the requester |
| Canceled | The patron requesting library has canceled the request or staff has updated the request indicating the requester has canceled, i.e., assigned Reason Unfilled = "Request Cancelled (CRQ)" |
Tabs
When a single request displays or a request is selected in the results grid, one or more tabs display the request's current status.
Currently, the possible tabs are:
|
Loan |
The Ship Loan tab displays when a request is in a Scan or Update queue, i.e., the book band has been printed or emailed. For more information, please see Loan an item. |
This tab is used to update a request when:
|
|---|---|---|
|
Supply |
The Supply tab always displays. For more information, please see Supply documents to your own patron or another library. |
This tab is used to add documents to service a request. |
|
Unfilled/Cancel |
The Unfilled/Cancel tab appears when processing requests. For more information related to unfilled, please see Update as unfilled. |
This tab allows for:
|
| Recall/Renew |
The Recall/Renew tab always displays. |
This tab allows staff members to process recalls for material by choosing the 'Recall' button, or send a 'Request to renew' message to the supplier to request renewal of materials for their patron. When a borrowing library receives a positive response to their renewal request, staff members will click on the renewal button to mark the renewal transaction on their end. As the supplying library, requests for renewal can be responded to through the same tab which displays the 'Respond to renew request' button on the recall/renew tab. |
| Bib Info | The Bib Info tab always displays. | This tab is used to view bibliographic information from the request and to update it as required. The duplicate request option in this tab includes the following options:
|
|
Request Info |
The Request Info tab always displays to staff who are associated directly with the request type for the request being viewed. |
This tab is used to view specific information for the request being viewed. |
|
Delivery Info |
The Delivery Info tab always displays to staff who are associated directly with the request type for the request being viewed. |
This tab is used to view specific information for the request being viewed.
|
|
Request Routing |
The Request Routing tab always displays. For more information, see the Request Routng tab.
|
This tab is used to view the existing routing list associated with a patron’s request, view a list of all configured suppliers in the system, and modify the routing list as appropriate. |
Standard buttons
At the bottom of each tab is a set of standard buttons.
Add Note
You can use the Add Note button at any time to add a note to the request history.
- After entering your note click Update.
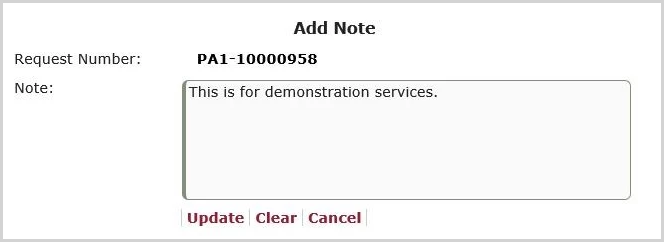
- To clear the note you have entered, click Clear.
- To return to the tab without adding a note click Cancel.
The display of the Add Note button is optional.
Patron Record
If you need to update the patron barcode in order for the AcceptItem message to be successful, and you are using NCIP or eSIP, then use the Patron Record button.
- After entering the new barcode click Update.
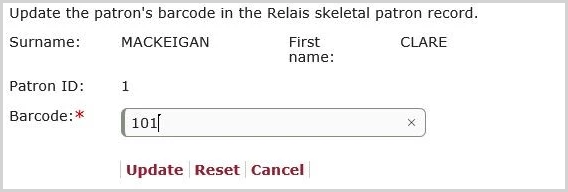
- To clear the barcode you have entered, click Reset.
- To return to the tab without updating the barcode click Cancel.
If you are part of a shared system, the Patron Record only displays for requests from your own patrons.
Configure Standard Buttons
To hide or display any standard buttons contact your local Relais Administrator.
Request history
Under the tab or tabs the full request history displays. The information displayed in the Request history can be configured by hiding specific rows and columns. Contact OCLC Support for assistance.

- To expand any of the lines in the history, highlight the line and click

Configure the query results and the grid
Any of the following items can be configured for each staff group.
- The maximum number of requests to retrieve
- The default number of requests retrieved via a query is 500, you can configure a different maximum number.
- The maximum number of requests to display on one page of the grid.
- The default number of requests that display on one page of the results grid is 100, you can configure a different number to display.
- In the results grid you can:
- hide columns
- change the columns' heading name
- change the default sort by field (Request Number by default)
- change the default sort order (Ascending by default)
Note:
To make configuration changes on the results grid contact your local Relais Administrator and specify the changes you want
