Display of a request
There are three components to the display
- Constant request information
- A tab or a set of tabs
- The request history
Constant request information
The following information displays:
- Request from your patron
- Request from another library

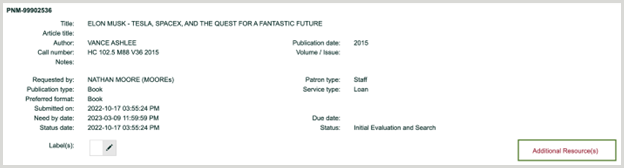
The table below defines the fields available from the Constant request screen.
| Field | Definition |
|---|---|
| Request Number | The Relais request number. |
| Bibliographic information | The Title, Author, Publication date, Call number, and Volume/Issue for the item, in addition to any Notes provided by the requestor. |
| Requested By |
|
| Publication type | The publication type of the item. |
| Service type | The request's service type (e.g., Loan). |
| Preferred format | The requestor's preferred format for the item. |
| Submitted on | The date the request was submitted. |
| Need by date | The date the request is needed by. |
| Due date | The date the request is due. |
| Status date | The date and time of the current status. |
| Status | The current status of the request. |
| Label | |
| Additional Resource(s) | Additional search resources can be added if the catalog supports URL parameters. The link will be based on the search result format and constructed using the information in the search result record. Additional search resources include, but are not limited to:
To access an additional resource:
|
Request status
The current status for each request is determined when the request is retrieved as a single request or when the request is opened in the results grid.
Note: The label used for request statuses can be customized to suit local requirements. Contact OCLC Support and indicate the status label(s) you would like to modify and what you would prefer to use instead.
The status depends on a number of factors, including:
| Status | Used when |
|---|---|
|
Name of the current RequestFlow queue. For example:
|
Requests
|
| Shipped | Request has been updated using the Ship Loan tab |
| On Loan | Request has been updated using the Loan tab |
| Sent Back | Request has been updated using the Send Back tab |
| Returned | Request has been updated using the Return tab |
| Unfilled |
Request has been updated with a Reason Unfilled, e.g. Not on shelf, No locations found, and a message sent to the requester |
| Cancelled | The patron requesting library has canceled the request or staff has updated the request indicating the requester has canceled, i.e., assigned Reason Unfilled = "Request Cancelled (CRQ)" |
Tabs
When a single request displays or a request is selected in the results grid, one or more tabs display depending on the current status of the request.
Currently the possible tabs are:
| Loan | The Ship Loan tab displays when a request is in a Scan or Update queue, i.e., the bookband has been printed or emailed. |
This tab is used to update a request when:
|
|---|---|---|
| Unfilled | The Unfilled tab displays prior to the request being shipped/loaned | This tab is used to indicate a reason for non-supply, e.g., Not on shelf, No locations found |
| Bib Info | The Bib Info tab always displays. | This tab is used to view bibliographic information from the request and to update it as required. The duplicate request option in this tab includes the following options:
|
Standard buttons
At the bottom of each tab is a set of standard buttons.
Add Note
You can use the Add Note button at any time to add a note to the request history.
- After entering your note click Update.
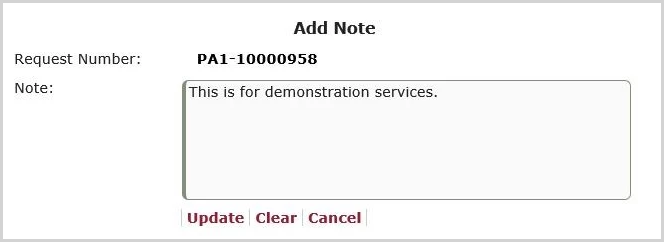
- To clear the note you have entered, click Clear.
- To return to the tab without adding a note click Cancel.
Display of the Add Note button is optional.
Patron Record
If using NCIP or eSIP and you need to be able to update the patron barcode in order for the AcceptItem message to be successful, then use the Patron Record button.
- After entering the new barcode click Update.
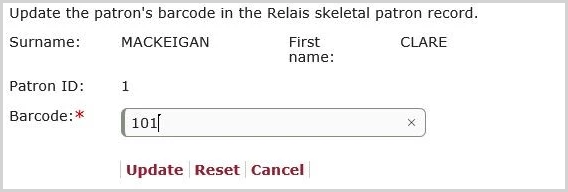
- To clear the barcode you have entered, click Reset.
- To return to the tab without updating the barcode click Cancel.
If you are part of a shared system, the Patron Record only displays for requests from your own patrons.
Configure Standard Buttons
To hide or display any standard buttons contact your local Relais Administrator.
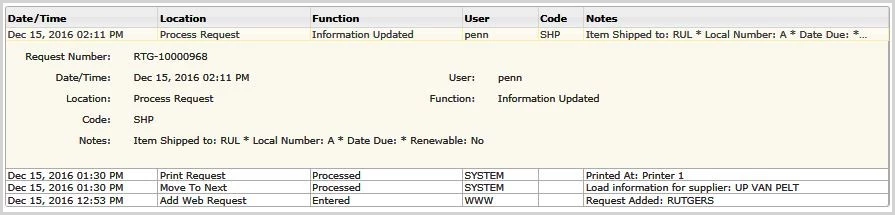
Request history
Under the tab or tabs the full request history displays. The information displayed in the Request history can be configured by hiding specific rows and columns. Contact OCLC Support for assistance.

- To expand any of the lines in the history, highlight the line and click