Request Forms
Use the Request Forms screen in OCLC Service Configuration to customize forms that your patrons and off-system partner libraries can use to submit requests.
Learn more in a training course: Patron Management & Notifications
Request Types
As a Tipasa user, you have access to five types of request forms:
| Form | Description | Accessible to patrons or off-system partners from |
|---|---|---|
|
Article |
The default form allows patrons to request articles. |
My Account |
|
Book |
The default form allows patrons to request books. |
My Account |
|
Other |
The default form allows patrons to request other types of materials (e.g., dissertations, audio visuals). You can customize the form to suit your library's most requested "other" type of material. |
My Account |
| Lender's Off-System Request Form | This form allows a staff member at an off-system partner institution who is assigned the WorldShare ILL Partner role to use a web-based request form to submit off-system lending requests on behalf of their institution. | Unique URL you provide to the staff member at the off-system partner institution |
| WorldShare ILL Request Form | The WorldShare ILL Request form allows you to configure and customize elements of the form for your library users and provide access from any discovery services and request any item via WorldShare ILL. Requests submitted via the form can be automatically routed to the automated request manager. | My Account |
|
This form allows libraries with WorldShare ILL and WorldCat Discovery to create a request form that displays in WorldCat Discovery and allows patrons to place requests for items not held by your library. Tipasa libraries should not use this form. Note: OCLC recommends using the forms available through My Account and using OpenURL to link your resource sharing button to the My Account forms. For more information, see Before you begin: WorldCat Discovery and WorldCat Local libraries only. |
WorldCat Discovery |
Note: You will need to substitute your institution's registry ID to customize the direct links. If you have customized your request form names, the direct link name will not reflect those changes.
- Sign in to OCLC Service Configuration
- Navigate to the WorldCat Registry > Identifiers
- Find the Identifier Type WorldCat Registry ID and the associated number
Article, Book, and Other Forms
The image below is an example of the Book Request Form. The sections of the form are described below.
When you have familiarized yourself with the sections of the form, see Configure Your Request Form for instructions on customizing your request forms.
Note: For an explanation of each available field, please see Request Form fields.
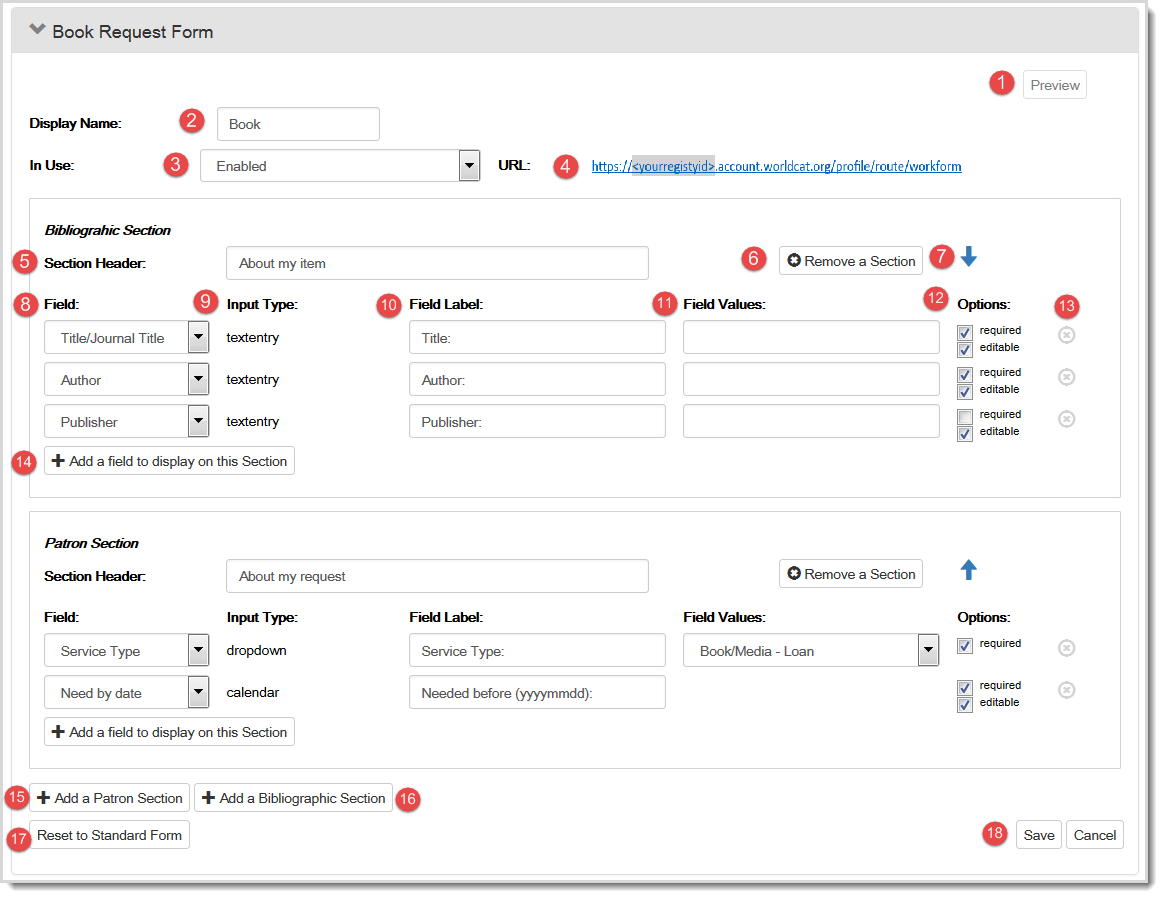
- 1. Preview
- Once you have configured the form, you can preview how it will appear to patrons. To preview the form, click Preview.
- 2. Display Name
-
The Display Name determines how the form tab will be labeled for users in My Account. To edit the Display Name, enter a new name in the Display Name field.
- 3. In Use
-
The In Use field turns the form on or off. Forms will not be available to patrons in My Account when they are disabled. The default is Enabled. To enable the form, select Enabled. To disable the form, select Disabled.
- 4. URL
-
The URL indicates the page where the forms are located. Click the URL to view the forms.
- 5. Section Header
-
Use the Section Header to assign a title to the section of the request form. Entering a header can help the patron understand the type of information you expect them to input in the fields contained in the section. For example, you can title a section "About My Request" to inform patrons that the following fields will ask for information about the item being requested. Links and basic HTML formatting can be included in the Section Header. See Include links and formatting. To edit the Section Header, enter a new header into the Section Header field.
- 6. Remove a Section
-
Use the Remove a Section button to remove the section. Note: You will not be asked to confirm the removal of the section. Before clicking the button, make sure you want the section to be removed. To remove the section, click Remove a Section.
- 7. Move a section
-
The arrows allow you to change a section's position on the form. Arrows will only appear in the directions you can move the sections. To move the section up on the form, click the up arrow (
 ). To move the section down on the form, click the down arrow (
 ).
). - 8. Field
-
The fields you select determine what appears on the request form. If you have not configured the form yet, default fields will be selected. Note: Only the Note to Patron field can be reused on the forms. All other fields can only be used once. To add a field, see 14. Add a field to display on this Section. To change a field, click the Field list and select a new field. To delete a field, see 13. Remove (delete) a field.For an explanation of each available field, please see Request Form fields.
- 9. Input Type
- The Input Type displays how the patron inputs information into the field. Input type is fixed for each field.
- 10. Field Labels
-
The Field Label determines how the field is described on the form. Each field has a default field label. Use the field label to provide patrons with a description of the information you would like them to input in the field. For example, Patron Max cost could be relabeled to Max cost I am willing to pay. Note: Field labels are limited to 30 characters. To edit a field label, enter a new label in the Field Label.
- 11. Field Values
- Field Values can be used to enter default text or options that will appear on the form to the patron. For example, you may enter a value for Patron Max cost to let patrons know the maximum amount charged for any item. If the Input Type is dropdown, you can select the default selection from the list, or depending on the field, you can enter your own values to appear in the dropdown. If the Input Type is textentry, you can enter default text in the field.
- 12. Options
-
Options allow you to further define the fields on your form. By selecting an option, you can make fields required or editable.
- Select the Required check box if you want the field to be required. When a field is required, patrons must provide information in the field in order to submit the form. Patrons will encounter an error if they try to submit the form without filling out all required fields.
- Deselect the Required check box if you do not want to the field to be required. When a field is not required, patrons do not have to fill in the field.
- Select the Editable check box so that patrons can edit the field. Most fields should be editable.
- Deselect the Editable check box if you do not want patrons to edit the field. You can enter a value in the 11. Field Values that patrons cannot edit.
- 13. Remove (delete) a field
-
Use the remove icon (
 ) to remove a field from the section. Note: You will not be asked to confirm the removal of a field. Before clicking the remove icon make sure you want the field to be removed. To remove a field, click the remove icon () to remove a field from the section.
 - 14. Add a field to display on this Section
-
Use the Add a field to display on this Section button to add another field to the section. To add a field to the section, click Add a field to display on this Section.
- 15. Add a Patron Section
-
Use the Add a Patron Section button to add a Patron Section to the form. See Patron Section Fields for a description of each field in the Patron Section. To add a patron section, click Add a Patron Section.
- 16. Add a Bibliographic Section
-
Use the Add a Bibliographic Section button to add a Bibliographic Section to the form. See Bibliographic section fields for a description of each field in the Bibliographic Section. To add a bibliographic section, click Add a Bibliographic Section.
- 17. Reset to Standard Form
-
Use the Reset to Standard Form button to reset the form to the default (non-customized) version of the form. To reset the form, click Reset to Standard Form.
- 18. Save and Cancel
-
Once you have completed editing the form, you can save or cancel your changes. To save the form, click Save. To cancel your changes, click Cancel.
Lender's Off-System Request Form
The image below is an example of the Lender's Off-System Request Form. The sections of the form are described below.
When you have familiarized yourself with the sections of the form, see Configure Your Request Form for instructions on customizing your request forms.
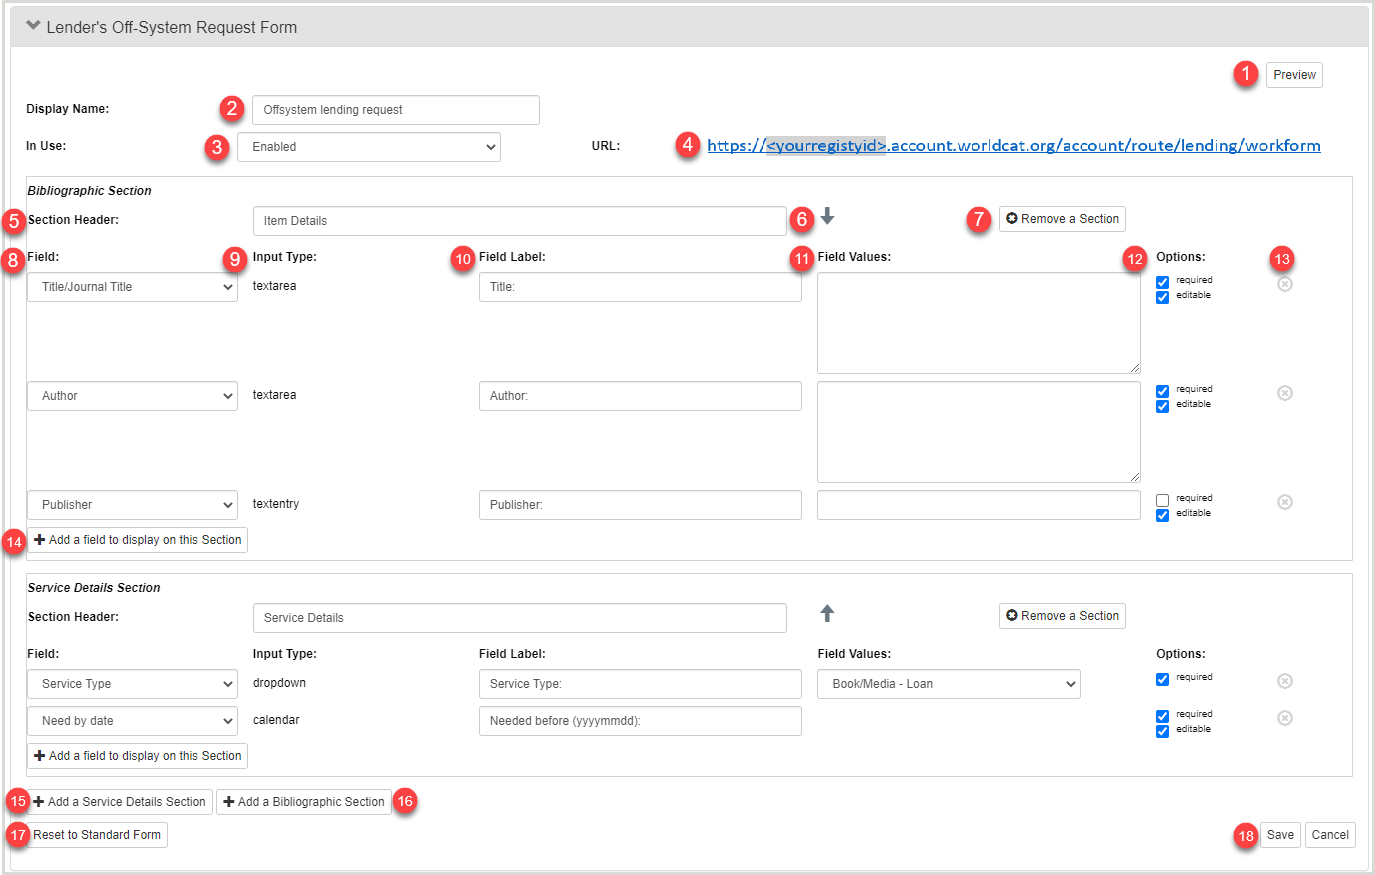
- 1. Preview
- Once you have configured the form, you can preview how it will appear to users. To preview the form, click Preview.
- 2. Display Name
-
The Display Name determines the text that displays as the header on the form. To edit the Display Name, enter a new name in the Display Name field.
- 3. In Use
-
The In Use field turns the form on or off. The default is Disabled. To enable the form, select Enabled. To disable the form, select Disabled.
- 4. URL
-
The URL indicates the page where the forms are located. Click the URL to view the forms.
Note: The form is not currently available to display. This feature is coming soon.
- 5. Section Header
-
Use the Section Header to assign a title to the section of the request form. Entering a header can help the staff at the partner library understand the type of information you expect them to input in the fields contained in the section. Links and basic HTML formatting can be included in the Section Header. See Include links and formatting. To edit the Section Header, enter a new header into the Section Header field.
- 6. Move a Section
-
The arrows allow you to change a section's position on the form. Arrows will only appear in the directions you can move the sections. To move the section up on the form, click the up arrow (). To move the section down on the form, click the down arrow ().
- 7. Remove a section
-
Use the Remove a Section button to remove the section. Note: You will not be asked to confirm the removal of the section. Before clicking the button, make sure you want the section to be removed. To remove the section, click Remove a Section.
- 8. Field
-
The fields you select determine what appears on the request form. If you have not configured the form yet, default fields will be selected. Note: Only the Note to User field can be reused on the forms. All other fields can only be used once. To add a field, see 14. Add a field to display on this Section. To change a field, click the Field list and select a new field. To delete a field, see 13. Remove (delete) a field.For an explanation of each available field, please see Request Form fields.
- 9. Input Type
- The Input Type displays how the user inputs information into the field. Input type is fixed for each field.
- 10. Field Labels
-
The Field Label determines how the field is described on the form. Each field has a default field label. Use the field label to provide users with a description of the information you would like them to input in the field. Note: Field labels are limited to 50 characters. To edit a field label, enter a new label in the Field Label.
- 11. Field Values
- Field Values can be used to enter default text or options that will appear on the form to the user. For example, you may enter a value for Max cost to let users know the maximum amount charged for any item. If the Input Type is dropdown, you can select the default selection from the list, or depending on the field, you can enter your own values to appear in the dropdown. If the Input Type is textentry, you can enter default text in the field.
- 12. Options
-
Options allow you to further define the fields on your form. By selecting an option, you can make fields required or editable.
- Select the Required check box if you want the field to be required. When a field is required, users must provide information in the field in order to submit the form. Users will encounter an error if they try to submit the form without filling out all required fields.
- Deselect the Required check box if you do not want to the field to be required. When a field is not required, users do not have to fill in the field.
- Select the Editable check box so that users can edit the field. Most fields should be editable.
- Deselect the Editable check box if you do not want users to edit the field. You can enter a value in the 11. Field Values that users cannot edit.
- 13. Remove (delete) a field
-
Use the remove icon () to remove a field from the section. Note: You will not be asked to confirm the removal of a field. Before clicking the remove icon make sure you want the field to be removed. To remove a field, click the remove icon () to remove a field from the section.
- 14. Add a field to display on this Section
-
Use the Add a field to display on this Section button to add another field to the section. To add a field to the section, click Add a field to display on this Section.
- 15. Add a Service Details Section
-
Use the Add a Service Details Section button to add a Service Details section to the form. See Service Details Fields for a description of each field in the Service Details. To add a service details section, click Add a Service Details Section.
- 16. Add a Bibliographic Section
-
Use the Add a Bibliographic Section button to add a Bibliographic Section to the form. See Bibliographic section fields for a description of each field in the Bibliographic Section. To add a bibliographic section, click Add a Bibliographic Section.
- 17. Reset to Standard Form
-
Use the Reset to Standard Form button to reset the form to the default (non-customized) version of the form. To reset the form, click Reset to Standard Form.
- 18. Save and Cancel
-
Once you have completed editing the form, you can save or cancel your changes. To save the form, click Save. To cancel your changes, click Cancel.
WorldShare ILL Request Form
For WorldShare Interlibrary Loan libraries. Refer to WorldShare Interlibrary Loan, Request Forms.
WorldCat Discovery Request Form
The WorldCat Discovery Request Form should no longer be used. Use the WorldShare ILL Request Form. Contact OCLC Support with any questions.
Request Form configuration
Follow the instructions below to configure and provide links to your request forms. For an explanation of each section of the form, see Article, Book, and Other Forms or Lender's Off-System Request Form. For an explanation of each available field, please see Request Form fields.
Some points to keep in mind when configuring your form:
- Use the definitions in Bibliographic section fields, Service Details Section Fields and Patron Section Fields to create a draft of your form.
- Only the Note to Patron field can be reused on a form. All other fields can only be used once.
- Fields can be grouped into sections under a labeled Section Header to organize the information on the form.
- Sections can be moved up or down at any time by clicking the arrows in the upper right corner of each section.
- Fields can be reordered by removing and adding them in the order that you would like them to appear on your form.
- You can preview your form before you save it to confirm that it will appear to your patrons or users as you expect.
- Any updates you make to the request form will not take effect immediately. Changes will usually appear on the form within 2-3 minutes.
Before you begin: WorldCat Discovery libraries only
Tipasa libraries:
- OCLC recommends configuring the resource sharing button in your WorldCat Discovery with OpenURL to link to the forms in My Account. OpenURL will fill in the request forms with bibliographic information from the catalog.
To enable OpenURL in WorldCat Discovery or WorldCat Local:
- To configure the Resource Sharing (Any Level) button, in Service Configuration, on the left navigation, click WorldCat Discovery and WorldCat Local > Place Hold/Request Buttons.
- On the Place Hold/Request Buttons screen, under Resource Sharing (Any Level), select OpenURL 1.0 from the Type of button configuration list.
- From the Choose an OpenURL Resolver from the OpenURL Resolvers you have already registered with OCLC list, select your request form URL.
- Click Save.
- Continue to Step 1: Customize the equest forms below.
Participation in Off-System Request Form
- For institutions with Resource Sharing for Groups or WMS groups.
Determine whether your library should be listed as a lending library on the group's Off-System Request Form. Libraries are included in the group's Off-System Lending Request form by default.
- To remove your library from the list, deselect the My institution should appear as a lender on my groups' Off-System Lending Request form(s) setting.
The lending library list on the group's off-system lending request form includes group member libraries that have:
- Opted into the group's lending request form.
- Set their supplier status to Yes in the OCLC Policies Directory.
Refer to Off-system requesting workflow and Off-system lending by request form for more information.
Customize the request forms
If this is your first time customizing the request forms, the forms will contain default fields. Forms can be customized to include parameters and information relevant to your library. Refer to Article, Book, and Other Forms or Lender's Off-System Request Form for an explanation of each section of the forms.
Note: For an explanation of each available field, please see Request Form fields.
To customize your request forms:
- In Service Configuration, on the left navigation, click WorldShare ILL > Request Forms.
- Click the Article Request Form, Book Request Form, Other Request Form or Lender's Off-System Request Form, depending on the form you want to customize.
- If this is your first time customizing the form, you will see the default form.
- Edit the Section Header or use the default text.
- Under Field, click the field list to select a field.
- Input type is fixed for each field and will change depending on the field you select.
- Optional. Rename the field by entering a new Field Label.
- Use the field label to provide patrons or users with a description of the information you would like them to enter.
- Field labels are limited to 30 characters.
- Determine whether you would like to apply any of the Options to the field.
- Select the required or editable check box to turn the options on.
- Deselect the check boxes to turn the options off.
- Optional. To remove the field, click the remove icon (
 ) at the end of the field line.
- You will not be asked to confirm the removal of a field. Before clicking the icon, make sure you want the field to be removed.
- To add another field, click Add a field to display on this Section.
- Continue adding and editing the fields you want to include until you are satisfied with that section of the form.
- At any time, you can click Preview at the top of the form to view the form as a patron or user will see it.
- To add another section, click Add a Patron Section, Add a Service Details Section or Add a Bibliographic Section (fields will differ depending on the section you select).
- Repeat steps 4-11 until you are satisfied with the sections and fields within each.
- Click Preview to confirm that the forms looks as you expect.
- Click Save you save your customizations to the form. Patrons or users will not be able to see the changes you have made to the form until you save it.
- Repeat steps 2-14 for any additional forms you want to configure.
- Continue to Step 2: Provide links to your request forms for information on providing links to the forms.
Note: At any time, you can click Reset to Standard Form at the bottom left of the form to return to the default (non-customized) version of the form.
Add copyright compliance and acceptance for non-US Libraries
Confirm and track acceptance of local copyright terms by adding the Copyright Acknowledged and Copyright Declaration fields to your request form.
Libraries in Australia, New Zealand, Spain, and the United Kingdom require a copyright acknowledgement to track acceptance of local copyright terms.
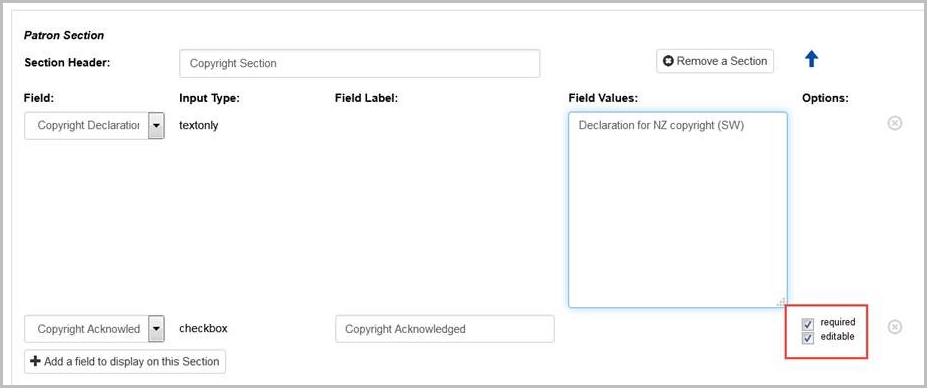
- Click Add a Patron Section. Enter a Section Header title.
- In the new Patron Section, click Add a field to display on this Section.
- Select Copyright Declaration and enter your Copyright terms.
- Click Add a field to display on this Section.
- Select Copyright Acknowledgement.
- Click Preview to confirm that the form looks as you expect.
- Click Save to save customizations to the form.
Include links and formatting
Links and basic HTML formatting can be included in selected fields within Request Forms, making it easier to communicate information to users within the forms.
The below fields allow basic HTML formatting:
- Section Header
- Copyright Declaration
- Notes
- Note to Patron
The allowed formatting tags are:
- Link tag: <a></a>
- Bold tag: <b></b>
- Italic tag: <i></i>
- Underline tag: <u></u>
- Paragraph tag: <p></p>
Note: Any other HTML or JavaScript codes will be stripped and will not display on the form.
Automatically populate Patron Type on Request Forms
The value of illPatronType from the patron record will automatically populate in the Status field on Request Forms. Patron Status will then automatically apply on ILL requests and in Usage Statistics.
Values from the Status field are available in Report Designer and OCLC Usage Statistics. See Reports for more information.
Note: If your library uses WMS Circulation, the value from the Interlibrary Loan Patron Type section of the patron record will be used and not the borrower Category. Be sure to supply values in the illPatronType field of the patron load that reflect meaningful categories for statistics related to Interlibrary Loan. See Patron data files for more information about patron loads.
- In the Patron Section, click Add a field to display on this Section.
- Select Status.
- Select the Field Values drop-down.
- Enter all of the values in use for illPatronType for your institution.
- Matching is not case sensitive.
- illPatronType values for each patron are typically included as part of the patron load. See Patron data files for more information. For libraries who manually create and/or update patron records in the staff interface, the value set as illPatronType in the patron record will be used here.
- Optional. Edit the Field Label for Status to be more descriptive to your users.
- Click Preview to confirm that the form looks as you expect.
- Click Save to save customizations to the form.
The value from the patron record for Patron Type will automatically populate the Status field if a match is found between the value in the patron record and the values configured in the field values drop-down.
Note: If a patron has a Patron Type that has not been added in the Field Values for Status on the Patron Request Workflows, no value will automatically populate in the request. The patron will need to select an option from the configured values.
Configure Pickup Location on Request Forms
Using the Pickup Location field, Request Forms can be configured to allow you to easily identify where to send an item for patron pickup if you have multiple branches.
If configured, when a patron selects a pickup location and submits the request form, My Account will send the pickup location name and location code. The location code can be passed from Tipasa to your Circulation system for inclusion in temporary circulation items. This information stays with the request and is passed to the staff interface. It is also available for use with statistics.
Add a branch in WMS
- In Service Configuration, on the left navigation, click WorldCat Registry > Relationships.
- To add a branch, click the plus symbol (+) to expand the branch option. You can add new branches by:
Note: If your institution is using WMS, you may find that branches have already been configured.
- On the left navigation, click WorldCat Discovery and WorldCat Local > Holdings Codes & Shelving Location Messages > Holding Codes Translation Table.
- Add a row for each Registry Branch. See Holding Codes & Shelving Location Messages for more information.
Configure the Pickup Location on Request Forms
Note: If a Home Branch and/or Pickup Location value is defined within a patron’s record in the WorldShare Admin module, that value will override the default pickup location that has been defined in the Tipasa request form within OCLC Service Configuration.
- On the left navigation, click WorldShare ILL > Request Forms.
- Open the form (i.e., Book Request Form) that should have the Pickup Location field.
- Add the Pickup Location.
- Set the Pickup Location field as required/not required based on the desired behavior.
- Click click to view/edit field values.
- Select the desired pickup locations you would like to include on the request form.
- If no active locations are available, No selection is automatically selected.
- Set the desired default location. A default pickup location is required.
- To add or edit locations, see ILS Locations within the Circulation Integration module.
- Click Save.
- Click Save to complete the Pickup Location setup.
Note: Be sure to save the form to save changes to the Pickup Location. Click Preview to see how the drop-down list will appear to patrons using the form. - Repeat steps 5-8 for each form that has a Pickup Location.
Provide links to your request forms
Provide your patrons with links to the Article, Book, and Other Forms using OpenURL.
OpenURL
An OpenURL can be used to configure your library's discovery interfaces to send OpenURLs to the request forms for items that your patrons want to borrow. OpenURLs take the bibliographic information from the discovery interface and insert it into the appropriate patron request form.
Use the following base URL in the configuration modules of your discovery interfaces and replace xxxxxx with your library's WorldCat Registry ID (Find your Registry ID):
https://xxxxxx.account.worldcat.org/account/route/openurl?
If the discovery interface requires you to configure custom linking syntax, see Configure Custom OpenURL Links.
Request Form fields
Bibliographic Section Fields
The Bibliographic Section contains fields that patron or user can use to describe the item they are requesting.
These are all the fields available in the Bibliographic Section:
Patron Section Fields
The Patron Section contains fields that the patron can use to describe themselves or the item they are requesting.
For information on how to customize the list, see 11. Field Values.
These are all the fields that are available in the Patron Section:
| Field | Description |
|---|---|
|
Address 1 |
Patron's street address |
|
Address 2 |
Other address information, such as Apartment, Suite, etc. |
|
City |
Patron's city |
| Copyright Acknowledged |
Patron acknowledges the copyright terms set by the institution. The patron must acknowledge the copyright terms on the patron request work form to submit copy requests. Note: This setting is for libraries in Australia, the U.K., Spain, and New Zealand. See Add copyright compliance and acceptance for non-US Libraries for more information. |
| Copyright Declaration |
Declaration of copyright terms to the patron. Links and basic HTML formatting can be included in the Copyright Declaration as well. See Include links and formatting. Note: This setting is for libraries in Australia, the U.K., Spain and New Zealand. See Add copyright compliance and acceptance for non-US Libraries for more information. |
|
Country |
Patron's country. Select your country from the list to make it the default setting or, to pre-populate Request Forms with the country as entered in the patron record, see Tab-delimited patron data loading. |
|
This field can be customized to allow patrons to select a department they are associated with from a customized list.
Examples:
|
|
|
Edition |
Allows the patron to select the preferred edition of the requested item from a list (Any, Recent, This). |
|
|
Patron's email address |
|
Fax |
Patron's fax number |
|
First Name |
Patron's first name |
|
Patron's last name |
|
|
Need by Date |
Allows the patron to enter the date by which the item is needed (in YYYYMMDD format) This field appears in the Notes field of the Patron section in the borrowing request. |
|
Enter additional information or provide directions to patrons. When displayed to the patron, the field will not begin with the Note to Patron field label. This field can be reused throughout the form. Links and basic HTML formatting can be included in the Note to Patron field. See Include links and formatting. Examples:
|
|
|
Notes |
Provides the patron with a free text field to enter any relevant information about themselves or their request. This field cannot be reused. The borrowing library can use this field to enter relevant information as well. Entered via the Comments field in the patron form. The borrowing library can access the Notes field in the Patron section of the borrowing request. Links and basic HTML formatting can be included in the Notes field. See Include links and formatting. Character limit: 500 If the Patron Max cost and Need by Date are included on the Request Form, any information added to these fields are included in the Notes field and are included in the 500 character limit. Examples of potential patron entries:
|
|
Patron ID |
Allows the patron to enter an identification number (library card, student or faculty id, etc.) in a free text field. If you have enabled Tipasa and WorldShare Circulation integration, you must include this field on the Request Form and select Required. Please see Set up integration for more information. The barcode field in the Patron data load maps to the Patron ID field in the Patron request form. |
|
If your library charges patrons for certain types of ILL requests, this field allows you to ask patrons to provide information about the maximum amount (in US dollars) that they are willing to pay for a particular item. If it is used, the label could be changed to provide patrons with clearer instructions about what information to enter, or a Note to Patron could be added to explain the meaning of this field. This field appears in the Notes field of the Patron section in the borrowing request. Examples:
Please see Maximum Cost for information about setting the institution's maximum cost. |
|
|
Phone |
Patron's phone number. You should recommend patrons to enter their mobile phone number so that they can receive SMS notifications about their request. See Notifications for more information. |
|
Pickup Location (Maximum 400 branches) |
Allows the patron to select a preferred pickup location from a customized list. Additionally, locations configured in the WorldCat Registry and added to the Holding Codes Translation Table can be added as the Pickup Location.
For information on how to customize the list, see 11. Field Values. |
|
Postal Code |
Patron's postal code (e.g., zip code) |
| Preferred delivery format |
Allow the patron to specify and save a preference for electronic or print materials. Field values include:
If the preferred delivery format is not included on the request form, the value defaults to No Preference. |
|
Service Type |
Allows the patron to select the type of service being requested from the two options in the list:
|
|
State/Province |
Allows the patron to enter their state. Select your state or province from the list to make it the default setting. Values are available to the United States, Canada, and Australia. A country must be selected if State/Province is included on the form or, to pre-populate Request Forms with the state/province as entered in the patron record, see Tab-delimited patron data loading. |
|
Status |
Patron's status (within the library, company, school, etc.), selected from a list of customized statuses.
|
Service Details Section Fields
The Service Details Section contains fields that a user can use to describe the item they are requesting.
These are all the fields available in the Bibliographic Section:
| Field | Description |
|---|---|
| Edition | Allows the user to select the preferred edition of the requested item from a list (Any, Recent, This). |
| Max cost |
If your library charges users for certain types of ILL requests, this field allows you to ask users to provide information about the maximum amount (in US dollars) that they are willing to pay for a particular item. If it is used, the label could be changed to provide users with clearer instructions about what information to enter. Example:
|
| Need by date | Allows the user to enter the date by which the item is needed (in YYYYMMDD format) |
| Notes |
Provides the user with a free text field to enter any relevant information about themselves or their request. This field cannot be reused. The borrowing library can use this field to enter relevant information as well. |
| Note to User |
Staff members can add a free text note to their users that will display at the bottom of the off-system request form only. This field is limited to 500 characters but can be used multiple times. |
| Reference ID | The Reference ID of the item. |
| Service type |
Allows the patron to select the type of service being requested from the two options in the list:
|
Configure Custom OpenURL Links
An OpenURL can be used to configure your library's discovery interfaces to send OpenURLs to the request forms for items that your patrons want to borrow. OpenURLs take the bibliographic information from the discovery interface and insert it into the appropriate patron request form.
Use the following base URL in the configuration modules of your discovery interfaces and replace xxxxxx with your library's WorldCat registry ID (Find your registry ID):
https://xxxxxx.account.worldcat.org/account/route/openurl?
Here's an example of OpenURL 1.0 syntax:
- https://12345678.account.worldcat.org/account/route/openurl?rfr_id=<?rfr_id?>&genre=<?rft.genre?>&jtitle=<?rft.jtitle?>&rft.atitle=<?rft.atitle?>&rft.volume=<?rft.voume?>&rft.issue=<?rft.issue?>&rft.date=<?rft.date?>&rft.pages=<?rft.pages?>&rft.issn=<?rft.issn?>&rft.au=<?rft.au?>&rft_id=info:oclcnum/<?oclcnum?>
| From field name | OpenURL 0.1 | OpenURL 1.0 (Z39.88-2004) |
|---|---|---|
| Article Title/Chapter Title | atitle | rft.atitle |
| Author/Article Author |
aufirst auinit auinit1 auinitm aulast |
rft.aufirst rft.auinit rft.auinit1 rft.auinitm rft.aulast rft.ausuffix rft.au rft.aucorp |
| Date | date | rft.date |
| DOI | id=doi: | N/A |
| Edition (text) | edition | rft.edition |
|
Format |
genre | rft.genre |
| ISBN | isbn | rft.isbn |
| ISSN | issn | rft.issn |
| Issue | issue | rft.issue |
| OCLC# | N/A |
rft.oclcnum rft_id=info.oclcnum/ |
| Page Numbers |
pages spage epage |
rft.pages rft.spage rft.epage |
| Place of Publication | N/A | rft.place |
| PMID | id=pmid: | N/A |
| Publisher | N/A | rft.pub |
| Title/Journal Title |
stitle title |
rft.jtitle rft.btitle rft.stitle rft.title |
| Where did you learn about this item?* | sid | rfr_id |
| Volume | volume | rft.volume |
*The value of sid/rfr_id will not display to the user in the form. This data is stored and will be visible to library staff in the request Verification field in Tipasa. If the user enters a value in the Where did you learn about this item? field, this data will also be visible to staff in the Verification field.
WorldCat Discovery users, see Before you begin: WorldCat Discover libraries only for instructions on how to configure OpenURL.
Patron form field population
When a patron uses a patron request form in My Account, some patron data is automatically populated into the form.
Auto-populated fields include:
- First Name
- Last Name
- Patron ID
- Phone
- Address 1
- Address 2
- City
- State/Province
- Postal Code
- Status
Other fields, although they may be present in the patron record, will not auto-populate in the form. These include:
- Pickup Location
- Department
Keep in mind that you can label fields so that they are more meaningful to your patrons.