Automated Request Manager
As a feature of Smart fulfillment, use the Automated Request Manager (ARM) screen to configure automated ILL workflows. Automations are composed of match criteria you define along with actions you want the system to perform on matched requests.
To access this screen, sign in to OCLC Service Configuration, open the WorldShare ILL module from the left navigation, and then select Automated Request Manager.
The Automated Request Manager is divided into two tabs:
- Borrowing (Default)
- Lending
Automations are a combination of:
- Matches: What the request should look like.
- Actions: What the system should do with the request.
- Exceptions (Borrowing only): When you do not want these actions to occur.
- Priority: If a request matches multiple automations, which set of actions should be performed.
Note: Previously configured Direct Request Profiles will appear in the Automated Request Manager as Automations.
Bibliographic matching
Bibliographic matching helps ensure that the library user receives the item they're expecting and happens automatically with Automation. When a user's request includes only partial bibliographic information, the system uses the information that is provided and applies a series of rules to identify the best-matched item. the best-matched record is cataloged completely and correctly in WorldCat, is widely held by libraries, and closely matches the item the user requested. Once it identifies the best item, the system automatically adds or updates bibliographic information in the request.
Bibliographic matching requires at least one of the following: ISSN, ISBN, or OCLC number.
- If an ISSN is included, the system uses it to identify the best WorldCat record.
- If an ISSN is not included, the system looks for an OCLC number. If an OCLC number is present, the system uses it to identify the best record.
- If no ISSN or OCLC number is included, then the system looks for an ISBN. If an ISBN is present, the system uses it to identify the best record.
- If no ISSN/ISBN or OCLC number is included, then the system sends the request to staff review.
When an ISSN is provided, a title-matching check of 30% is required. For example, a value like "J Clin Psych" would be a match for Journal of Clinical Psychology but not for Journal of Business Economics.
Persistence Setting and Automated Request Manager
We recommend that libraries do not use constant data persistence and toggle the Persistence Setting to Off in the OCLC Service Configuration > WorldShare ILL > Interlibrary Loan Options module. Instead, apply constant data for both borrowing and lending via automation.
For borrowing requests:
- When the Persistence Setting is turned On in the OCLC Service Configuration > WorldShare ILL > Interlibrary Loan Options module, the DEFAULT constant data record overrides other Constant Data applications including through automation. If using automations to apply constant data on borrowing requests, turn off the Persistence Setting. See Interlibrary Loan Options.
For lending requests:
- Constant data persistence will be blocked on lending requests where automation has taken an action to apply a constant data record.
- When the Persistence Setting is turned On in the OCLC Service Configuration > WorldShare ILL > Interlibrary Loan Options module, and when an automation has taken an action to apply constant data on a request:
- Persistence will be disabled on that lending request.
- A warning message will appear in orange at the top of the screen alerting users that constant data persistence is turned on, but automation has already performed that activity, with a recommendation that constant data persistence be turned off in service configuration.
- When the Persistence Setting is turned On in the OCLC Service Configuration > WorldShare ILL > Interlibrary Loan Options module, and an automation has not taken an action to apply constant data on a request, constant data persistence will operate as usual.
Borrowing
Automations allow you to determine how patron-generated requests are processed. OCLC recommends creating at least one borrowing automation for loans and one for copies. Keep the following in mind when you are configuring automations:
- Automations are applied based on the Automation Priority setting. A patron-generated request is compared against all automations. Of all the automations that match the request, the automation with the highest priority, or lowest assigned Automation Priority number, will be applied to the request.
- Each automation must have a unique numerical value for Automation Priority.
- Assign the highest Priority (lowest number) to your most specific automations.
- Each automation must have at least one Match, Action, or Exception (not one of each).
- If you do not select any match criteria, your automation will apply to all requests.
- If you select matches but not actions or exceptions, all requests matching that automation will be routed to review.
Standard Actions for Borrowing
At the top of the screen is a list of the standard actions the system automatically performs on new borrowing requests. All libraries will see the four actions on the left of the screen:
- Bibliographic record matching
- Requests that are not matched to a WorldCat record will not go through automation and will appear in the Review queue.
- WorldCat holdings check
- Knowledge base holdings check
- Custom Holdings Group check
Additional actions are available in Tipasa:
- US Copyright Management
- See Advanced Workflows configuration information.
- OPAC holdings check (currently for libraries using WMS, Ex Libris Alma, or Innovative’s Sierra)
- See Advanced Workflows configuration information.
- Patron approval check
- See Patron Settings for configuration information.
- RapidILL holdings check
- See External System Settings for configuration information.
- Notifications
- See Notifications for configuration information.
Configure Main Automations for Borrowing
To add an automation:
- Select the Borrowing tab.
- Click + Add New.
- Enter a Name and assign a Priority. See Main Automation fields for Borrowing fields for more information.
- Select any desired match criteria from the Matches drop-down menu. See Automation Match criteria for Borrowing for more information.
- If you do not select a match criteria, the automation will apply to all requests.
- Click the
 Add a match button to configure additional match criteria.
- Select any desired actions from the Actions drop-down menu. See Automation Actions for Borrowing for more information.
- Click the Add an Action button to configure additional match criteria.
- Click the
- Click the Add an Exception option to select any Exceptions. See Automation Exceptions for Borrowing for more information.
- If any exceptions are true on a matched automation, only the exception will apply and the rest of the selected actions will not apply except for the Add Request Tags action.
- Click Save.
To edit an automation:
- From the Main Automations list, select the Edit button associated with the desired automation.
- Edit information, as appropriate. Remove matches, actions, and exceptions with the remove button
 .
. - Click Save.
To delete an automation:
- From the Main Automations list, select the Delete button next to the desired automation.
- On the confirmation window, click Delete.
Main Automation fields for Borrowing
| Field | Description |
|---|---|
| Name* |
The name of this automation (20-character limit, with no special characters) that indicates the scope of the group of requests to which the automation pertains. The name must be unique. Note: Names are not case sensitive, so, for example, TEST is the same as test. Note: If you had included a Description on your previously configured Direct Request Profiles, the description will appear as read-only text on the Automation. |
| Priority* |
Set a numeric priority to each automation.
|
Automation Match criteria for Borrowing
Configure match criteria based on details of the request.
| Field | Description |
|---|---|
| Age of Material |
For Loans: Used to restrict the borrowing of items that are either very new or very old based on their publication date. For Copies: Type a whole number from 0-1000 representing the age of the material in years. |
| Formats |
|
| Languages | One or more languages that a request must specify if it is to match the automation. |
| Need at Earliest |
|
| Patron Departments |
Examples: |
| Patron Note |
Indicates if a patron has entered a note on the request. Match on:
|
| Patron Statuses |
Examples: |
| Patron Will Pay Up To |
Examples: |
| Request Sources |
|
| Request Type |
|
Automation Actions for Borrowing
Once you have determined which requests you would like to automate, Automations can be configured with specific actions.
Note: Some Actions are mutually exclusive from others. Unavailable actions are automatically removed as you build the automation.
| Field | Description |
|---|---|
| Add Request Tags |
Select the request tag(s) to automatically apply to requests matching this automation. Press enter after selecting a tag and ensure the tag turns blue before saving. For more information on request tags, see Tags. |
| Apply Constant Data |
Select the Constant Data record, if any, that you want to apply to the requests matching this automation. Once you select this action, you will see a dropdown list of all current Constant Data records for your institution.
|
| Build Lender String |
Select this option if you want to build a lender string on the request without sending the request automatically out to lenders. Once you select this option, you will be asked to select a Custom Holdings Path from the full list of Custom Holdings Paths currently configured for your institution. The matching requests will have lender strings applied and moved to review.
|
| Route Request to Review |
Automation will move matching requests to your Review queue. If you do not select an action that routes a request elsewhere (to lenders, purchase, or Document Delivery), this action will apply by default. |
| Route Request to Review for Purchase |
Requests will be sent to your Purchasing Requests > Review for Purchase queue. |
| Route Request to WMS Acquisitions |
For WMS libraries only. Automation will move matching requests to WorldShare Acquisitions for purchase consideration.
|
| Send Request to Lenders |
|
Automation Exceptions for Borrowing
Configure exceptions in Automation that apply instead of the defined actions when they are true.
| Field | Description |
|---|---|
| If Duplicate Request, Route to Review |
Potential duplicate requests will be sent to your Review File. |
| If Held By Custom Holdings Group, Route to Review |
Examples:
|
| If Held By My Institution, Route to Document Delivery |
When selected, all requests from your patrons for items held by your institution will be moved to your Document Delivery queue for separate processing. Note: Document Delivery must first be turned on in order for you to select this option. See Set up Document Delivery for more information. |
| If Held By My Institution, Route to Review | Requests will be sent to your Review File when your institution holds the requested item. |
Use borrowing automations with Tipasa
Automations allow you to determine how patron-generated requests are processed. Once a patron request has been submitted, with an automation, you can select whether the request, if matching the automation, should be produced (sent) to lenders or forwarded to your New for Review queue.
With Tipasa, you can set up your Automations to work in conjunction with the following features: Copyright, Document Delivery, and Proven Senders. You may want to set up multiple Automations to correspond with the Tipasa features, but you should keep the following in mind when you are creating your automations:
- Automations are applied based on the Priority setting. A patron-generated request is compared against all automations. Of all the automations that match the request, the automation with the highest priority, or lowest assigned Priority number, will be applied to the request.
- Each automation must have a unique numerical value for Priority.
- OCLC recommends creating an Automation for loans and an Automation for copies.
Basic borrowing automations
A recommended set of automations would Route Request to Review if the request is a duplicate or Route Request to Review or Route to Document Delivery if the item is held. If this automation is not configured, the system applies constant data and moves the request to review.
Examples
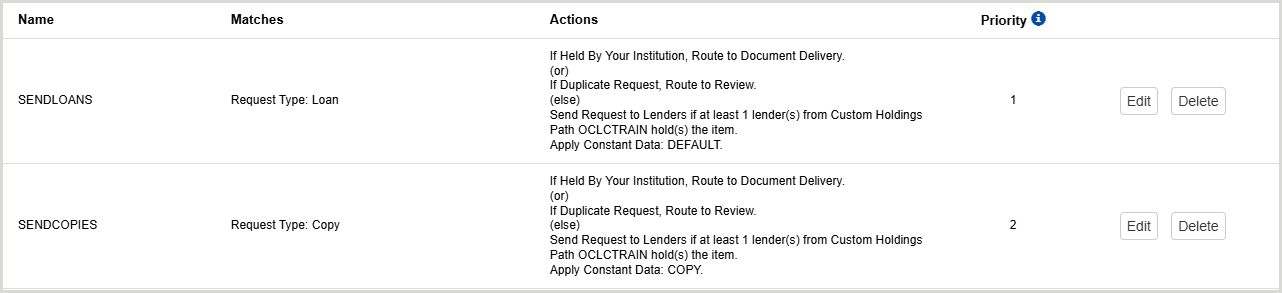
- LOANS:
If the request is not a duplicate and is not held by your institution, the system will apply the Constant Data record and build a lender string based on the holding libraries in the Custom Holdings Path and route the request to Review.
- Under Matches, select Request Type > Loan.
- Click the Add an Exception option and select If Duplicate Request, Route to Review.
- Click the Add an Exception option and select If Held By My Institution, Route to Document Delivery.
- Under Actions, select Send Request to Lenders and select the Custom Holdings Path to use.
- An approved patron must be linked to the request in order for the automation to send the request to lenders. If no patron has been linked to the request, or the linked patron is not approved or blocked, the request will be sent to the Review queue.
- Click the Add an Action option and select Apply Constant Data and select the Constant Data record to use.
- COPIES:
If the request is not a duplicate and is not held by your institution, the system will apply the Constant Data record and build a lender string based on the holding libraries in the Custom Holdings Path and route the request to Review.
- Under Matches, select Request Type > Copy.
- Click the Add an Exception option and select If Duplicate Request, Route to Review.
- Click the Add an Exception option and select If Held By My Institution, Route to Document Delivery.
- Under Actions, select Send Request to Lenders and select the Custom Holdings Path to use.
- An approved patron must be linked to the request in order for the automation to send the request to lenders. If no patron has been linked to the request, or the linked patron is not approved or blocked, the request will be sent to the Review queue.
- Click the Add an Action option and select Apply Constant Data and select the Constant Data record to use.
Advanced borrowing automations
The following are examples of how to expand your automations.
Examples
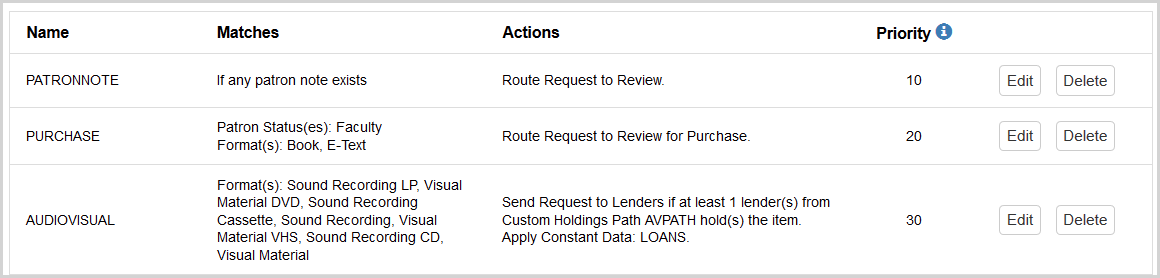
- PATRONNOTE
Any requests that have a patron note will not be sent to lenders, allowing for staff to read the patron's note and fill the request accordingly.
- Under Matches, select Patron Note. Select the Any words checkbox to retrieve requests that have any patron note.
- Under Actions, select Route Request to Review.
- PURCHASE
Books and eBooks requested by faculty will be routed to review for purchase.
- Under Matches, select Patron Status > Faculty.
- Select Add a match and select Formats. Select Book and E-Text from the available list.
- Under Actions, select Route Request to Review for Purchase.
- AUDIOVISUAL
Any request matching the specific formats will be sent to a specific set of lenders configured as a Custom Holdings Group who are known to fill audiovisual requests for a reasonable cost and loan period.
- Under Matches, select Formats and choose Sound Recording LP, Visual Material DVD, Sound Recording Cassette, Sound Recording, Visual Material VHS, Sound Recording CD, and Visual Material. You can select multiple formats from the available list.
- Under Actions, select Build Lender String and select the Custom Holdings Path to use to send to lenders known to fill these types of requests.
- Select Add an Action and select Apply Constant Data and select the Constant Data record to use.
Lending
Using the Automated Request Manager, lenders can choose to apply designated constant data records to lending requests based on the identity of the borrowing library, the type of request, or the material format being requested. This ensures that lending charges, notes, policies, and addresses are accurately applied to lending requests, saving staff time and ensuring compliance with local policies and preferences. Additionally, lenders can automatically apply request tags to incoming lending requests.
- Automations are applied based on the Automation Priority setting. A patron-generated request is compared against all automations. Of all the automations that match the request, the automation with the highest priority, or lowest assigned Automation Priority number, will be applied to the request.
- Each automation must have a unique numerical value for Automation Priority.
- Assign the highest Priority (lowest number) to your most specific automations.
- If you do not select a match criteria, the automation will apply to all requests.
Standard Actions for Lending
At the top of the screen is a list of the standard actions the system automatically performs on new lending requests. All libraries will see the actions on the left of the screen:
- Deflections
- Supplier status check
- Knowledge base holdings check
- Group affiliations check
- Time to Respond
- Real time availability check
Additional actions are available in Tipasa:
- OPAC holdings check
- Lending Priorities Assignment
Configure Main Automations for Lending
To add an automation:
- Select the Lending tab.
- Click + Add New.
- The Enable box will be checked by default and the automation will immediately be in effect upon saving. The automation will display Yes in the Enabled column.
- Enter a Name and assign a Priority. See Main Automation fields for Lending fields for more information.
- Select any desired match criteria from the Matches drop-down menu. See Automation Match criteria for Lending for more information.
- Click the Add a match button to configure additional match criteria.
- Click the
- Select any desired actions from the Actions drop-down menu. See Automation Actions for Lending for more information.
- Automations that specify actions but no Match criteria will match all requests.
- Click the Add an Action button to configure additional match criteria.
- Click Save.
To edit an automation:
- From the Main Automations list, select the Edit button associated with the desired automation.
- Edit information, as appropriate. Remove matches, actions, and exceptions with the remove button .
- Click Save.
- From the Main Automations list, select the Delete button next to the desired automation.
- On the confirmation window, click Delete.
Main Automation fields for Lending
| Field | Description |
|---|---|
| Enable |
By default, when an automation is created, the Enable box will be checked and the automation will immediately be in effect upon saving. The automation will display Yes in the Enabled column. Staff can edit automations and uncheck the Enable box so the automation is no longer in effect and displays as No in the Enabled column. |
| Name* |
The name of this automation (40-character limit) that indicates the scope of the group of requests to which the automation pertains. The name must be unique.
|
| Priority* |
Set a numeric priority to each automation. The priority must be a positive integer of 9 digits or less.
|
Automation Match criteria for Lending
| Field | Description |
|---|---|
| Borrower Group |
|
| Formats |
|
| Request Type |
Specify copy or loan requests:
If no request type is selected, the automation will apply to both copy and loan requests. |
| Branch Location |
Identify lending requests for items that are held at a specific branch location in the library system.
Note: Only available to Tipasa users with OPAC integration turned on.
|
| Shelving Location |
Only available to Tipasa users with OPAC integration turned on. Identify lending requests for items that are located in a specific shelving location in the library system.
Note: Only available to Tipasa users with OPAC integration turned on.
|
Automation Actions for Lending
| Field | Description |
|---|---|
| Apply Constant Data | Apply a designated Lender Constant Data record as an action. |
| Apply Request Tags |
Select the request tag(s) to automatically apply to requests matching this automation. Press enter after selecting a tag and ensure the tag turns blue before saving. For more information on request tags, see Tags. |
Use lending automations with Tipasa
Refer to Automated Request Manager for Lending for use cases and examples.
Use Reports to assess automations
Refer to Assess automations to learn how to access and use the Borrower Resource Sharing and Lender Resource Sharing Stats Reports to track your library's use of automation.