Register Shared Print retention commitments as an agent/group coordinator
Overview
As an agent or group coordinator, you can add retention commitments for multiple members of a group in a single data file. Before you can do so:
- If you do not have a program or agent/group coordinator profile created, email support@oclc.org to establish a login with an associated Shared Print Agent/Group Coordinator Symbol.
- Each library in your group will need to create a collection profile.
- You must create an agent/group coordinator profile in order to submit commitments on behalf of libraries participating in your program.
Note: Some required fields may not be relevant to an agent/group coordinator. These fields are only used to successfully save your profile and generate a collection ID. Placeholder values are provided in the step-by-step documentation if you wish to use them.
If you have already created a collection profile, you can begin submitting commitments on behalf of libraries participating in your program.
Steps for agent/group coordinator processing institutions' data
- Create a collection profile for your program to generate a Collection ID (for processing purposes only).
- Collect collection IDs and symbols from institutions whose data you intend to submit.
- Download and complete the Authorization Table with the symbols and collection IDs of the institutions which you intend to submit data for and send to support@oclc.org.
- An OCLC data sync specialist will accept your program profile and establish authorization for processing as a group coordinator.
- Prepare institutions’ data into the Full Format Shared Print File Template and submit file.
- You will receive an exception and summary report in the MyFiles location in Collection Manager, as will each institution you processed.
- Work with institutions to resubmit any data that was skipped due to errors.
- These commitments will be reflected in WorldCat.
Register Shared Print retention commitments
Create an agent/group coordinator profile
- Create a Collection screen - Image
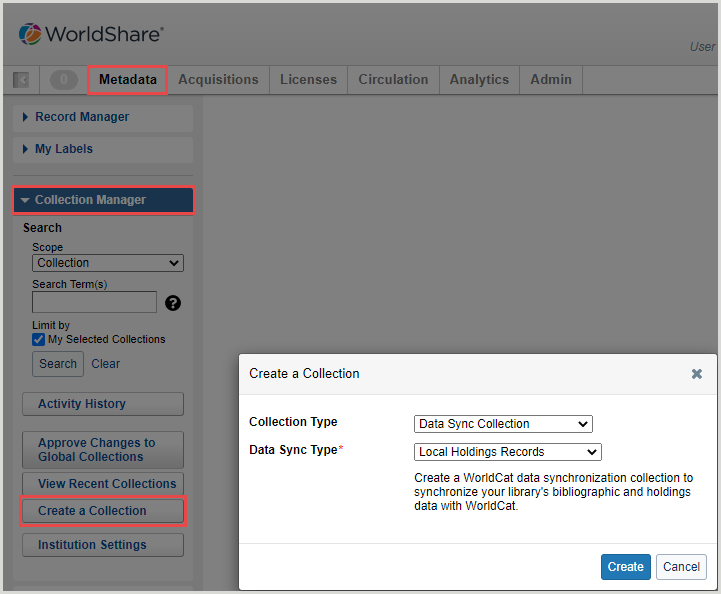
- In your browser, enter the WorldShare URL for your Shared Print agent/group coordinator symbol. Your Shared Print agent/group coordinator symbol's WorldShare URL will have the following format: https://yoursps.share.worldcat.org/wms. Replace yoursps with your Shared Print agent/group coordinator symbol.
Or
If you would like OCLC to create an agent/group coordinator profile on your behalf, email support@oclc.org with the required information in the Group collection profile template. - On the Sign in screen, enter your User Name and Password.
- Click Sign In.
- Navigate to Metadata > Collection Manager > Create a Collection.
- Select Data Sync Collection from the Collection Type drop-down list.
- Select Local Holdings Records from the Data Sync Type drop-down list.
- Click Create.
Complete the Properties accordion
- Completed Properties accordion - Example
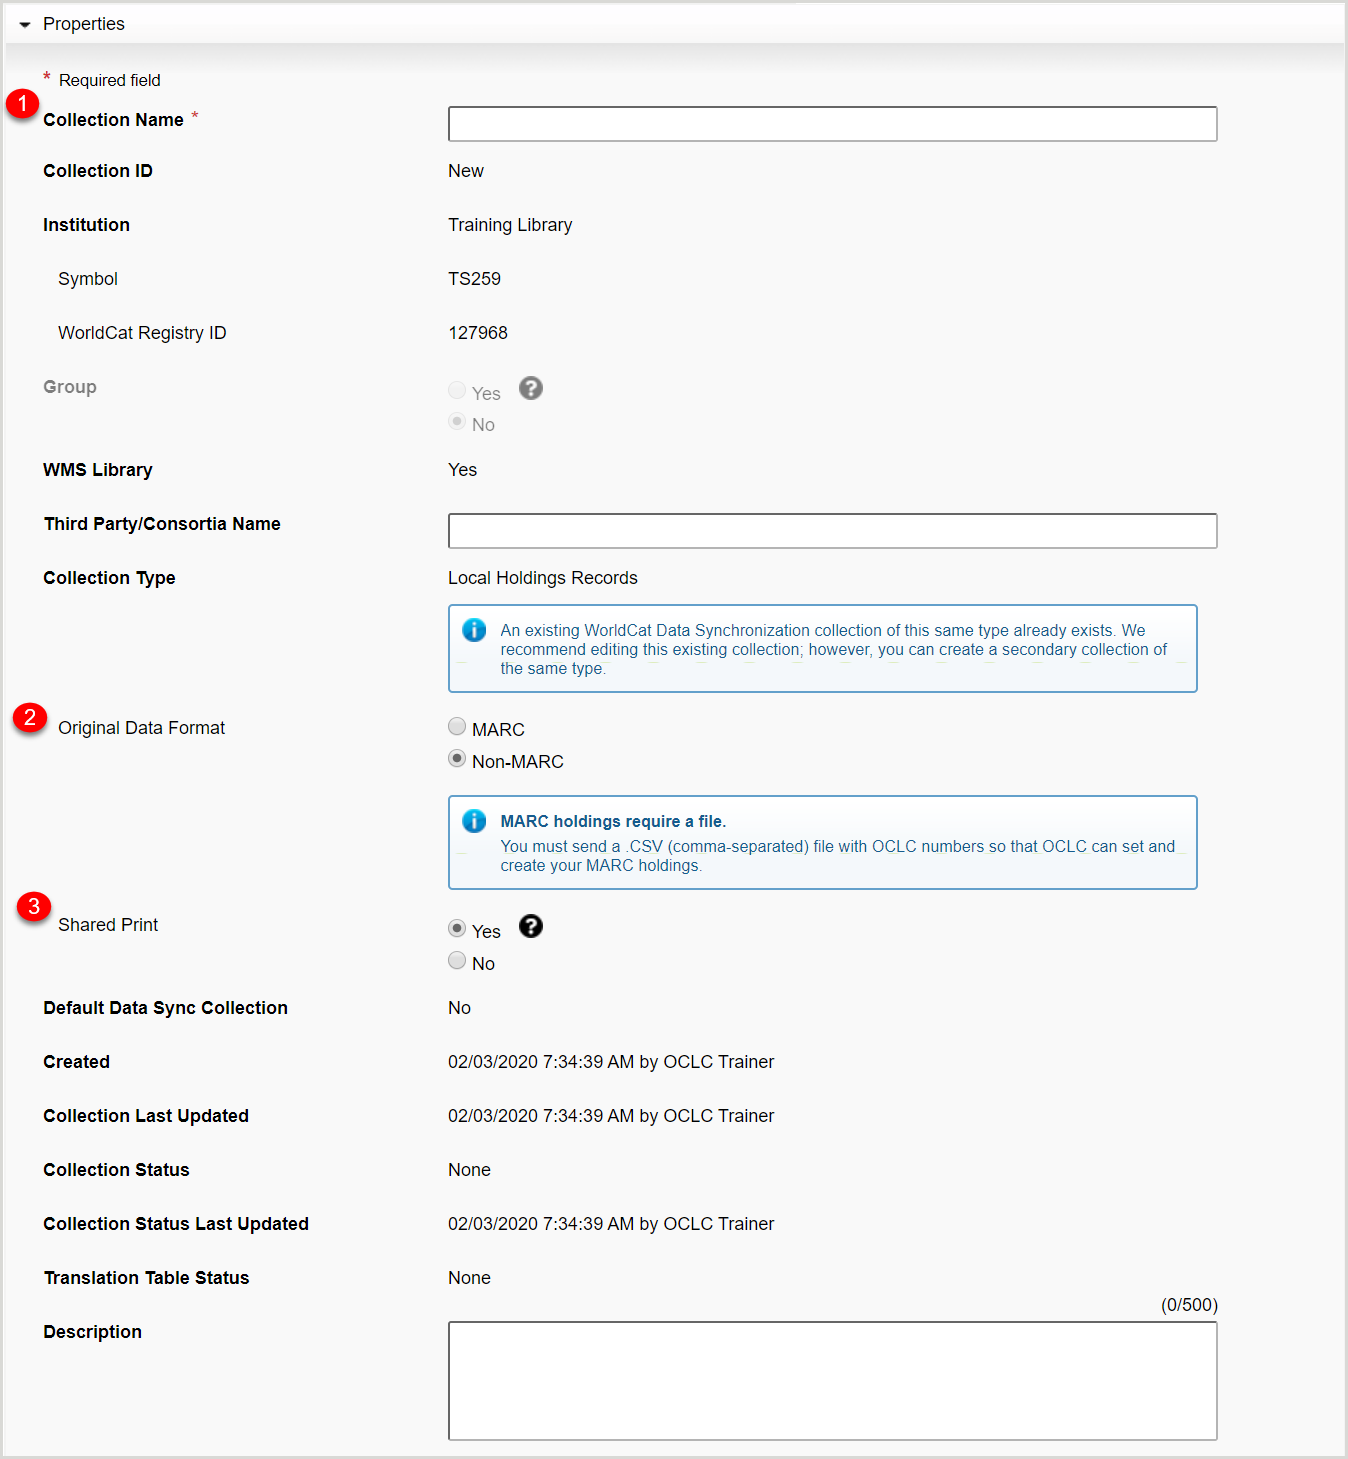
Note: The values for OCLC Symbol, WMS Library, and Collection Type are system-supplied and read-only.
- Enter a Collection Name (e.g., EAST agent profile for Shared Print) for your collection.
- Select Non-MARC for Original Data Format.
- Select Yes for Shared Print.
- Click Save at the top of the screen.
Note: The first time you click Save, a Collection ID is generated. The Collection ID is a unique 7-digit number assigned to your collection profile that is used as the first element in the file name when sending files to OCLC for processing
Complete the Local Holdings Records Information accordion
- Local Holdings Records Information accordion - Example
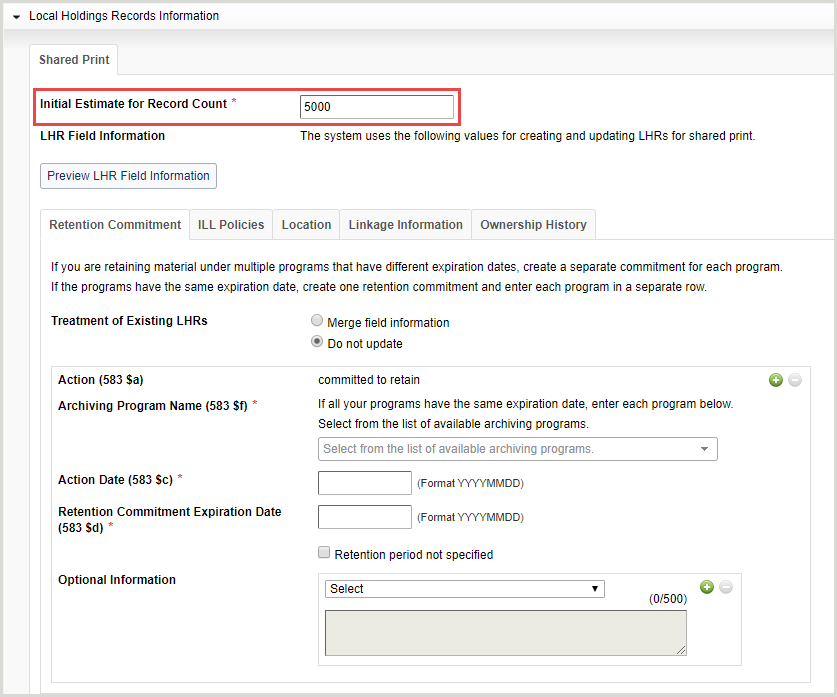
Note: In order to successfully generate a Collection ID for your agent/group coordinator profile, you will need to fill in all required fields, some of which may not be relevant to a program. Institution specific fields are only used to successfully save your profile. Institution specific fields will not be inherited or used for any type of reference, so values do not have to be valid. Placeholder values are provided below if you wish to use them.
- Click Local Holdings Records Information to open the accordion.
- For Initial Estimate for Record Count, you may enter a placeholder value of 9999.
- Complete the Retention Commitment, ILL Policies, Location, Linkage Information, and Ownership History tabs to specify what data you want in the local holdings records (LHRs) that will be created for each of the OCLC numbers in your data file.
Complete the Retention Commitment tab
The Retention Commitment tab allows you to create the 583 "committed to retain" action note. 583 "completeness reviewed" and "condition reviewed" notes can only be created using the Full format Shared Print file template.
Retain material under one program or under multiple programs that have the same expiration date
- Completed Retention Commitment tab for one or multiple programs that have the same expiration date - Example
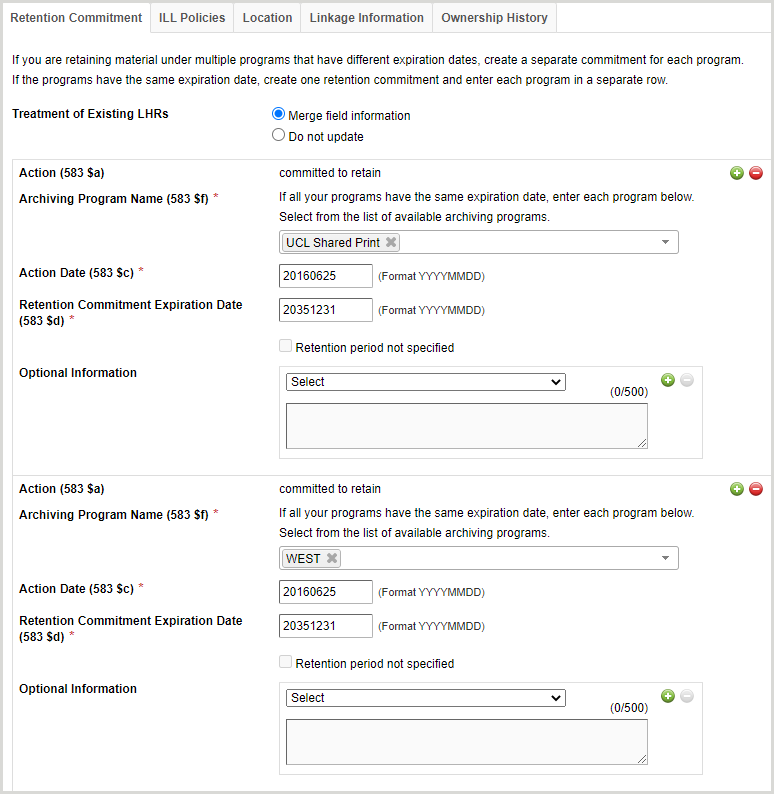
- Select Merge field information for Treatment of Existing LHRs.
- For Archiving Program Name (583$f), select the name of your archiving program/consortium from the controlled list. You can find a complete list of archiving program names here. If your archiving program/consortium is not listed, please contact support@oclc.org with your preferred archiving program name.
- (Optional) Click the Add row button (
 ) to add additional archiving program names.
 - For Action Date (583 $c), enter the start date (format: YYYYMMDD) of your retention commitments. The start date is typically an agreement at the program level.
- For Retention Commitment Expiration Date (583 $d), enter the expiration date (format: YYYYMMDD) for your retention commitments. The expiration date is typically an agreement at the program level.
Note: If you do not have an expiration date, Retention period not specified must be entered manually for your retention commitments when filling out and submitting the Full format Shared Print file template. - (Optional) You can add additional subfields to your 583 note with Optional Information.
- Click Save at the top of the screen.
You will have the opportunity to override the action note or include additional action notes in the Full format Shared Print file template.
Complete the ILL Policies tab
The ILL Policies tab allows you to set positions 20-21 in the 008 field.
- Click the ILL Policies tab.
- Select a Lending Policy (008/20) from the drop-down list.
- a - Will lend (Most groups will select this value)
- b - Will not lend
- c - Will lend hard-copy only
- l - Limited lending policy
- u - Unknown
- Select Merge field information for Treatment of Existing LHRs.
- Select a Reproduction Policy (008/21) from the drop-down list.
- Select Merge field information for Treatment of Existing LHRs.
- Click Save at the top of the screen.
Complete the Location tab
The Location tab allows you to create the required 852 field.
- Click the Location tab.
- For Holdings Library Code of Current Location (852 $b), verify that the holding library code is correct. If your library does not use 4-letter holding library codes, then use the default. Every symbol has a default holding library code, which should be displayed in the drop-down list.
- Click Save at the top of the screen.
Complete the Linkage Information tab
The Linkage Information tab allows you to create the required 014 field.
- Click the Linkage Information tab.
- Select Merge field information for Treatment of Existing LHRs.
- Enter 9999 (placeholder value) for MARC Organization Code (014 $b).
- Click Save at the top of the screen.
(Optional) Complete the Ownership History tab
The Ownership History tab allows you to create the 561 field.
- Click the Ownership History tab.
- For Include Ownership and Custodial History Note, select Yes.
- Select a value for Treatment of Existing LHRs.
- Enter the OCLC Symbol of Previous Owner or Location (561 $a).
- Enter the MARC Organization Code of Previous Owner or Location (561 $5).
Note: If you do not know the previous owner or location's MARC Organization Code, click MARC Code List for Organizations to search for it in a new tab. - Click Save at the top of the screen.
Preview LHR field information
If you would like to preview the retention commitment information you just entered, click Preview LHR Field Information. To correct an error, select the appropriate tab and update the information you entered originally.
Complete the MARC Record Output Information accordion
- Click MARC Record Output Information to open the accordion.
- Select Yes for Enable MARC Record Delivery.
- Select what type of records to return from the Records Returned drop-down list.
- Deliver my local holdings records only - You will only receive local holdings records created with the 583 retention note.
- Include a separate file of WorldCat records with my local holdings records - You will receive bibliographic records and local holdings records in separate files. The latest WorldCat bibliographic records will not include the 583 retention note.
- Interleave local holdings records with my library records - You will receive bibliographic records and local holdings records interleaved in OCLC number order.
- Click Save at the top of the screen.
Complete the Contact Information accordion
The information entered in the Contact Information accordion is required so that OCLC staff can contact you with questions about your collection or the data you submit for libraries.
You must enter one contact before submitting your collection profile.
- Click Contact Information to open the accordion.
- Enter the contact's Last Name.
- Enter the contact's First Name.
- Enter the contact's Title.
- Enter the contact's Telephone number and Email Address.
- Click Save Progress at the top of the screen.
Note: When adding multiple contacts, use the Add button () to create additional rows. List contacts in order of priority.
Submit your collection profile
Click Submit Collection at the top of the screen. You cannot delete a collection once it has been saved and/or submitted for review.
Establish permission to process data files
Permission to process data files must be established for each institution you will be submitting on behalf of.
Obtain collection IDs from all institutions
A collection ID is established once all required fields are filled out in the collection profile. It is used to identify and match institutions with profiles and is a required field on the CSV file when submitting as an agent/group coordinator.
Any institution you intend to process must have a collection profile with a collection ID established. Collection IDs can be obtained from the institution you are registering for, or OCLC can help to create collection profiles for institutions in your group that are not yet established.
If you or one of your member libraries need assistance in creating collection profiles, please complete a Collection profile template for each institution you intend to process and send to support@oclc.org.
Submit Collection ID authorization table
- Download and complete the Collection ID authorization table.
- save and send the completed Collection ID Authorization Table to support@oclc.org.
Note: Institutions who agree to have their commitments processed by an agent/group coordinator will also be asked to provide a note in their collection profile in WorldShare Collection Manager to confirm processing.
Submit records for multiple institutions in one CSV data file
Prepare the data file
Caution: The order and format of the columns in the template should not be changed. If you do not need to use a column, do not remove it from the CSV file. Instead, leave the data rows empty.
- Download the Full format Shared Print file template. Use this template for submitting monograph, multi-part monographs, or serials data that differs from the default values in your profile. It contains 14 columns, four of which are required (OCLC_Number, LSN, Barcode, and ActionNote_583$a). The remaining columns can be used to override default values defined in your profile.
- The data file should include commitment data for one or more group members.
- You can use Excel or another spreadsheet editor while preparing your data file, but it must be saved as a CSV file (File > Save As > Save as type > CSV (Comma delimited). You cannot submit a .CSV file encoded as UTF-8.
Shared Print data file columns
| Column name | Column description | Required | Example |
|---|---|---|---|
| OCLC_Number | The OCLC number of the record supplied. | x | 987654321 |
| LSN | Local System Number: A unique ID provided for user identification of reporting errors. | x | 123456 |
| Barcode | WMS-library-supplied barcode used for matching and merging existing LHR information. | x (WMS libraries only) |
123456 |
| InstitutionSymbol_852$a | Institution symbol you are registering on behalf of. | x (Group processing only) |
OSU |
| HoldingLibrary_852$b | Holding Library Code: Used for matching/merging on LHR.
Note: 4 characters only. |
MAIN | |
| CollectionID | A unique 7-digit number assigned to your data sync collection after you first click the Save button. | x (Group processing only) |
1234567 |
| ActionNote_583$a | Action Note: Used to create an additional 583 note. | x |
|
| ActionDate_583$c | Action/retention date: Date must be provided in YYYYMMDD format. | 20190125 | |
| ExpirationDate_583$d | Expiration date: Date must be provided in YYYYMMDD format unless you do not have an expiration date, in which case the text "Retention period not specified" should be entered for this field in the file. | 23010231 | |
| MethodofAction_583$i | Method of Action is only used in rows where $a =
To apply mutiple methods of action in one statement, separate with "$i". |
|
|
| Status_583$l | Status values come from a controlled list, which is part of the Detailed Metadata Guidelines. Available values for Status depend on whether 583 $a =
To apply multiple statuses in one statement, separate with "$l". |
||
| PublicNote_583$z | Public Note To apply multiple notes in one statement, separate with "$z". |
Archived copy damaged | |
| ProgramName_583$f | Archiving Program Name This columns acts as an override to the program name in your profile. To apply multiple programs in one record, include the program name from your profile and separate any additional programs with "$f". |
SCELC Shared Print$fWEST | |
| MaterialsSpecified_583$3 | Holdings summary | v.1(2000)-v.76(2019) |
Upload the data file
Note: You must save your data file as a standard Comma Separated Values (CSV) file, not as an Excel spreadsheet (.xls) or a CSV UTF-8 encoded file.
- In the WorldShare interface, navigate to Metadata > My Files > Uploads.
- Click Choose File to locate the file you wish to upload. See File naming conventions for more information.
- Select your file and click Open. The file name replaces "No file chosen" in the Upload File field.
- Select Data sync LHR for File Type.
- Click Upload. A confirmation message appears when the file has successfully uploaded. If a file was unable to upload, an error message will appear.
File naming conventions
Each file name must be unique and must adhere to the following naming convention:
<agentcollectionID>.<agentOCLCsymbol>.sharedprint_<optionaltext>_<YYYYMMDD>.<optionalfile#>.csv
The "agentcollectionID" is generated after you click Save Progress in Collection Manager for the first time. You can find the unique 7-digit Collection ID in the Properties accordion. Record this number as you will need it to rename your data file to the required naming convention. This will ensure that the data file you submit will match the collection information you created in Collection Manager.
If you need to upload more than one data file on the same day for the same profile (Collection ID), the file names must be made unique. One option is to utilize the <optionaltext> of the required naming convention.
Example
- 1028071.ndclv.shareprint_first_20170731.csv
- 1028071.ndclv.shareprint_second_20170731.csv
Another option is to differentiate files with file numbers in the <optionalfile#> portion of the required naming convention.
Example
- 1028071.ndclv.shareprint_first_20170731.1.csv
- 1028071.ndclv.shareprint_first_20170731.2.csv
Local holdings record creation and merging
Once the file is submitted, retention statements for each record will be included in a local holdings record (LHR) which will be created or added to depending on if an LHR already exists for that record. The internal process is described below:
- If no LHR exists, one is added.
- If one LHR exists, the Shared Print (583) information is merged into it.
- If more than one LHR exists but none are designated as Shared Print, a new Shared Print LHR is added.
- If more than one LHR exists and one LHR already is designated as Shared Print, a new Shared Print LHR is added.
If you intend to update existing Shared Print LHRs, OCLC recommends using submission via MARC format.
Next steps
An OCLC database specialist will review your Shared Print collection profile, Collection ID Authorization Table, and data file once all have been submitted. If they have any questions, they will contact you. Once your profile has been approved and any questions have been answered, the database specialist will change your collection's status from "In Progress" to "Accepted".
You will know that your data file has been processed when you see reports in My Files or the OCLC Usage Statistics portal.
Download your My Files outputs
- In the WorldShare interface, navigate to Metadata > My Files > Downloads.
- Locate the file you want to download.
- Reports will include a .csv or .txt extension.
- MARC files include a .mrc extension
- In the Action column, click Download. The report will automatically download to your computer.
Available outputs
Summary report
This report provides statistical counts regarding the file's input and processing results.
Output location: /metacoll/reports
Format of file name:
metacoll.[symbol].datasync.[collectionID].D[DYYYYMMDD].T[hhmmsssss].sp_admin_summary.[file#].csv
Example file name: metacoll.ESTPP.datasync.1034620_1584290348241.D20200316.T123403000.sp_admin_summary.1.csv
Local Holdings Record Exception Detail
The Exception Detail report displays record identifiers of Local Holdings records that OCLC was unable to process. The Data Sync Exception Description column describes any errors found within the records which were added to WorldCat as a result of processing (e.g., "Failed due to processing error, please resubmit record", "No matching barcode in WorldCat"). Exceptions may occur due to:
- System processing errors
- Missing OCLC numbers in the original data file
- Barcodes not found in WorldCat (WMS libraries only)
- Missing information in required template columns
Note: If your initial Shared Print upload file contains errors, you will need to correct any errors in your data file (e.g., add or correct OCLC numbers and/or barcodes, remove Multi-Part Monograph and/or Serial data). You can email support@oclc.org for assistance with this.
Output location: /metacoll/reports
Format of file name:
metacoll.[symbol].datasync.[collectionID].D[DYYYYMMDD].T[hhmmsssss].sp_admin_exception.[file#].csv
Example file name: metacoll.ESTPP.datasync.1034620_1584290348241.D20200316.T123403000.sp_admin_exception.1.csv
WorldCat MARC records
Note: MARC records are only available if your collection profile included outputting MARC records.
Output location: /metacoll/reports
Format of file name: metacoll.[symbol].datasync.sharedprintlhr.[symbol_collectionID].D[YYYYMMDD].T[hhmmsssss].[file#].mrc
View your retention commitments in WorldCat
See View Shared Print retention commitments to learn how to view your Shared Print retention commitments in FirstSearch, WorldCat Discovery, WorldShare Collection Manager, WorldShare Record Manager, and via the WorldCat Metadata API.