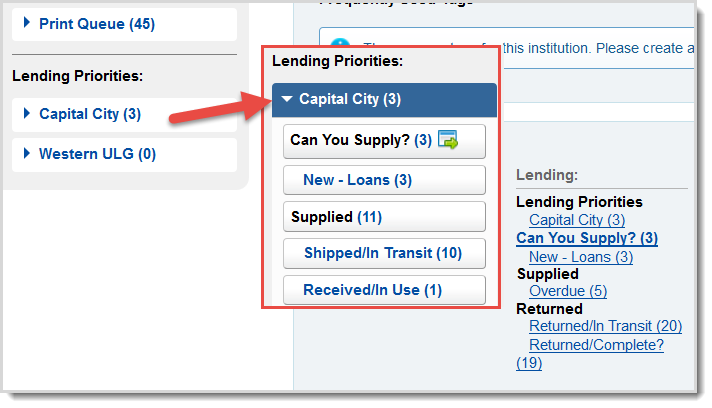
Lending Priorities
About Lending Priorities
The Lending Priorities feature allows you to enable special queues in Tipasa for requests from priority borrowers. Priority borrowers are chosen by you and may include your library's consortium partners or any other libraries of your choosing. All incoming requests from libraries identified as priority borrowers will be visible in a set of lending queues that appear at the bottom of the left navigation under the category Lending Priorities. New requests from priority borrowers will also appear in the Quick Links section of the Tipasa Home.
When using Lending Priorities, keep the following in mind:
- Requests from priority borrowers appear in their Lending Priorities queues and the Lending Requests queues.
- You can create and name up to five groups of priority borrowers that will appear under Lending Priorities.
- If the same library belongs to more than one priority borrowers group, their requests will appear in all respective queues.
- You can create Custom Holdings Groups in OCLC Service Configuration for each set of your priority borrowers, or you can use OCLC Profiled Groups. For a list of Profiled Groups, see OCLC profiled groups.
- The requests that appear in Lending Priorities queues have the same available actions and statuses as those found under Lending Requests.

Set up Lending Priorities
Before you can use the Lending Priorities queues, you must identify the libraries you want to add as priority borrowers, find or create a custom holdings group, and enable the Lending Priorities feature in OCLC Service Configuration.
Step 1: Identify the OCLC symbols of your priority borrowers
Before you enable Lending Priorities, you want to identify which libraries are your priority borrowers. With Lending Priorities, you can maintain lending priority queues for up to five sets of priority borrowers.
For example, in the below image there are three priority borrower groups set up, each with their own set of libraries (libraries can be included in more than one group):
You want to make a list of all the libraries you want to add as priority borrowers and their symbols. You will need their symbols in order to identify if they are in an OCLC Profiled Group or if you have to create a Custom Holdings Group (these will be detailed in Step 2: Find or create a Custom Holdings Group). You can search for a library's OCLC symbol in the OCLC Policies Directory.
To search for OCLC symbols in the Policies Directory:
- Sign in to the Policies Directory.
- In the Policies Directory, on the left navigation, from the Search By list, select Institution Name.
- Enter the name of the institution whose OCLC symbol you are searching for.
-
Due to the variety of abbreviations used in names, wildcards are recommended when searching by name. For example, Ohio State univ*
-
For more information on searching in the Policies Directory, see Search Policies Directory.
-
- Click Search or press <Enter>.
- A table appears with your search results. You can view any institution's symbol in the Symbols column.
Step 2: Find or create a custom holdings group
Once you have identified the libraries that will be your priority borrowers, you have to consider:
Are the institutions collected into a OCLC Profiled Group?
If the institutions you want to add as priority borrowers are collected into a Profiled Group, you can skip to the next step. Profiled Groups can be selected when you enable Lending Priorities. For a list of Profiled Groups, see Resource sharing groups. If you do not know which symbols are contained in a Profiled Group, you can search for the group in the Policies Directory. To search for a Profiled Group, follow the same steps as above to search for a symbol, but select Group Symbol from the Search By list.
Do you have the institutions collected into a Custom Holdings Group?
If you already have one or more custom holdings groups set up with the institutions you want to add as priority borrowers, you can skip to the next step. Otherwise, you need to create a custom holdings group for every group of priority borrowers you want to have queues for under Lending Priorities.
To create a custom holdings group of priority borrowers:
- Sign in to Service Configuration.
- On the left navigation, click WorldShare ILL > Custom Holdings Groups.
- On the Configure Custom Holdings Groups screen, select Create New Custom Holdings Group.
- In the Custom Holdings Group Name, enter a name for the custom holdings group. This is not the name that displays in Tipasa.
- Optional. Enter a description of the group.
- Click Add/Edit symbol(s).
- In the Add/Edit OCLC symbols window, add the symbols for your priority borrowers in the box provided. Separate multiple symbols with a space.
- Click Update Symbols.
- Click Save as New.
Step 3: Enable feature in Service Configuration
Once you have created a custom holdings group, or you have found a Profiled Group or custom holdings group that contains the symbols for the libraries you are adding as priority borrowers, it is time to enable the feature in Service Configuration.
To enable Lending Priorities:
- Sign in to Service Configuration.
- On the left navigation, click WorldShare ILL > Advanced Workflows.
- Under Lending Priorities, select the On check box.
- In the Display Name field, enter a display name for the group. The display name appears in the Tipasa interface, at the bottom of the left navigation.
- In the Filter by fields, from the first list, select Profiled Group or Custom Holdings Group, depending on the group you want to add.
- From the second list, select the group you want to add as a lending priority.
- To add additional groups to your lending priorities, click Add Row and repeat steps 2-4. For each row you add, a separate set of queues for that group will display in Tipasa. You can have up to five rows (five sets of lending priorities groups).
- To delete a row, click Delete Row.
- Click Save.