Learner guide: CONTENTdm Basic Skills 1 - Getting started with CONTENTdm
Course overview
This course provides instruction on the structure of CONTENTdm, navigating and using CONTENTdm Collection Administration to create and manage a digital collection, as well as using the CONTENTdm Project Client to prepare digital items for addition to a collection. After completing this web-based training, learners will have the foundational knowledge required to begin using CONTENTdm to manage digital items, as well as navigate CONTENTdm Collection Administration and the Project Client. With this basic understanding of the software, learners will be prepared for the next module, Working with Text in CONTENTdm.
Note: This learner guide is designed to accompany the CONTENTdm Basic Skills 1: Getting started with CONTENTdm course. If you attended the CONTENTdm Basic Skills 1: Getting started with CONTENTdm instructor led course or listened to the recording, please complete our brief evaluation. Your feedback is very important! Thank you!
CONTENTdm system architecture
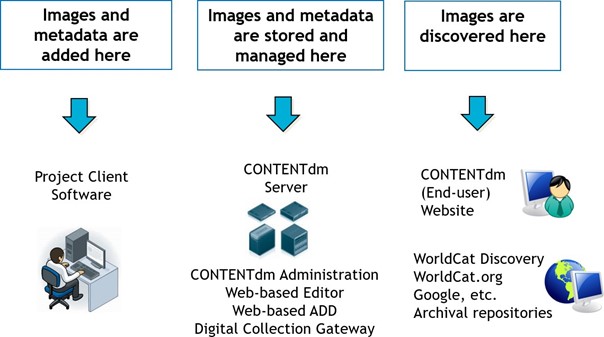
CONTENTdm terminologies
- Collection shares a common metadata schema; resides on the CONTENTdm server.
- Project is a working space within the Project Client; resides on your local workstation.
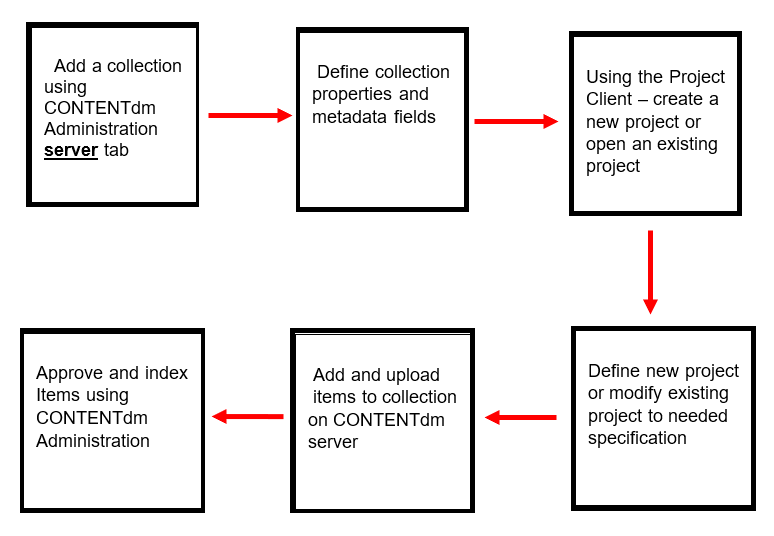
Build a digital collection
Step 1: Add a collection on the CONTENTdm server
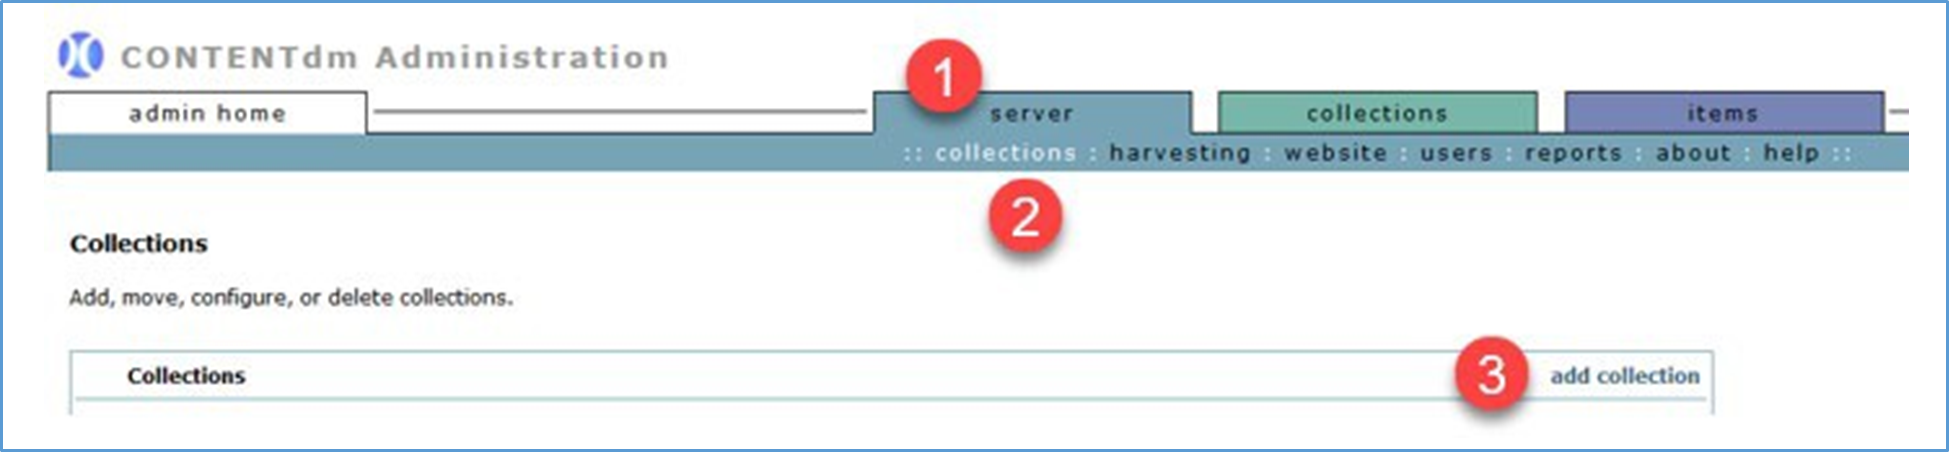
- Under CONTENTdm Administration, click the server tab.
- Click collections.
- Click add collection to add a new collection.
- Select an existing collection from the drop-down to use as a template.
- Enter a name for the new collection.
- Enter an alias for the new collection.
- Click add to create the new collection.
Step 2: Configure a collection on the CONTENTdm server
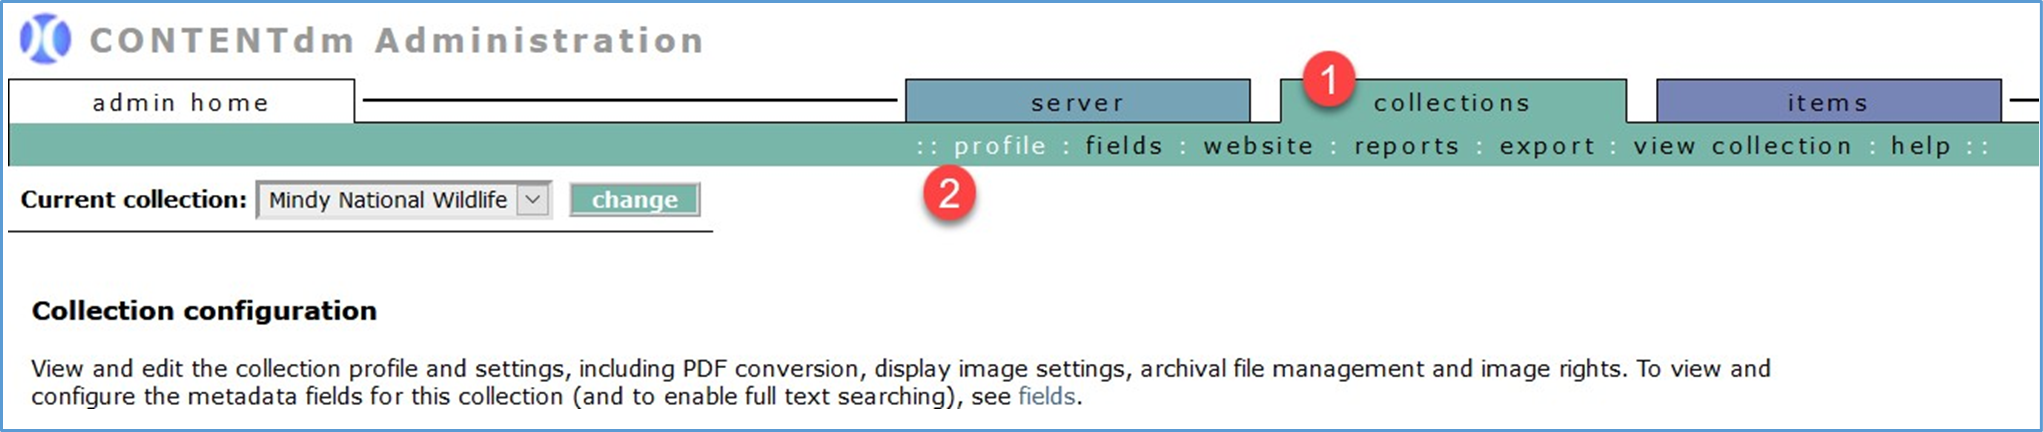
- Under CONTENTdm Administration, click the collections tab.
- Click the profile link to configure the profile & permissions and the optional collection settings.
Edit the Profile & permissions section

- Click the edit link on to the right of the section.
- Edit as needed:
- Collection name
- Collection status
- Collection permissions
- Collection information
- Click save changes when done.
Edit each option in the Optional collection settings summary section

- Click the edit link to the right of each option.
- Edit the desired option(s):
- PDF conversion
- Display image settings
- Archival file manager
- Click save changes when done.
Edit metadata fields for the collection
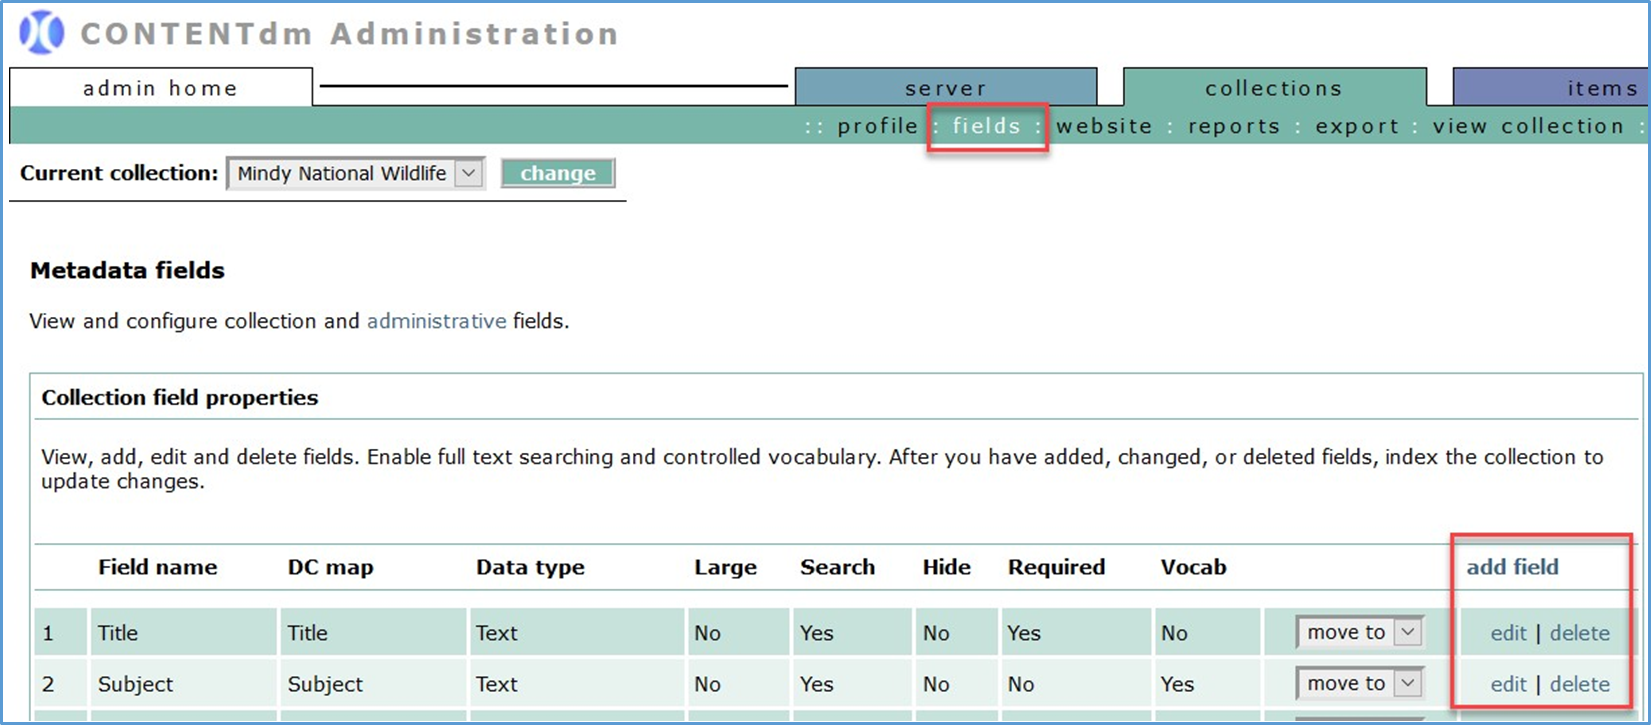
- Under the collections tab, click the fields link.
- View, add, edit, or delete metadata fields.
- To add a new metadata field:
- Click add fields.
- Enter data for the new field.
- Click Save changes to add the new field.
- To edit the existing metadata field:
- Click edit next to the desired field to modify.
- Edit the field.
- Click Save changes to update.
- To delete existing metadata field:
- Click delete next to the desired field to remove.
- Click Yes to confirm or cancel.
- To add a new metadata field:
- Use the move to drop-down menu next to each field to reorder metadata fields.
- Index the collection to update changes to metadata fields. To index the collection:
- Click the items tab.
- Click index.
- Under Index scheduler, click index now.
Step 3: Create a project in the Project Client

- Open your Project Client.
- Click the Project menu, then select New.
- Enter the URL for your library’s CONTENTdm server.
- Enter your logon credentials to the server. Click Next.
- Select the collection to associate with this project. Click Next.
- Enter a name for the project.
- Click Finish to create the new project.
Step 4: Configure a project
Use the Project Setting Manager to configure your project.
- Click the tab with the name of the current project
- Click the Project menu.
- Select Project Settings Manager.
- Select the setting you wish to configure.
- General settings: Contains information about the project and the collection to which it is contributing items; can export these setting for use in other projects
- Metadata templates: Use to streamline adding metadata to items imported into the project
- Metadata field types: Contains information about how the metadata fields are defined for the collectionImages
- Image & thumbnails: Use to modify the size and type of your display images; create watermarks, brands, and bands
- Image rights: Use to configure the display of copyright information or indicate ownership of items in the collection; must be configured before importing items
- Processing and OCR: Use if you want to create fully searchable text
- Project options: Use to configure how upload items in the project to the collection on the server; use and setup the spell checker
- Find in Collection: Useful for maintaining already-built collections
Step 5: Add digital items and objects to the project
Items (images, compound objects, PDF files, URLs, videos, etc.) can be imported to the project spreadsheet in several ways.
Add digital files to the project
- Click the Add menu.
- Select the option to add.
- Item: Ideal if you only have a few files to add; can add several files from a single folder or directory using ’ctrl-click’.
- Multiple items: Use to add ALL files in a single folder or directory.
- Compound object(s): Use to add multiple related files (e.g., pages in a document, audio files on a CD, postcards, etc.).
- Finding Aid: Use to add Encoded Archival Description (EAD) file is XML.
- URL: Use to add links to web pages or streaming media servers.
- Browse to folder/directory to locate the desired file to add.
- Select the desired file.
- Click Add to import the file into the project.
- Click Close to dismiss the Summary Screen.
View and and edit the digital items after they have been imported to the project
- In the project spreadsheet, double-click to open an item/file.
- Edit the item metadata.
- Click Save at the top of the editor to save changes.
Upload digital items to the collection on the server
- In the project spreadsheet, select each item to upload (or use select all to select all items).
- Click Upload for Approval at the top of the project spreadsheet.
- Fix any errors and select those items to Upload for Approval again.
Step 6: Approve and index the collection
Approve items uploaded to the collection
- In the Project Client, click the Administration menu.
- Select approve.
Note: This opens to the approval page of CONTENTdm Administration
- (Optional) Select to Approve all or Approve and Index All.
- Select individual items or select all to approve.
- Click go.
Index the collection
- In CONTENTdm Administration, click the items tab.
- Click index.
- Under the Index Scheduler section, click Index Now to index the collection immediately.
Or
Schedule the index- Select Once on to schedule the index process to run on a specified date and time.
- Select Recurring at to specify day(s) and time for the index process to run more than once.
Test your knowledge
- What is the core metadata schema used in CONTENTdm? Which single field is required by default to upload material?
- For each metadata element you must choose a data type, what are the three options?
- What three steps must be accomplished to start a new project in the Project Client?
- If you edit a record in the Project Client, the changes you make are automatically reflected in the data index in CONTENTdm.
- True
- False
- What steps must take place before you can administer a collection in CONTENTdm?
- Name three of the six basic tasks for building a collection by filling in these boxes.
- List two or more thesauri that support the controlled vocabulary function for the metadata subject fields.
- Is it possible to restrict access to a digital object that has been added to a collection?
- Ja
- Nee
- Metadata templates can be defined for several file types and several digital object format types. Name at least two types.
- Answer key
-
- CONTENTdm uses field properties mapped to Standard Dublin Core metadata schema. The Title field is required by default and can be modified but you can’t change the map. The title field is always required to upload material.
- Text, date, and full-text search
- To create a new project one must open the new Project Wizard and complete the following steps:
- Enter the CONTENTdm Server URL.
- Select the collection where you will upload items.
- Name your project.
- Click Finish.
- b. False, you must first approve and index new data before the changes are reflected in the data index.
- CONTENTdm Collection Administration is accessed via a Web interface using a browser. To administer a collection in CONTENTdm the collection must have been created on the server, you must have Collection Level administrative rights and you must establish the collection field properties.
- Tasks for building a collection include:
- Thesauri that support the controlled vocabulary function for the Dublin Core subject fields include any of the following:
- A set of local topics
- Art & Architecture Thesaurus (AAT) ®
- Dublin Core Metadata Initiative Type Vocabulary
- Getty Thesaurus of Geographic Names (TGN) ®
- Guidelines On Subject Access To Individual Works Of Fiction, Drama, Etc., 2nd ed.,
- Māori Subject Headings / Ngā Ūpoko Tukutuku
- Medical Subject Headings (MeSH®) 2008
- Newspaper Genre List
- Thesaurus for Graphic Materials: TGM I, subject terms
- Union List of Artist Names (ULAN) ®
- a. Yes, you can limit by a system user name or by IP address.
- Metadata templates can be defined for the following formats:
- Project template
- Images template
- Format-specific image for JPEG
- Format-specific image template for JPEG2000
- Format-specific image template for TIF
- PDF template
- Compound object template
- URL template
- Video template
- Audio template
Supplemental information
- CONTENTdm training - Find this class and additional training content here.
- CONTENTdm technical office hours - Find time and call-in information here.
- CONTENTdm FAQ & Troubleshooting articles
- CONTENTdm Community Center
- Connect with OCLC staff and peers using CONTENTdm.
- Attend webinar events and keep up with product news
Additional questions? Contact OCLC Support.