General
Redesign of the Menu
The Folders, New Record or Saved Searches tabs are no longer available as tabs on the right- hand side of the menu.

Folders and Saved Searches continue to be available in each domain in the Other Searches dropdown.

A new record can be created via the domains as before.
Changes to Folders
Changes have been made to folders to allow for better performance for those OLIB systems that have large numbers of records (especially Titles), assigned to Folders.
Accessing Folders
Folders are now accessed from the Searches> Folders domain:

You will see the folders you created listed here. If you are logged in as the System Administrator, you will see all folders created.
Folders are no longer available in Cataloguing> Personal Folders. They continue to be available from Other Searches.
When you open a Folder from the Folders domain or the Other Searches dropdown, this consistently opens the details of the Folder, rather than displaying a hitlist of the items in the Folder:

The Folder record details have been extended to present a Contents list for every type of folder, not just Titles, Users and Copies.
Use Up/down links to change position in the list. With the folder record in modify, simply select the item to be moved.

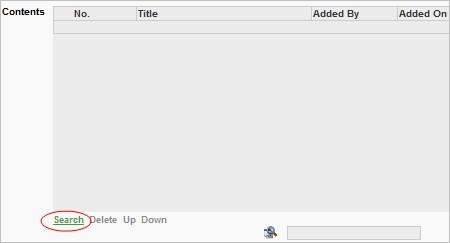
To display a hitlist of the items in the Folder, click in the Show as list hyperlink:

This hitlist allows you to change the sorting and/or add filter options, should the folder contain a very large list of items.

Removing items from Folder
To remove an item from a folder, modify the record and select the items you wish to remove. Click the Delete option.
When items are removed from the folder, they no longer appear in the Contents box.
Adding items to Folder
Whilst a folder record is in modify mode, items can only be added in the tab in which the folder is being edited. Attempting to add items in from a hitlist (whether by another user or not) will report that the folder is being modified by another user and not add the items.
Once the folder record is no longer in modify mode, items can be added by anyone (with permission) from a hitlist.
There are 2 ways to add Titles to the Folder using the Folders domain.
In the Folders domain
- Add items to folder via Titleno

- In the Title Numbers field, add the Titleno on separate lines - input them directly or paste them from another application.
- Having added all the numbers, click the Add Titles to Folder button.
- On completion Save and Close.
Add items to folder via Search link
- Click Search to run a search for a title.
- Click Insert to add a title or use Insert and Continue to add titles to the folder but stay on the Titles dependent search in order to add more titles.
- On completion Save and Close.
Example
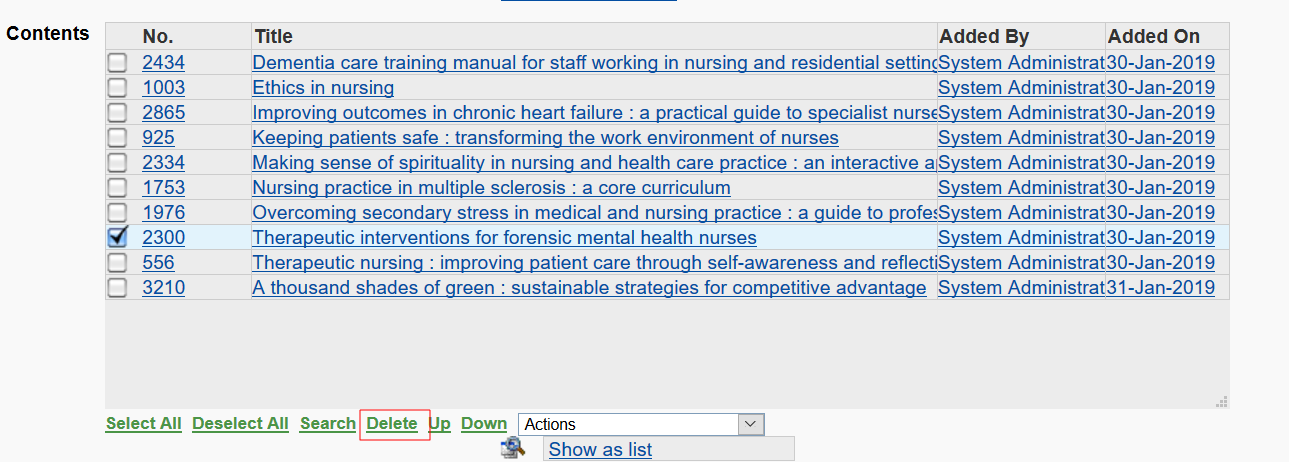
When you have added Titles to the folder, they are displayed in the Contents box:

New folders will not be visible in the Other Searches or Folders dropdowns until the next time the user logs in to OLIB Web.
Creating a folder by selecting items from a hitlist and adding a new folder will make the folder available in the Other Searches dropdown and the Folders domain immediately).
Identifying Records in a Folder
The OLIB domains for which Folders are available, Titles, Copies, Users, etc now have a folders attribute that can be added to a layout. This displays the folders that the current record is linked to:
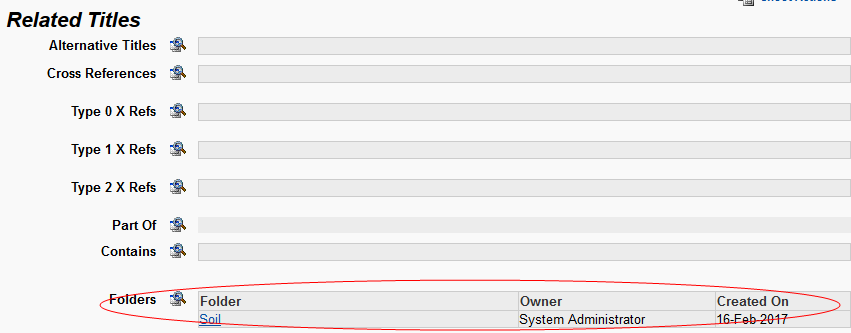
The System Administrator would need to add this to the layout using Layout Manager. The attribute names are all labelled “Folders”, for example Folders (titles2folders_attr)
Searches can now therefore be refined by the Folder names.
In the Refine Search window, select Linked Domains - Folders:

Search by Folder:

This lists all the Folder names in the Refinements window:

Type Ahead Combo Fields
A number of new fields are now available so that staff can simply start typing into a field and a list of possible matches is displayed.

Type ahead combo fields are available for:
- Publisher and Place of Publication
- Authors
- Folders
The system administrator will need to add the relevant attributes to your layout, using Layout Manager.
Example: Publication Details
- Add the new attributes Publisher Combo (ti_publisher_typeahead) and Place Combo (ti_place_typeahead) to your layout.
- In the Publication control, start typing the first few letters of the Place of Publication:

- OLIB immediately displays matches in an alphabetical list, that you can select from.
- Do the same for the Publisher Name:
Again, OLIB displays matches alphabetically. Select one and finish by entering the Date of Publication and click >> to complete the publication details entry.
If the place, or publication name, does not exist, you can use the new record in context icon at the side of the field. OLIB displays a new standard input window to complete the details.
For multiple publishers or places in a single imprint line or for other details on this imprint line, click the New link. OLIB displays the new Publication Details layout, where the Publisher and Place fields are now both type-ahead combo controls as standard:


Example: Authors
- Add the new attribute Name Combo (ti_author_typeahead) to your layout.
- In the new control, start typing the first few letters of the name:

- OLIB immediately displays matches in an alphabetical list, that you can select from. Select the Responsibility Type and >> to complete the name record.
Tip: use the comma (,) character to search in the surname and forename fields to increase the relevance of the list:

When the underlying search being used has several input fields you can specify a comma separator “,” between the terms in order to provide a value for the second, third, .. etc fields - for example ch,s.
Example: Folders
By default, a type-ahead combo is present here in the Folder Owner field. This is the Owner (bf_borrower) attribute.
Again, you can use the comma separator to search for users (for example da,j):

Summary of type-ahead controls
The list below shows where these type-ahead combo controls can be used and the new attribute names if you want to add them to your layout using Layout Manager.
|
Domain |
Layout |
Controls/Fields |
Layout Manager Attribute |
|
Titles |
Any Titles layouts – e.g:
|
Publisher |
Publisher Combo (ti_publisher_typeahead) |
|
Place |
Place Combo (ti_place_typeahead) |
||
|
Agents, Authors, Editors (RDA Layout) |
Name Combo (ti_author_typeahead) |
||
|
Publication layout (accessed from Titles domain) |
Publisher |
The pre-existing attributes now have the new type-ahead feature as standard |
|
|
Place |
|||
| Orders | Orders Standard Layout | Supplier | The pre-existing attribute now has the new type-ahead feature as standard |
|
Folders |
All layouts for each Folder Type, e.g:
|
Owner |
Owner (bf_borrower) |
Tip: for best results, add these new fields in a group by adding the appropriate snippet to the layout. This will add a selection of attributes, with help text, in a single step rather than finding, adding, sizing and styling the controls yourself. See the Changes to Layout Manager section.
Layout Manager enhancements
A number of enhancements have been added to improve the workflow in Layout Manager.
New Action - Create and Modify Draft
The system administrator can now create a draft sheet and open the sheet in modify mode with a single action. You no longer need to use separate Actions Create Draft and Modify Sheet.
- In the domain where you want to edit a sheet, e.g. Users, display a record.
- In Sheet Actions select Create and Modify Draft:

The draft sheet loads in Modify mode ready for you to edit as normal.
Attribute Actions placement
 The attribute actions remain on-screen (near the top right) when working with a layout, even if the page scrolls down:
New Actions in the Layouts domain
These actions are available to copy, remove or export a layout. To use them: Go to Admin Client Configuration> Layouts.
Search on the layout name. In most cases this is similar to the domain name, e.g. users.
In the hit list, select the correct layout and click the Other Actions drop down to see available actions:

|
Copy Layout To Archive Domain |
OLIB will create a copy of the layout. It will be placed in one of the Archives domains, e.g. Archived Titles, Archived Users. The archive record layout will be placed in the correct matching domain, e.g. an archived Users layout will be placed in Archives> Archived Users. See below. Attributes that are not included in the Archive domain’s definition will not be included in the layout, although their labels will. |
|
Copy Layout With Copied Sheets |
(Prior to service pack 13). This will duplicate the selected layouts, prefixing the new layouts with Copy of The new layout will link to copies of the sheet records (that were linked to the original layout) |
|
Copy Layout With Same Sheets |
(Prior to service pack 13). This will duplicate the selected layouts, prefixing the new layouts with Copy of The new layout will link to the same sheet records as its original |
|
Export |
Starts an Export download. The output can be imported to another OLIB database. See Export/Import below. |
|
Remove Layout and Sheets |
The layout and the sheets belonging to it are deleted from the database. |
|
Remove Layout, keep Sheets |
The layout is deleted from the database, but the sheets will still remain and can be re-used. |
Example: Create a copy of a layout for archived User records
Tip: you may consider archiving records for which you have a highly customised layout to assist data entry and wish to view the archived records using the same field labels.
- In the Layouts domain, when you select Copy Layout to Archive domain, OLIB responds:
A new layout "Archived Staff Users" has been created.
- If this is e.g. a Users layout, OLIB places the layout in Archives> Archived Users.
- To view it, display the details of any record in Archived Users.
- Under the Layouts drop down, the archived Users Layout is visible (Archived Staff Users):

The domain for the layout is now ARCH_BORROWERS.
Note: check that the Layout you are creating an Archives copy for, has all possible Info Types associated with it (see Info Types sheet in the Layout):

If not, the layout will not be displayed in Archives and will still be visible in the “active” domain.
New Action - Insert Labelled Attributes
This allows quick adding of multiple Controls to a sheet. These are the attributes that aren’t already on the current sheet.
Select an existing Label on the sheet and from Actions choose Insert Labelled Attributes.

The new attributes will be added above this label.
OLIB displays available attributes; check the boxes to select your preferred attributes:

OLIB will automatically include the field label (based on the attribute description) and the help text. OLIB will also match the styles and label widths used elsewhere on the sheet.
New Action - Insert Snippet
Snippets in Layout Manager are a collection of related fields/attributes arranged together, with help text, to provide a simple way to add a feature to your own layout(s). When you choose to add the snippet, all the attributes are added to the sheet in one action. This includes field labels, buttons and help text; OLIB also matches the styles and label widths used elsewhere on the sheet.
With OLIB 9 Service Pack 13 these are available in the Titles domain only. They are helpful if you want your own Layout and Sheets to take advantage of the Type-ahead / fast entry fields for cataloguing.
- When editing a Titles sheet, select a Label near where you want the new fields to appear. The new fields will be inserted above the label.
- In the Actions drop down on the top right choose Insert Snippet.
- OLIB displays the available snippets in a popup window. The fields included with each snippet are as follows:
|
Snippet |
Attributes included |
|
Agents (Authors, Editors, etc) Entry |
Name Combo (ti_author_typeahead) Responsibility Type (ti_prresbty) Add Name Button (ti_name_add) Authors / Names (titleauths) |
|
Classmark Entry |
Classmark Combo (ti_class_typeahead) Classes (Type 0) (titleclasses) |
|
Copies Entry |
Copy Barcode Entry (ti_copybarcode_entry) Default copy location (ti_defcopyloc) Default copy category (ti_defcopycat) Shelfmark Prefix (ti_sm_prefix) Copy Shelfmark Entry (ti_shelfmark_entry) Add Copy Button (ti_copy_add) Copies (ti_copies) |
|
Publication Entry |
Type of Publication information (ti_pub_mxxi_ind2) Place Combo (ti_place_typeahead) Publisher Combo (ti_publisher_typeahead) Publication Date Entry (ti_pub_tdate) Publication (ti_publisher) |
Tip: in Admin Client Configuration> Sheets, you can search for all Snippets. Enter Wildcard
% in the Sheet Name and use Refine Search. Refine the search by Sheet Status = Snippet.
Example
- For example you can add all the fast entry Author details to the Sheet/Layout in one go:
- Go to the Titles domain, search for any record, and select the Layout you require from the Layouts drop down.
- Display the Sheet you want to edit, e.g. Main Details.
- From Sheet Actions, select Create Draft and Modify.
- Select the Label control above which you want to add the Authors fast entry attributes, e.g. the Edition.
- From the Actions drop down on the top right, select Insert Snippet.
- In the popup window tick the box to choose Agents (Authors, Editors, etc.) Entry and OK.
- OLIB inserts a set of 5 new Author fields as shown:

Save the changes for them to take effect in the Sheet. Publish the Sheet as normal.
Note: do not add the same snippet more than once to a Sheet as this will cause problems for the type-ahead fields.
Export and Import of Layouts
Layouts can be exported from one OLIB system and imported into another OLIB system. This can be beneficial in several scenarios such as:
- Create a new layout in an OLIB test environment for review and improvement; subsequently export the layout and import it to the live environment
- Export a layout from an OLIB test environment and import to a live environment, following a new Service Pack installation); layouts can be produced during the test phase and simply copied to live when the Service Pack is in place
- Manage changes to layouts supplied by Service Pack installations (e.g. export a "backup" copy of a custom layout with a new name, so that the installation does not overwrite it)
- User Support: export a layout for problem solving purposes
Overview
- Logged in as a system administrator in the "source" OLIB system, go to the Layouts
- domain and export the layout to a file as below.
- Copy the file to a location where the “receiving” browser can access it.
- Logged in as a system administrator in the "receiving" OLIB system, create a record in the Import Batch domain of type Layout Import as below.
- Attach the exported file to the Import Batch and run Process - Load.
- OLIB imports the layout file. Any layouts with a matching name in the domain will be replaced with the new layout.
Export the layout from the source OLIB system
In this example, a custom layout for Titles Internal Reports is to be exported from an OLIB system.
- Logged in as the system administrator, go to Admin Client Configuration> Layouts.
- Search for the layout, e.g. by layout name:

- Select the layout in the hit list and choose Export from the Other Actions drop down:

- OLIB responds:

- Click the download link as prompted and choose to save the file. Your browser will output to the Downloads folder by default.
- If required, copy the file from Downloads to any location where the receiving OLIB's browser can access it. Change the filename / copy the file with a meaningful name, e.g. TempStaffRecordExport.exp.
Note: the output file is a .zip archive of an xml file. It can contain several xml files if you selected multiple layouts in the hit list for the Export action.
Import the layout into the receiving OLIB system
In this example, the above custom layout for Titles named Internal Reports is to be imported into another OLIB system. (When importing, any layouts with a matching name in the domain will be replaced with the new layout supplied).
- Logged in as the system administrator in the receiving OLIB system, go to Data Exchange> Import Batch.
- Click New Record to create a new file.
- In Batch Type select Layout Import.
- Enter a meaningful Description, e.g. Internal Reports Layout.
- In Files to Import click New and attach the file containing the exported layout(s) - with an Object Type Binary File; a meaningful Title; In Database Yes:

- Save the details and in Files to Import, check the box to select the file and in Actions select Process.
- In the Alert, select the Load option; OLIB responds

- On completion, the Import Batch record contains the relevant Style Mappings:

You might need to do some corrections to get the correct Matched values. If you need to do this, Process and Load the batch file again.
- In Admin Client Configuration> Layouts, check that the imported layout has all relevant Info Types attached to the layout.

View the new layout
In this example, the new layout will be available in the Titles domain. Click on the Layouts link to view a record in the new layout:


The import is completed and no rebuild is required.
Report SYS008 Layout Export
This report is also available in addition to the Export action above.
The report asks for the Domain, Info Types (optional) and Layout. The domain and Info Type prompts are there simply to aid the selection of the Layout Number in Parameter 3.
Parameter 3 is the only parameter used in the report itself. The report generates an XML output which can then be downloaded, zipped and then used as a layout transfer file.
As the Report Description states:
This report will generate an XML representation of the layout definition for import into another OLIB database using the "Layout Import" Import batch type.
Refining a Search using a Relative Date
There is now a facility to use a relative date when refining a search. For example, a library might wish to run a search to see a list of titles catalogued in the past 7 days.
A days ago field is now available for date refinements:

Run a search and choose a Date filter, the date or days entry fields appear, depending on your chosen operator, e.g. After:

You can enter the exact date using the calendar picker, or you can enter the number of days in the days ago box. The days ago option should be used in conjunction with a suitable operator.
For example:
"Equals 90 days ago" will list everything that was changed 90 days ago
"After 90 days ago" will list everything that has been changed since 90 days ago
When you choose the Between operator, OLIB displays 2 sets of fields:

If you are doing a "between x and y days ago", the larger number must be on the left (listed first).
For example:
"between 21 and 7 days ago"
not
"between 7 and 21 days ago"
OLIB Support Link
The link to the OLIB Users Site that was accessible from the top right hand of the OLIB Web screen has been changed. The link text now reads OCLC Support.

This links out to the new OCLC Support reference site https://help-nl.oclc.org/
