User account details
Access user account details page
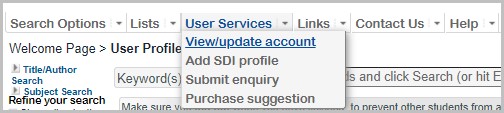
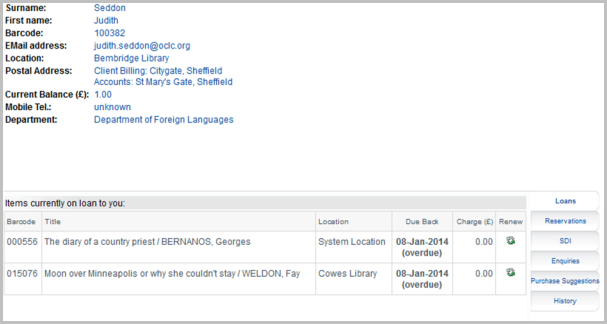
Using the View/update account link in the User Services menu, users can view their account details. The standard display of user details in Folio is as follows:
This screen appears when:
- the user first logs in
- the user clicks on User Services> View/Update Account
- the user hovers over their login details and clicks on User Profile
User Account details are configurable in:
- g_user_details
In the top half you can configure which field details are displayed. In the lower half you can control which tabs are displayed.
What can you configure?
- Whether the View/update account option appears in the User Services menu
- Whether the self registration option appears in the Login box
- A message to all users in the header bar
- The order the user details fields appear in and what they are called
- Which user details fields are displayed
- Whether any of the fields can be updated by the user and what values appear in the drop downs
- Which tab options are displayed
- The screen size ratio between the top (user details) and the bottom (user tabs)
Disable View/update account
View/update Account is available as standard in the User Services menu. To remove this option:
- Go to OPAC> Configuration Settings.
- To find the relevant user menu option search for usmenu_options.
- Tick the box for the “view” setting:
| Config Block | Setting | Value | Sequence 1 | Sequence 2 | Include? |
|---|---|---|---|---|---|
| g_uservmenu | usmenu_options | "view" | 1 | 1 | Y |
- The Actions box will appear at the foot of the screen – select Exclude.
The change takes effect in the OPAC immediately so the View/update account option will immediately be removed from display.
Disable self-registration in the Login box

Users who do not yet have a log in can use the Register yourself feature from the Login button. This feature is available by default. To disable self-registration change the self-registration setting in login.ini from true to false:
- Go to Configuration Settings.
- Search for the setting self_registration.
- Set the Value field to False if you do not want Register yourself to appear in the Login box.
Changes take effect immediately in Folio.
Display a note / message to all users
You can add a note / message to the header bar of the Account Details display:
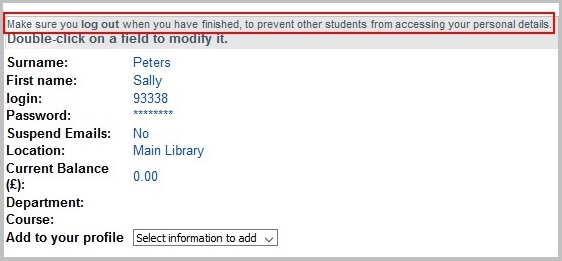
To do this you create a new user_note setting in g_user_details:
- Go to OPAC> Configuration Settings.
- Search and check that user_notes has not already been created.
- Modify or use New Record to enter details in the Value field as follows:
"Make sure you <B>log out</B> when you have finished, to prevent other students from accessing your personal details.<br/>
 <FONT SIZE='+1'><B>Double-click on a field to modify it.</B></FONT>"
Note: use the <FONT SIZE='0.5'> HTML tag to increase the size of the message.
Use the <B> HTML tag to highlight selected text in bold.
Include/exclude user fields, re-sequence and re-name
Some libraries may wish to allow users to view their account details but not to edit any of them. To completely remove the ability to update their User Account details:
- Go to OPAC> Configuration Settings.
- Search for allow_acc_update in g_user_details.
- Open in modify and set Value = “N”.
Alternatively if you DO want users to be able to edit some of their details ensure the allow_acc_update setting has Value = “Y”. Then you can configure which fields display, which are editable and so on.
User account fields
To do this you configure the usdetails array:
- Go to OPAC> Configuration settings.
- Search for usdetails. This shows the following example array from g_user_details:
| Config Setting ID | Interface | Config Block | Setting | Value | Sequence 1 | Sequence 2 | Include? |
|---|---|---|---|---|---|---|---|
| 603715 | 1 | g_user_details | usdetails | "sname E Surname" | 4 | 1 | Y |
| 603716 | 1 | g_user_details | usdetails | "fname E First name" | 4 | 2 | Y |
| 603717 | 1 | g_user_details | usdetails | "barcode M Barcode" | 4 | 3 | Y |
| 603718 | 1 | g_user_details | usdetails | "password E <view>Password</view><edit>New Password:<br/>Confirm Password:</edit>" | 4 | 4 | Y |
| 1000107 | 1 | g_user_details | usdetails | "notes C Other Information" | 4 | 8 | N |
| 603751 | 1 | g_user_details | usdetails | "SUSPEND_EMAIL_NOTICES Y Suspend Emails" | 4 | 37 | Y |
| 603770 | 1 | g_user_details | usdetails | "LOC S Location" | 4 | 56 | Y |
| 603789 | 1 | g_user_details | usdetails | "CURBAL M Current Balance (£)" | 4 | 75 | Y |
| 603793 | 1 | g_user_details | usdetails |
"bortp R User Type" |
4 | 79 | Y |
| 603940 | 1 | g_user_details | usdetails | "depts SEAD Department" | 4 | 90 | Y |
| 603941 | 1 | g_user_details | usdetails | "courses SEAD Course" | 4 | 91 | Y |
| 603993 | 1 | g_user_details | usdetails | "button N Add to your profile" | 4 | 200 | Y |
- Click the link to display full details. Switch to modify in order to include/exclude the field, change the field name, or re-order the display using Sequence 2.
For example, User Type: the Value field should be structured:
“bortp [display flags] User Type”
By default it has the display flag set to Read only - "R" as shown in the table above, but it could be set to "SE" "SR" or "SM" as described below.
The usdetails array can also include a User Notes field for display on user account details and the self registration page. You would need to create this new usdetails setting as displayed in the example array above.
In the Value enter:
“notes C Other Information” -
Where:
notes: the field name
C: denotes that it is editable and that it can be cleared
Other Information: the field label
Include?
If you set Include?=No for one of the settings, the field is not displayed in either the user self-registration page or the User Account details page. It is possible to define fields to be visible in account details but not to be visible during self-registration. Use the codes below to do this.
Field codes
Use codes in the Value field to control the fields.
For example in the above table, Value "sname E Surname":
sname indicates the OLIB field name
E indicates it is editable by the user
Surname is how the field displays in Folio
The following codes are used to control how a field behaves in Folio:
| Code | Description |
|---|---|
| E | Editable. Cannot be emptied. Unless M is also specified, will only show if there is a value in the field. For S fields (eg: addresses) this will mean that at least one address must be retained. |
| M | Mandatory: will always be shown, even if the field has no value. The field will show with the content of the “l_EmptyUserField” setting. |
| C | Editable, can be cleared. Will only show if there is a value in the |
| P | Population only: For Self registration this field can be populated, but cannot be changed by the User after the User has registered |
| R | Read only. Unless M is also specified, will only show if there is a value in the field. |
| Y | Yes/No field. Unless M is also specified, will only show if there is a value in the field. For relevant fields, this option must always be included. |
| S | Selection – display a list of values linked to the User Record (eg: Addresses, Departments, Courses). Unless M is also specified, will only show if there are values in the fields. For relevant fields this option must always be included. |
| A | Additions to the selection list are possible. |
| D | Deletions from the selection list are possible. If E is specified, and not C, this will not be offered for the first record in the list. |
| N | New information – reserved for the option to add additional information to the profile and cannot combine with other options. |
For example:
g_user_details usdetails "barcode M Barcode" Seq.1:4 Seq.2:3 Include: Y
Barcode will appear on the Account Details page and cannot be edited (Mandatory only). It will not appear on the self-registration page – as it only has an “M”, it is not editable by the user.
Re-sequence
To re-sequence fields, edit the number in Sequence 2 in relation to the other array settings, for example to swap around Surname and Forename:
Sname: set Sequence2 =2
Fname: set Sequence2 =1
Configure whether the user can update fields
After accessing their user account details, you may allow some of these fields to be updated by the user in Folio. If a field is editable by the user in Folio, they will be able to double click in the field, make changes and Save or Cancel:

The allow_acc_update setting in g_user_details should be set with Value= “Y”:
| Config Setting ID | Interface | Config Block | Setting | Value | Sequence 1 | Sequence 2 | Include? |
|---|---|---|---|---|---|---|---|
| 605651 | 1 | g_user_details | allow_acc_update | "Y" | 63 | 0 | Y |
You can also configure fields in the Folio self registration page that can be populated by the user, but not subsequently end-user editable in Account details. For example, fname, sname. To do this you use the P code in the Value field of one of the above usdetails settings:
P (Populate) This means the field can be populated in self-registration, but cannot be changed by the User after the User has registered.
Many libraries may wish to enable self-registration in this way but to also allow users to later change the Password in their User Account:
| password E Password | Password appears on self-registration and users CAN change later |
|---|---|
| sname P Surname fname P Forename |
Surname and Forename can be populated in self-registration but not subsequently in account details |
Limit the values available in user account details drop downs
If you allow users to update some fields in their Folio user details it is possible to limit what values appear in the drop downs that the user can choose from. This can be done using the following fields:
| Setting | Config Block | Drop down field | Description/Comments | Value example |
|---|---|---|---|---|
| user_details_combo_locs | g_user_details | Locations | Which locations to include in the Location drop down list. Enter as a semi-colon-separated list of location key IDs. Edit the example codes and set Include = Yes. | “;B1;B2;” |
| user_details_combo_depts | g_user_details | Departments | Which departments to include in the Departments drop down list. Enter as a semi-colon-separated list of department key IDs. Edit the example codes and set Include = Yes. | ";SPM;SMD;" |
| user_details_combo_courses | g_user_details | Courses | Which courses to include in the Courses drop-down list. Enter as a semi-colon-separated list of course key IDs. Edit the example codes and set Include = Yes. | ";F103;F107;" |
| user_details_combo_bortps | g_user_details | User types | Which user types to include in the User Type drop down list. Enter as a semi-colon-separated list of course key IDs. Edit the example codes and set Include = Yes. | ";TST1;TST2;" |
- Go to OPAC> Configuration Settings.
- Search using one of the required settings above, e.g. user_details_combo_bortps.
- Switch to modify and edit the example value in Value to your own relevant codes.
- Set Include? = Yes.
Change the tab displays
The lower half of the User Account details screen includes a number of tabs that display further information relating to the user.
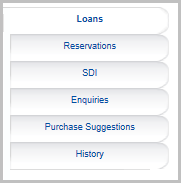
The user details tabs array settings in g_user_details determine which tabs and content are displayed and in what order in the lower half of the page:
- usdetails_tabs
- Go to OPAC> Configuration Settings.
- Search for the usdetails_tabs setting:
| Config Setting ID | Interface | Config Block | Setting | Value | Sequence 1 | Sequence 2 | Include? |
|---|---|---|---|---|---|---|---|
| 603833 | 1 | g_user_details | usdetails_tabs | "loan Loans Items currently on loan to you:" |
5 | 11 | Y |
| 603999 | 1 | g_user_details | usdetails_tabs | "res Reservations Reservations you have placed:" |
5 | 2 | Y |
| 603834 | 1 | g_user_details | usdetails_tabs | "sdi SDI" | 5 | 3 | Y |
| 603835 | 1 | g_user_details | usdetails_tabs | "enq Enquiries" | 5 | 4 | Y |
| 603836 | 1 | g_user_details | usdetails_tabs | "purch Purchase Suggestions" | 5 | 5 | Y |
| 603837 | 1 | g_user_details | usdetails_tabs | "hist History Transaction History" |
5 | 6 | N |
| 603838 | 1 | g_user_details | usdetails_tabs | "titles Titles" | 5 | 7 | N |
| 603839 | 1 | g_user_details | usdetails_tabs | "req ILL Requests Inter-Library Loan Requests" |
5 | 8 | N |
| 603840 | 1 | g_user_details | usdetails_tabs | "subs Subscriptions" | 5 | 9 | N |
| 603841 | 1 | g_user_details | usdetails_tabs | "circlist Circulation Lists" | 5 | 10 | N |
Include?=Y means that the tab is displayed.
Sequence 2 determines what order on the page the tab is displayed in. Swap round the Sequence 2 numbers to re-order the tabs.
Information in tab settings
Loans

This displays the list of items on loan to the user, with an option to renew each item separately. The list is sorted by return date so that the items that are due back soonest (or most overdue) are displayed first.
You can hide Location from the display. Add a configuration setting called show_loc in g_user_details and set the Value field to “N” (including the double quotes). You can also hide the Charge display: add a configuration setting called show_charges in g_user_details and set the Value field to “N” (including the double quotes).
Reservations

This displays the active reservations that the user has placed, with an option to cancel each reservation. The list is sorted by the date on which the reservation was placed.
SDI

This displays the SDI profiles that the user has created or subscribed to, with options to add a new profile, modify or delete an existing profile, and subscribe or de-subscribe to other users’ or public profiles.
Enquiries

This displays the user’s enquiries, with options to modify or cancel an existing enquiry and submit a new enquiry.
Click the Submit new enquiry link to display the new enquiry form.
Purchase Suggestions

The tab displays the user’s purchase suggestions (outstanding, received and held for the user, and received and in stock), with an option to submit a new purchase suggestion.
Circulation Lists

This displays the journal circulation lists and ToC lists that the user has been added to.
History
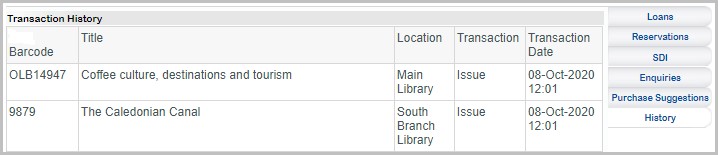
This displays the user’s transaction history, most recent transactions listed first.
Titles
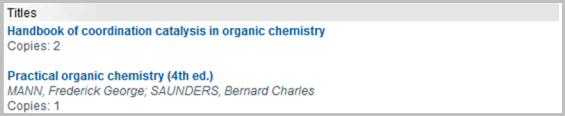
This displays the titles that the user is linked to. Titles can be linked to users in OLIB Web Users domain using the Titles (borrtitles) attribute. There is a corresponding attribute in the Titles domain – Users (borrtitles). They should use a Link Type and reverse Link Type of User and Title. These attributes are not provided on the Users standard layout or the Titles standard layout and would need to be added by the system manager using Layout Manager.
ILL Requests
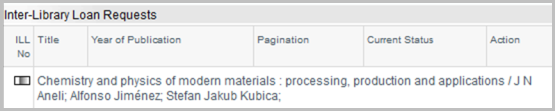
This displays the user’s ILL requests. Inter Library Loans requires the VDX system within OLIB to be operational.
Clicking the Submit request link displays a new ILL request form. Mandatory fields are indicated with a faint red background and a red border.
Users can click the Submit request icon to save a new ILL request and the Cancel request icon to return to the account details screen without submitting a new request.
Remove a specific tab display
- Go to OPAC> Configuration Settings.
- Search for the usdetails_tabs settings as shown in the table above.
- Check the box to select the setting you want to remove e.g. Purchase Suggestions.
- In Actions select Exclude (the same as Include?=N).
Re-order a tab display
- Go to OPAC> Configuration Settings.
- Search for the usdetails_tabs settings as shown in the table above.
- Click to open the tab setting you want to re-order, in modify mode.
- Edit the Sequence 2 field in relation to other usdetails_tabs settings.
Configure split screen ratio
The top half (user details) and bottom half (tab details) of the user account details screen are apportioned a set amount of screen space; the default ratio is 35/55. This is the default applied if you do not create any of the below settings. Depending on your data, you may prefer to apportion more space to the top half of the screen, e.g. if the bottom half of the screen only includes the Loans tab and you typically have one or two items on loan.
If you want to change the ratio, this is configurable at various levels - system ; site specific interface ; user category; individual user. This depends on the following settings which you can choose to create.
Example
- Go to OPAC> Configuration Settings.
- Search for one of the settings below from g_user_details, e.g. ssr_usr. If not found, click New Record to create it.
- Enter details as described in the table below. In Value the number you enter will be the “size” of the top half of the screen. The size of the bottom half will be calculated by subtracting this number from 90.
Changes will take place when you reload Folio.
| Config Block | Setting | Description | Value e.g. | Include? |
|---|---|---|---|---|
| g_user_details | ssr_usr | The top level split screen ratio for the user details screen if no user category-specific or user-specific setting applies. | 50 | Y |
| g_user_details | ssr_usr_[user category key ID] e.g. ssr_usr_STAFF |
The split screen ratio for the user details screen used for all user records with the specified user category if no user-specific setting applies. The user category key ID should be in upper case. | 60 | Y |
| g_user_details | ssr_usr_[borrower] e.g. ssr_usr_245 |
A user-specific user details split screen ratio. (Note that this is the borrower record number, not the user’s barcode.) | 80 | Y |
Note: if there is only one tab to display on the lower section of the title or user account details screen, the tab graphic itself is not displayed. Instead, the data on the tab that has been configured to display is automatically stretched across the full width of the screen.