Create spine label reports
Most spine label reports require the loading of a customised spine label. The following guide takes you through the entire process for loading the customised template, creating a new report, creating a Saved File of items to print and running the report.
Save the Template
- Save the template into the Amlib/Reports folder on the Amlib server. This will make the template available for use for all users. Alternatively, you may save it into a local folder on your PC – but please be aware, that the template (once loaded) will only be available for use on that PC.
- Ensure that the template is saved with a name that clearly identifies it as a customised spine label – for example: PRSPINE5.QRP
Load the Template
- Launch the Amlib client
- Go to Main > Reports > RepAddNew – the Report Files screen will display
- From the Report Entity drop-down select Stockitem
- Click the F1 New button – the Stockitem – New Report File screen will display:

- Type in a Description – for example: MyLibraryName Spine Labels (5 wide)
- Click on the Browse button and navigate to the Amlib/Reports folder on your Amlib Server and locate the template to be loaded (if the template has been loaded onto your PC – then navigate to the local folder)
- Select the file and then click on the Open button
- Choose Type – ensure you select Spine Labels (with the matching number of columns to those in your template) – for example: Spine Labels 5 label wide
- You can leave Default Stats Code blank
- Update Entity (Y/N) = N
- Click the F3 Update button to save the new template
- Close out of the Report Files window
The template is now loaded and available for use in a Report.
Create the Report
- Go to Main > Reports > RepStockitem – the Stockitem Reports screen will display
- Select the F1 New button – the Select Report Format table will display:

- Locate the template you just loaded via RepAddNew, highlight it and click on the Select button
- You will be returned to the Stockitem Reports screen – locate the report you just created and highlight it (the entry will be in bolded red and the Report Type = the Report Description of the template you loaded)

- The spine label settings should be typed into the Report Description field – for example: 5,6,w,a. DO NOT type in any other descriptive characters as this will stop the report from functioning correctly – your Description should be similar to that in the example above. The Report Description is composed of four positions using the following criteria:
- The first position: how many labels to ignore before printing is commenced. In the example there would be 5 labels missed before printing. On a 5 column wide spine label printout, printing would then start from the first label on the second line). To print on a new sheet of labels, the value would be 0.
- The second position: each line has a maximum of X characters before going to the next line (in the example, the line would be 6 characters wide).
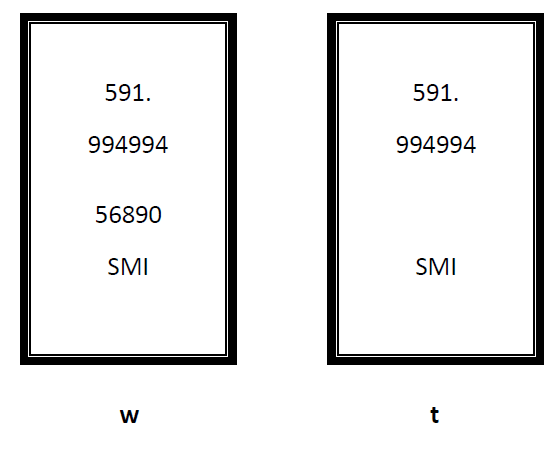
- The third position – t or w
- w: Wrap the remainder of the Call Number to the next line(s)
- t: Truncate the remainder of the Call Number
(The example will wrap the remainder to the next lines)
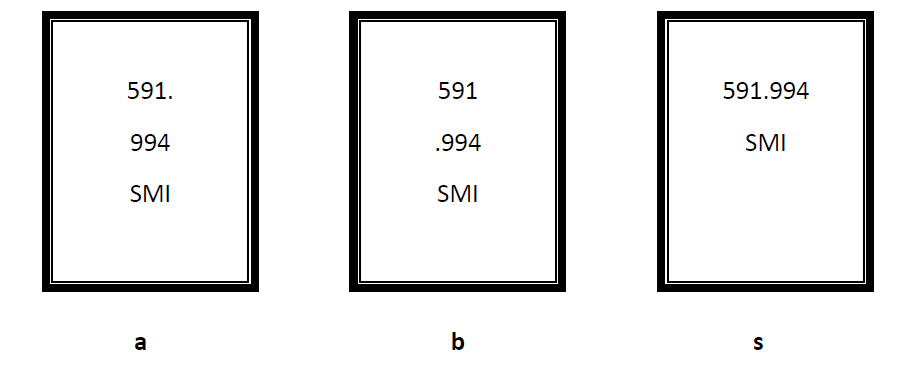
- The fourth position: a, b or s
- a: Puts a full stop at the end of the line
- b: Put a full stop at the beginning to the next line
- s: Sets the space as the break and ignores other Punctuation
- Select the F3 Save button
Once saved the line will be bolded red as the report does not have a F7 Where search. Typically this report is used only with a Saved File (therefore requiring no Where search). However, a F7 Where search of Received Date = Current Date could be used for those items received on that day only.
Wand Into File
Items can be wanded into a selected file. This is useful if you wish to use the group of items in a Report (for example: Spine Labels):
- Go to Main > StockItems > Stockitem – the Stockitem screen will display
- From the menu, select File > WandIntoFile - the Wand Into File screen will display:

- Click the F4 Select button – the Stockitem Saved Query Results table will display
- You can either use a pre-existing list file or create a new list file:
- To use a pre-existing file: select a list entry from the table and click F9 Select (click F2 Empty first if you would like to clear any pre-existing list items – look at the Qty column to ascertain this
- Alternatively, a new file can be added by: clicking on the F1 New button, typing in the Details (for example: Spine Labels) and then clicking on the F3 Save button. Then highlight the file and click on the F9 Select button.

- This will return you to the Wand Into File screen – the name of the selected list file will now appear in the Saved File: field:

- You can now start wanding in items: as each item is wanded, the Barcode and Title display in the window (they will be automatically saved into the selected Saved File)
- After all the items have been wanded close the window by clicking the[ X ] in the top right- hand corner
Run the Spine Label Report
- Go to Main > Reports > RepStockitem – the Stockitem Reports screen will display
- Locate the report you created as part of the Create a Report procedure above and highlight it
- Click the F8 View button – the Select Saved File stable will display:

- Select the File Name (that you wanded your items into) and click the OK button
- A Report - View screen will display:

- The above example, shows a report starting at the first label: Report Description = 0,6,w,a
- The following example shows a list starting at the tenth spine label: Report Description = 9,6,w,a

- Select the print button to print
Please Note: When the print button is clicked, a prompt with the following message may display: Report margins are less than printer offsets…Text may be clipped. Continue?

The message is the result of the report template having particularly narrow borders. Users should click OK button and check printouts to ensure that no clipping has occurred.
Clearing the File
After successfully printing the spine labels, the file can be emptied, ready for the next batch.
- In the Stockitem module, select File > DisplayFile from menu – the Stockitem Saved Query Results screen will display
- Highlight the SPINE LABELS file and click the F2 Empty button – a prompt with the following message will display: Are you sure you want to remove all entries from the ‘SPINE LABELS’ saved file?
- Click the Yes button
- Click the F3 Save button when complete