SMS reservation and Overdue reports
Overview
Amlib utilizes the Reports module to produce exported text files for Reservation and Overdue notifications.
The SMS mobile phone messaging system works on a ‘campaign’ basis, where a text file is exported from Amlib. The file is then sent and imported to the SMS-messaging service supplied by a third party (Talking Technologies, Telstra, etc.). The information in the export file from Amlib is used for the content of the SMS message.
The field format requirements of the templates being used will differ between SMS messaging providers – generally the file is required to be in .TXT format.
Amlib employs two SMS messaging templates (which may need to be customised fit the specifications of a particular provider)
- &RESSMS.QRP Reservations Module
- &ODSMS.QRP Circulation Module
The report templates can be used to print a report in .TXT format using the Amlib Report Scheduler. The .TXT file may saved in a local directory (for example: C:\SMS Messaging) or a network directory (for example: Q:\Library\SMS Messaging).
File transfer methods
The most effective way to share files between the two systems is to set up a Windows File Share.
A user account with appropriate permissions to read, write and delete the transfer files will need to set-up; this account will be accessed by both systems.
See Network File Sharing in Microsoft Windows for more information.
If this is not possible; the .TXT file may be emailed to the SMS messaging provider (see final section).
SMS templates
Both overdues and reservation SMS messaging employ the use of a dedicated template. In some circumstances, it may be necessary to edit these templates to adjust the content and sequencing of the fields in use to suit the specifications of the SMS messaging provider.
The templates can be found in the Amlib/Reports folder located on your Amlib server, and can be modified using RepWin30.exe (located in the Amlib/Utility/Repwin folder on your Amlib server).
The simplest method for editing these templates, is to copy them into the Amlib/Utility/Repwin folder and then drag-and-drop the template to be edited on the RepWin30.exe program file – this will cause the template to automatically open in the editor.
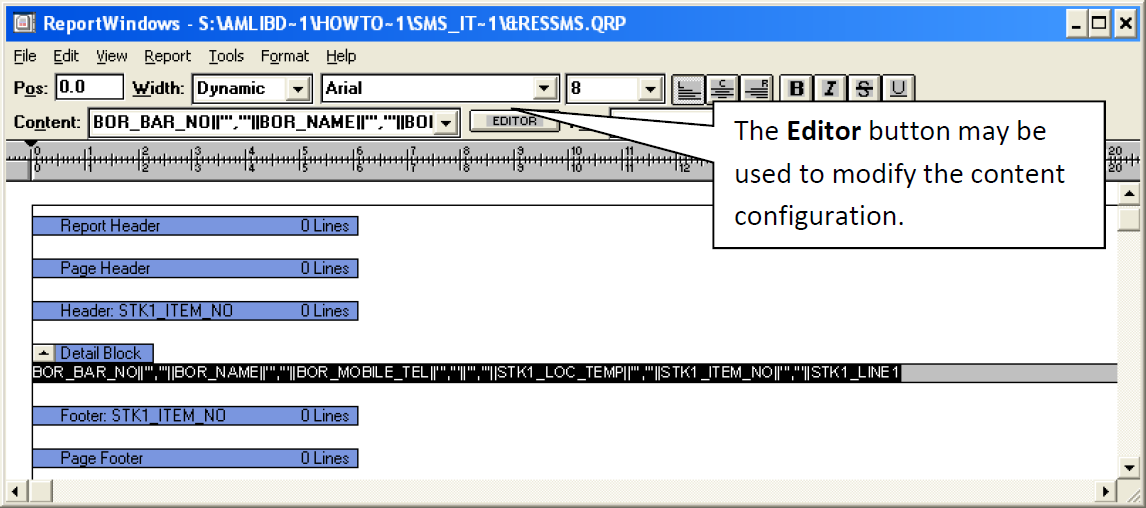
- Highlight the fields in the Detail Block and click on the Editor button to reconfigure the content and sequencing – being careful not to remove the delimination (usually “,”) necessary for creating the required .TXT files.
Reservations: &RESSMS.QRP
Overdues: &ODSMS.QRP

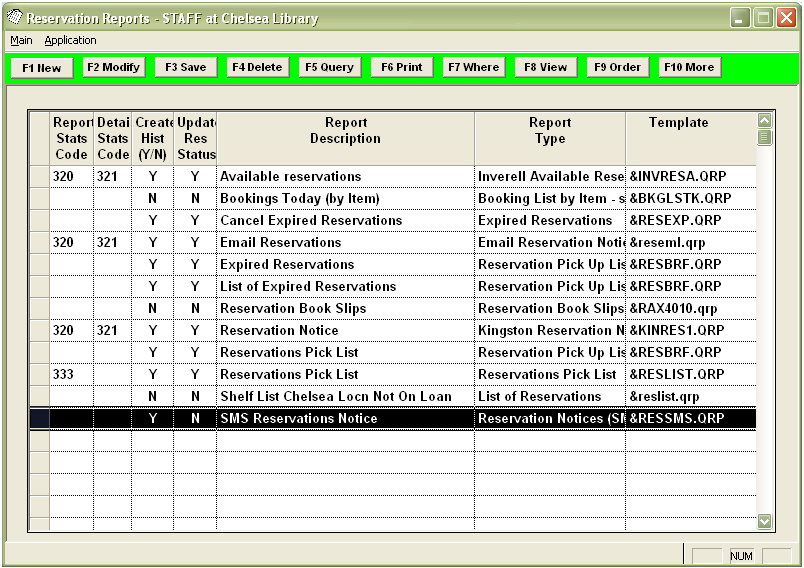
SMS reservations
The template may be saved in Amlib/Reports folder on your Amlib server or on a local drive.
Load the template
- Launch the Amlib client.
- Go to Main > Reports > RepReservation.
- From the main menu, select Application > RepAddNew.
- The Report Files window will open – ensure that the Report Entity = Reservation.
- Click the F1 New button.
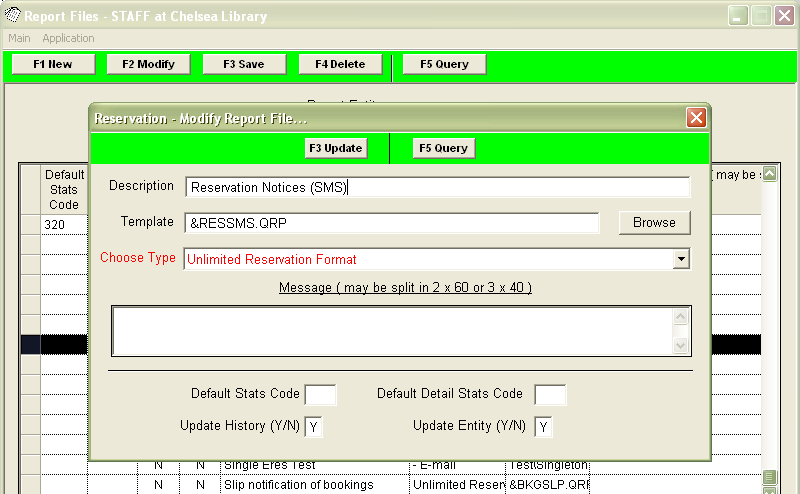
- Description = Reservation Notices (SMS).
- Browse to the Amlib/Reports folder on your Amlib Server and select the &RESSMS.QRP file (if the template has been loaded onto your PC – then navigate to the local folder).
- Click the Open button.
- Choose Type = Unlimited Reservation Format.
- Update History = Y.
- Update Entity = Y.
- Click the F3 Update button.
- Close out of the Report Files window.
The template is now loaded and available for use in a Report.
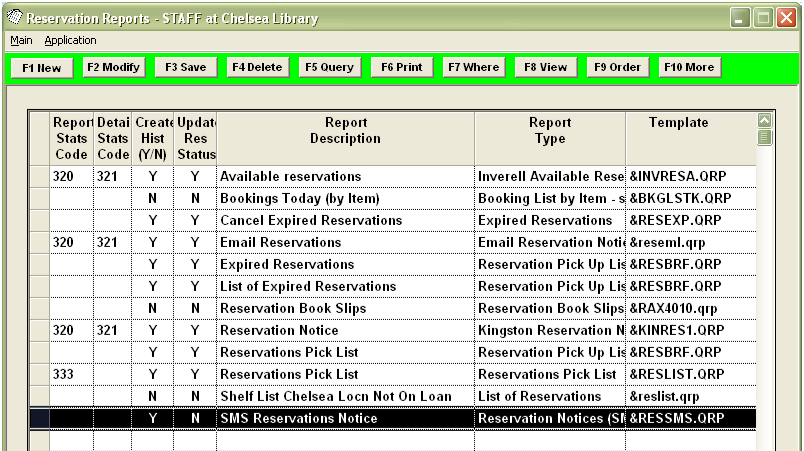
Create the report
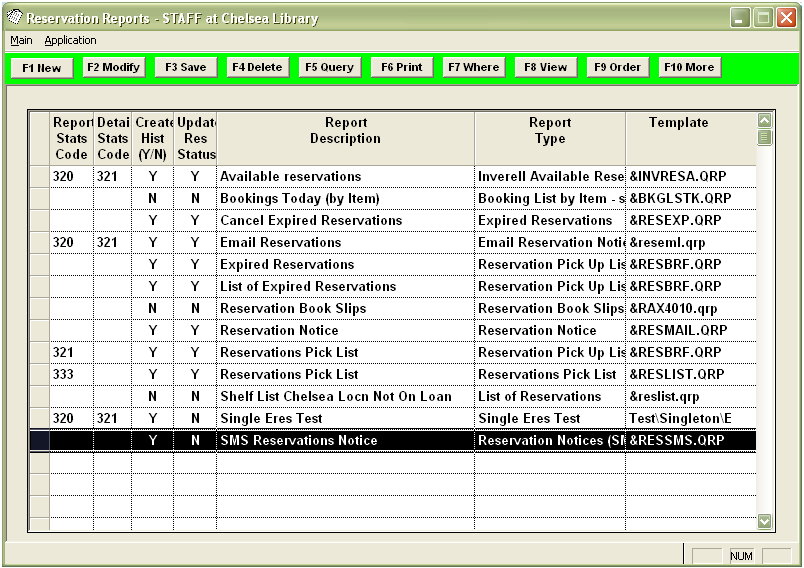
- Go to Main > Reports > RepReservation – the Reservation Reports screen will open.
- Click the F1 New button.
- Highlight Reservation Notices (SMS) and click the Select button.
- Enter a Description – for example: SMS Reservations Notices.
- Click the F3 Save Button.
Create/modify the Where statement
The ‘Where Statement’ for this report should based on the normal reservation notification report. However, with this report an additional line should be added to the ‘Where’ to ensure that it only selects the borrowers who have nominated to receive notification via SMS. Generally, borrowers without a mobile phone number should be collected in a separate reservations print run that produces paper notices.
- Highlight the SMS Reservation Notice and click the F7 Where button – the Reservation Reports – Where screen will open.
- Create the following Where conditions:
- Only Show First in Queue (Y/N) = Y (otherwise ALL reserves on an item will show).
- Res Item Status = RETURN – This status will change to PRINTED once this report is run, to prevent duplicate emails being sent.
- Bor Mobile/Cell Number IS NOT NULL (Paste without placing a value in 3).
- Bor use Mobile/Cell (Y/N) = Y.
- (Optional) Res Collect Location = Temp Loc [select using the Special button] – this ensures that the item is at the collection location).
- (Optional) Res Collect Location = (enter your location code – for example: CHELSEA) – this will limit the notices sent to items for collection at the selected location.
- Click the F3 Save button.

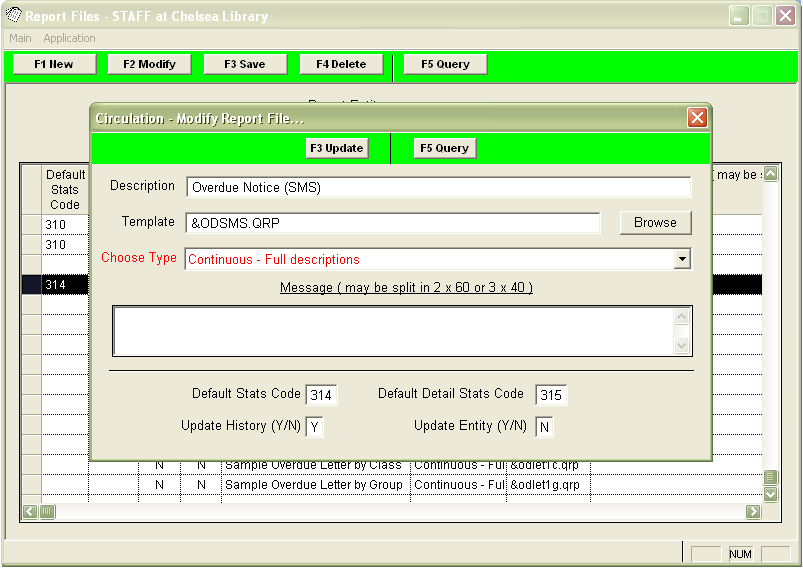
SMS Overdues
The template may be saved in Amlib/Reports folder on your Amlib server or on a local drive.
Load the template
- Open the Amlib Circulation Reports module: Main > Reports > RepCirculation.
- From the main menu, select Application > RepAddNew.
- The Report Files window will open – ensure that the Report Entity = Circulation.
- Click the F1 New button.
- Enter a Description – for example: Overdue Notice (SMS).
- Browse to the Amlib/Reports folder on your Amlib Server and select the &ODSMS.QRP file (if the template has been loaded onto your PC – then navigate to the local folder).
- Click the Open button.
- Choose Type = Continuous – Full descriptions.
- Update History = Y.
- Update Entity = N.
- Click the F3 Update button.
- Close out of the Report Files window.
- The template is now loaded and available for use in a Report.
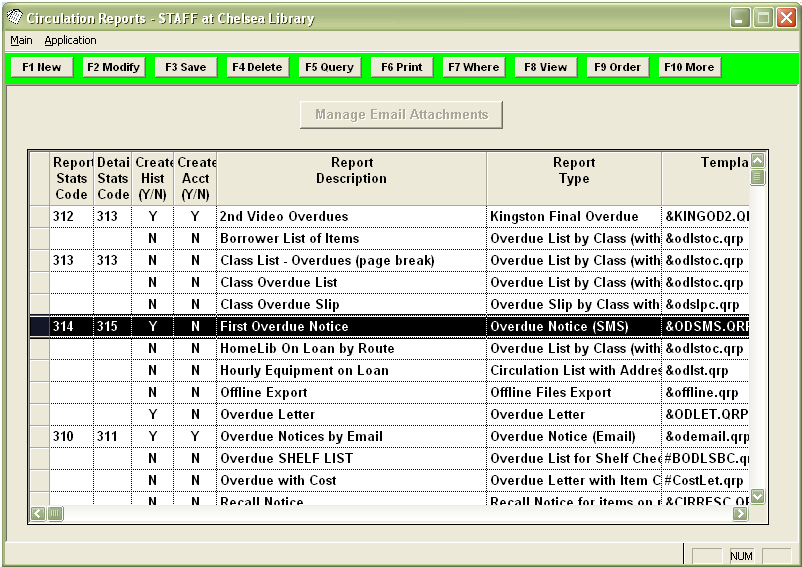
Create the report
- Go to Main > Reports > RepCirculation – the Circulation Reports screen will open.
- Click the F1 New button.
- Enter a Description – for example: SMS First Overdue Notice.
- Click the F3 Save button.
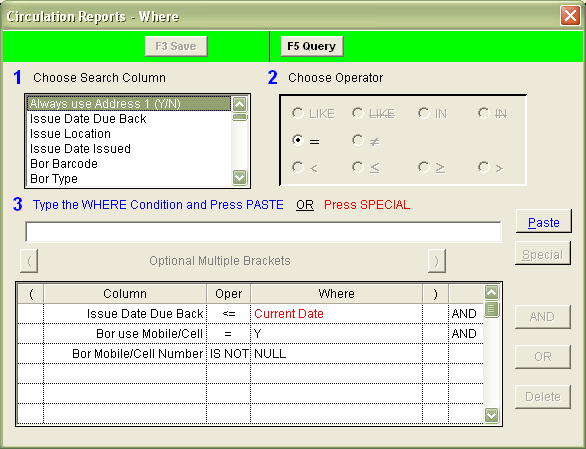
Create/modify Where statement
The ‘Where Statement’ for this report should based on the normal reservation notification report. However, with this report an additional line should be added to the ‘Where’ to ensure that it only selects the borrowers who have nominated to receive notification via SMS. Generally, borrowers without a mobile phone number should be collected in a separate reservations print run that produces paper notices.
- Highlight the SMS Overdue Notice and click the F7 Where button – the Circulation Reports – Where screen will open.
- Create the following Where conditions:
- Issue Date Due Back <= Current Date [alter as required]
- Bor use Mobile/Cell = Y
- Bor Mobile/Cell Number IS NOT NULL (Paste without placing a value in 3)
- Bor Location = <specify location code> [optional]
- Click F3 Save button.
Run the SMS Reports file (Reservations/Overdues): File sharing
If using the Windows File Sharing method to supply the required .TXT file to your SMS-messaging service, then the report will need to be scheduled to run to save the file to the specified directory.
Reports can be scheduled to run once Daily, several times Daily, or several times Weekly.
Schedule the report
- Go to Main > Reports > RepReservation or RepCirculation.
- Select the SMS Reservations Notice or SMS Overdues Notice.
- Click the F6 Print button.
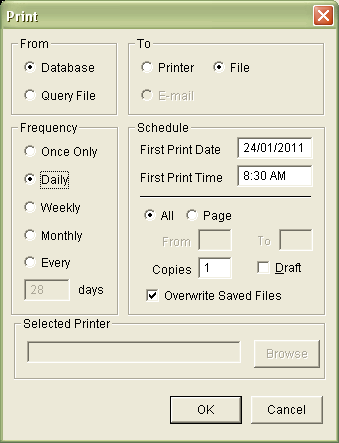
- Set the conditions as follows:
- From = Database.
- To = File.
- Frequency = Daily or Weekly (if the report is to be run only on certain days a week, select Weekly and nominate the day via the First Print Date).
- First Print Date = <set date for first scheduled occurrence – for example: 30/08/2010>.
- First Print Time = <set time for first scheduled occurrence – for example: 8:30 AM>.
- Overwrite Saved Files = ticked [the same file is then used to generate the notices].
- Click the OK button.
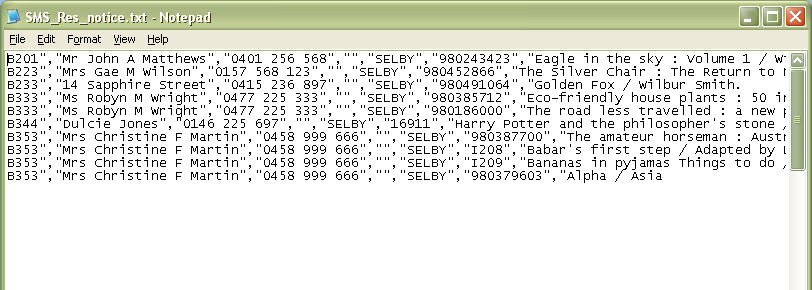
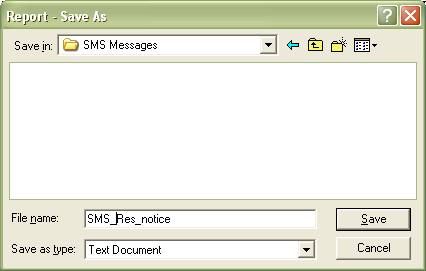
- Save the file in .TXT format (Save as type: Text Document) in the drive location to be used for file transfers (usually Windows File Sharing) – for example: C:\SMS Message, using the following file name: SMS_Res_notice or SMS_Over-notice.

- If you would like to print a report several times Daily or Weekly, repeat steps 3 – 5 with altered First Print Dates and Times).
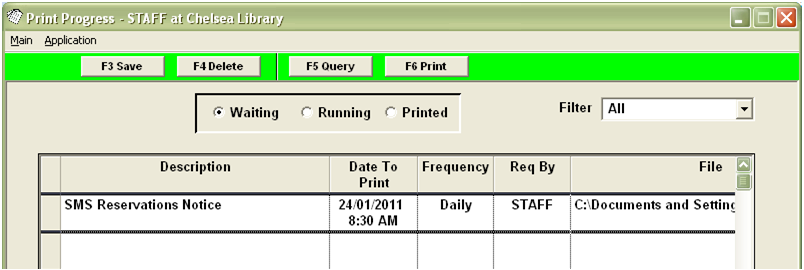
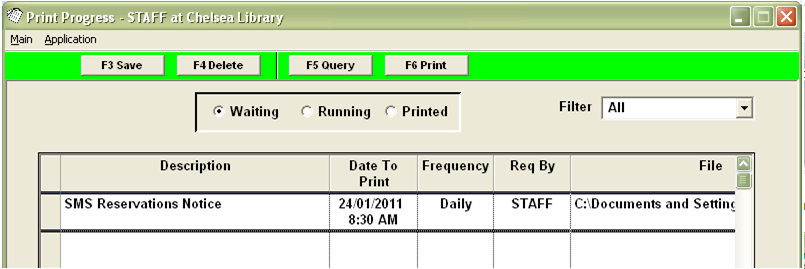
- Check Application > RepPrintProgress to ensure all reports are scheduled correctly (see example of screen below).
Start the Scheduler
- Go to Main > Reports > RepReservation or RepCirculation.
- From the main menu, select Application > RepStartSchedule.
- You must check both Save to File and E-mail.
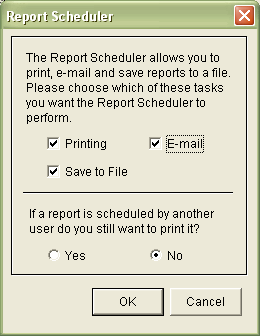
- Click on the OK button.
- When the scheduled report run is complete the following text file will be available to be transferred to the SMS-Messaging provider for further processing.
Note: Please ensure that the Scheduler is started PRIOR to the printing time – otherwise the report will not print.

Run the SMS Reports file (Reservations/Overdue): Email
If you are required to supply the SMS-messaging service with your SMS report via email, the email can be sent from directly within the system as an attachment.
The process is similar to that in the previous section, however, the email specifications for the SMS-messaging service must also be provided.
Supervisor parameters
- Launch the Amlib client.
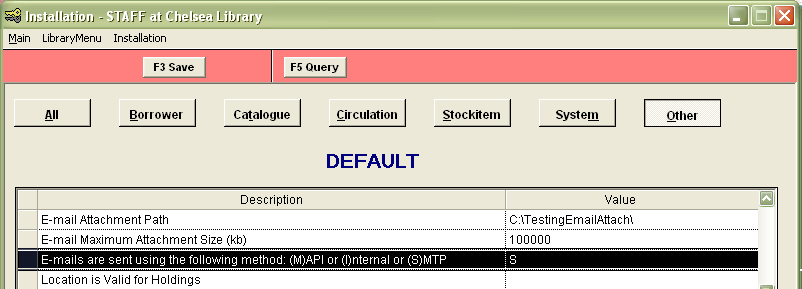
- Go to Main > Supervisor > Installation – the Default Installation screen will open.
- Select the Other tab.
- Scroll down set the following: E-mails are sent using the following method: (M)API or (I)nternal or (S)MTP. Set to S, I, or M.
Generally (S) SMTP is recommended, especially as it is simple and it has advantages over the others. It also means that the email client does not need to be open on the PC running the notices and allows greater flexibility with regard to setting up “from” and BCC/CC parameters.
Then the following parameters should also be set (a full table is included below):- SMTP Blind Carbon Copy e-mail address: you can specify the BCC address to send a copy of all notices (so that you can verify that they have been sent).
- SMTP sender e-mail address: the email address to display on the notice sent to the borrower (For example: enquiries@amlib.com.au, it can be the same as the BCC address).
- SMTP Server name: the address of the SMTP mail server being used. This might be a server address or an IP address.
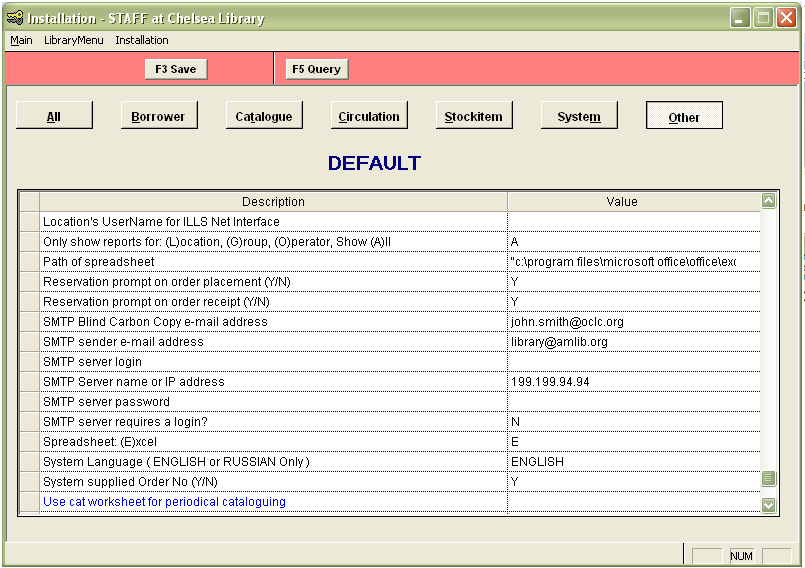
- Click the F3 Save button.
- Once complete, you must exit and reopen the Amlib client to allow the settings to take effect.
The complete set of parameters to consider:
| description | explanation | example |
|---|---|---|
| Emails are sent using the following methods (M)API, (I)nternal or SMTP | Generally (S) SMTP is recommended, especially if the organisation is not using a Microsoft Exchange Server. It also means that the email client does not need to be open on the PC running the notices AND can display the “from” name from one of the parameters below rather than the email address from the email client. | Set to S, I, or M |
| SMTP Blind Copy e-mail address | Optional: If using the SMTP for emails. Enter only if copies of the email are to sent to a chosen email address – for example: Testing purposes | library@amlib.com |
| SMTP sender e-mail address | Optional: If using the SMTP for emails, enter the Address you wish to indicate as the sender | enquiries@amlib.com.au |
| SMTP server login | Optional: From your Systems Administrator if required | |
| SMTP Server name or IP address | If using the SMTP for emails, enter the Server Name or IP Address of the Server installed with the e-mail communication protocol, responsible for receiving and forwarding email messages | ServerName – for example: server.amlib.com.au |
| SMTP server password | Optional: From your systems administrator if required | |
| SMTP server requires a login? | If Y, supply a SMTP server logon and password If N, leave SMTP server logon and password blank |
Y/N |
The above tasks create Sender and BCC for ALL emails generated by the system. However, it is possible to set up separate SMTP parameters (Sender and CC) for individual locations, modules and reports.
Set up individual email systems by location
- In any Installation screen module, select Installation > Choose Location and choose a Location.
- Repeats steps 2-5 above. If you would like to use the Default settings, then the relevant fields for each location should be left blank.
- Once complete, you must exit and reopen the Amlib client to allow the settings to take effect.
Set up individual email locations, modules, and reports
We recommend leaving the email set-up for particular locations until after initial testing has been completed. Once the initial testing has been done, then:
- In any Supervisor module, select Library Menu > LocRepSMTP – the SMTP Parameters by Location table will open.
- Select the F1 New or F2 Insert button.
- Using the drop-down boxes available in each column, select the Location, Report Screen, and Report Type.
- Then type in the individual Sender’s Email and Carbon Copy Email addresses.
- Click the F3 Save button when complete.
- Once complete, you must exit and reopen the Amlib client to allow the settings to take effect.
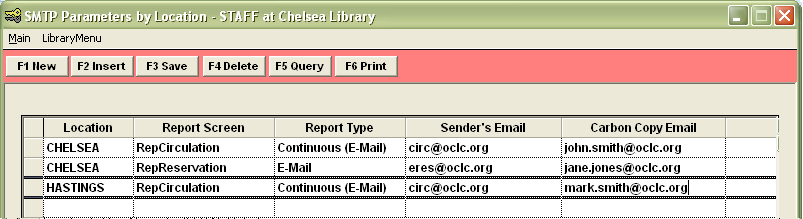
Note: It is not possible to alter a pre-existing entry in the SMTP Parameters by Location table – entries must be deleted (using F4 Delete) and then re-entered.
Set up SMS-messaging service parameters
- Go to Main > Reports > RepReservation or RepCirculation.
- Select the SMS Reservations Notice or SMS Overdues Notice.
- Click the F10 More button – the More screen will open.
- Click the F1 New button.
- Enter the following parameters:
Note: Since Lines 1 and 2 are already used for other reporting purposes, the email function uses Line 3.
column header comment 1 Report Line Number Always 3 2 SMS Always SMS 3 SMS Message Message body – becomes the message in the email (50 chars) 4 Email Address The email address of the SMS-messaging service (50 chars) 5 Delete File After Sending - Y or N
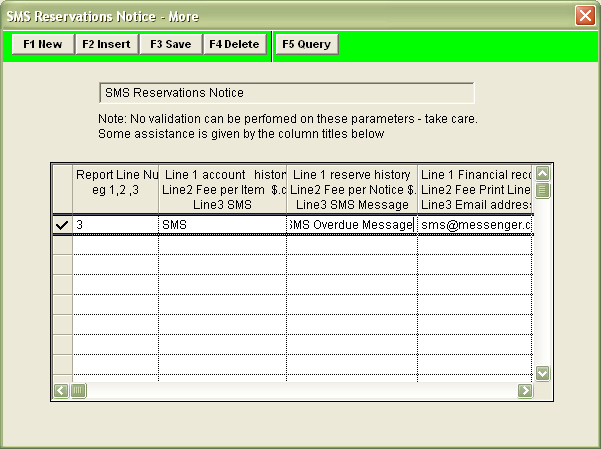
- Click the F3 Save button when complete.
- Click on the F6 Print button.
- Set the conditions as follows:
- From = Database
- To = File
- Frequency = Daily or Weekly (if the report is to be run only on certain days a week, select Weekly and nominate the day via the First Print Date).
- First Print Date = <set date for first scheduled occurrence – for example: 30/08/2010>.
- First Print Time = <set time for first scheduled occurrence – for example: 8:30 AM>.
- Overwrite Saved Files = ticked [the same file is then used to generate the notices].
- Click the OK button.

- Save as type: Text Document to a specified drive location – for example: C:\SMS Message, using the following file name: SMS_Res_notice or SMS_Over-notice. (A copy of the file will be saved here, unless the Column 5 was set to Delete the File at Step 5 above.
- If you would like to print a report several times Daily or Weekly, repeat steps 3 – 5 with altered First Print Dates and Times).
- Check Application > RepPrintProgress to ensure all reports are scheduled correctly (see example of screen below).
Start the Scheduler
- Go to Main > Reports > RepReservation or RepCirculation.
- From the main menu, select Application > RepStartSchedule.
- You must check both Save to File and E-mail.

- Click the OK button.
- When the scheduled report run is complete the following text file will be emailed to the SMS-Messaging provider for further processing.
Note: Please ensure that the Scheduler is started PRIOR to the printing time – otherwise the report will not print.