
Where can I add or remove shelving locations?
Applies to
- WorldCat Discovery
- WorldShare Circulation
Answer
The Steps for updating/deleting Shelving Locations are:
- Login to the OCLC Service Configuration Module.
- Click WorldCat Discovery and WorldCat Local.
- Click Holding Codes & Shelving Location Messages.
- Click the blue information icon to read the information there. If at any time you are not sure if you have made an error click the Cancel button at the bottom of the page and start again.
In the example below we are editing the shelving locations in the MAIN location/branch.
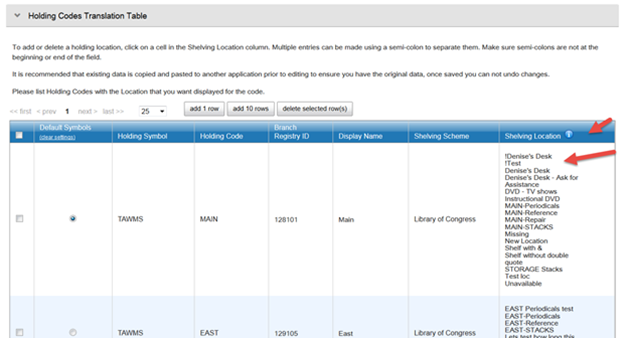
- It is recommended that you save a copy of the table as is before you do any editing.
- To save a copy click inside the Shelving Location column in the Holding Location you are working with.
- Right click in the blue area and copy this information into your computers clipboard.
- Open Notepad or another editor that does not add any kind of formatting when you save.
- Paste the contents of this shelving location into the document and save it where you can find it again.
- To edit the shelving locations file use semi-colon ; and a space to separate the shelving locations.
- Do not start or end your list with a semi-colon. This can cause issues with display of availability in WorldCat Discovery.
- If you wish to keep a copy of the new list save and name accordingly.
- Then paste the new list into the shelving location column of the location/branch you are working with.
- Click Save Changes at the bottom of the page.
Note: Once you create a location here it will be available to select in WorldShare Management Circulation (it can take several minutes to be active).
Additional Steps to Take:
Verify that the appropriate loan policy exists for the new shelving location.
- Click on WMS Circulation in the middle of the navigation menu of the Service Configuration Module.
- Click on the Loan Policy option in the WorldShare Circulation list.
- Click on Loans > Loan Policy and verify that the loan policy you want assigned to the new shelf exists.
- Click Create New in the upper right hand corner to create and save a new policy if needed. Please see Loan Policy for more information regarding loan policy set up.
- Click on WMS Circulation > Loans > Loan Policy Map.
- Add lines to the Loan Policy Map to pick up loans for the new shelving location in order to route them to the correct loan policy. Please see Loan Policy Map for more information on these settings.
- Click on the Save button to save your changes to the Loan Policy Map.
Note: It is important to remember that the Loan Policy Map is read from left to right and top to bottom by the system. When you add new lines, in general, you want the more restrictive rules closer to the top.
Additional information
How do I remove a branch location from our WMS?