Advanced Lending
The Advanced Lending feature provides four additional queues within the Lending workflow:
- Verifying
- Retrieving
- Scanning
- Packaging
Once Advanced Lending is enabled, you will have access to the four queues, which appear under the Considering queues and act as minor queues (if you use Document Delivery they act as minor queues of the In Progress queue). You can move requests through the queues as you process them prior to responding. Advanced Lending can be useful if your library processes high volumes of requests from other libraries or has different staff members responsible for different steps in the lending process.
When Advanced Lending is enabled:
- Requests will not be automatically moved into or between the queues.
- Library staff must manually move requests into a queue either when processing an individual request or using batch processing.
- The Advanced Lending feature does not affect request aging or Days to Respond.
- Requests that have aged from your library and go on to the next lender will be automatically removed from the queue they were in.
- The four queues will also be visible under Lending Priorities and Document Delivery if you have these features enabled.
When enabled, the Advance Lending queues appear on the left navigation and on the Tipasa Home under Quick Links.
Set up Advanced Lending
Before you can use the Advanced Lending queues, you must enable the Advanced Lending feature in OCLC Service Configuration. Note: If you have also enabled Document Delivery and/or Lending Priorities, you will see the Advanced Lending queues in the Document Delivery and/or Lending Priorities queues.
To enable Advanced Lending:
- Sign in to Service Configuration.
- On the left navigation, click WorldShare ILL > Advanced Workflows.
- On the Advanced Workflows screen, under Advanced Lending, select the On check box to enable Advanced Lending.
- Click Save.
- Once you have enabled Advanced Lending, the queues will be available in Tipasa.
Advanced Lending workflow
Enabling Advanced Lending adds four new queues to Lending Requests: Verifying, Retrieving, Scanning, and Packaging. The four queues act as minor queues of the Considering queue (if you use Document Delivery, they act as minor queues of the In Progress queue). It is important for your library to determine how staff will be using the queues for processing copies and loans when implementing this feature.
Library workflow example
This workflow illustrates one way the Advanced Lending queues can be used. You can use the queues to facilitate your own library's procedures. Requests do not have to go through every Advanced Lending queue before you respond to the request and can move around between the queues in any order.
Library A has a full-time interlibrary loan librarian and one student worker. Their workflow consists of the following:
- In the morning, the librarian marks all new lending requests as Verifying. The librarian works through the Verifying requests they placed in the queue by adding all location and call number information in the Local ID and confirming payment and shipping options. They also respond conditionally to any requests placed in the queue, if needed. As the librarian finishes with the requests, they mark the requests as Retrieving.
- When the student worker arrives, they start working on the Retrieving queue.
- The student worker uses the Print Book Straps/Stickers option (this can be done individually or through batch processing) to use the previously added location and call number information to retrieve the items in the queue.
- Once the items have been retrieved, they are marked as Scanning for copy requests and Packaging for loan requests.
- The student worker scans the requests in the Scanning queue (into PDF, TIFF, or JPEG files) and attaches them using Article Exchange. The student worker responds Yes to the requests and completes the workflow for copies.
- The student worker prints the book straps and labels for requests in the Packaging queue. As items are packaged and labeled, the student worker responds Yes to the requests (this can be done individually or through batch processing).
- After responding Yes to requests, the requests move out of the Advanced Lending queues and into Supplied.
Note: If the borrowing library has the lender marked as a Proven Sender for copies, the supplied request will be quickly Received and Closed and will not appear in the lender's Supplied queue.
Advanced Lending considerations
Your library should establish expectations regarding who is responsible for marking requests and moving them into the next queue. For example, if a student worker is working on the requests in the Retrieving queue and is in the process of removing items from the shelf, you may not want to add more requests to the Retrieving queue until the student worker is ready to process additional items.
Large interlibrary loan departments should also consider using the Lending Priorities feature with Advanced Lending. This would allow your department to have library staff responsible for a specific group of borrowers (e.g., a consortium). When Lending Priorities is enabled, lending requests from the group can be processed in their own Advanced Lending queues under the Lending Priorities section of the left navigation (or can be viewed with other requests under Lending Requests).
Move Requests into an Advanced Lending queue
Requests will not be moved into the Advanced Lending queues (Verifying, Retrieving, Scanning, and Packaging) until marked by library staff. Requests can be moved into an Advanced Lending queue individually or through batch processing.
Individual requests
You can individually mark requests as Considering, Verifying, Retrieving, Scanning, or Packaging.
To move a request into an Advanced Lending queue:
- On the left navigation, under Lending Requests, click Can You Supply?.
- On the Can You Supply? screen, click the request ID or Title to display the request.
- Process the request as normal.
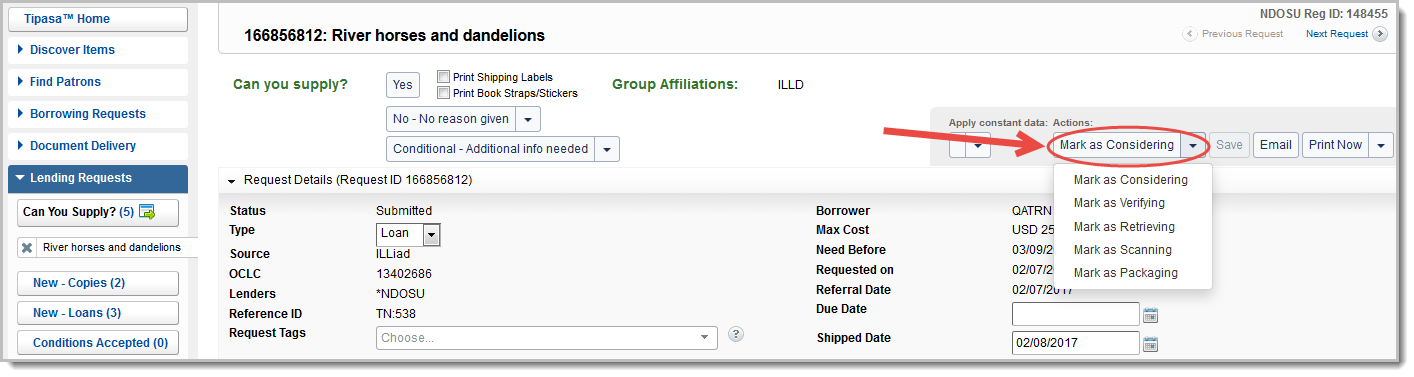
- On the upper right side of the screen, under Actions, click the down arrow to expand the list.
- Select what you want to mark the request as (Considering, Verifying, Retrieving, Scanning, or Packaging).
- The request's status is updated based on what you selected and is moved to the respective queue.
Batch processing
You can also use batch processing to mark a request as Considering, Verifying, Retrieving, Scanning, or Packaging.

To use batch processing to move requests into an Advanced Lending queue:
- On the left navigation, under Lending Requests, click Can You Supply?. Alternatively, you can perform batch processing from any lending queue that contains the batch icon (
 ) in the left navigation.
 - On the Can You Supply? screen, click Considering, Verifying, Retrieving, Scanning, or Packaging.
- A table appears with the batch processing fields.
- Optional:
- Add Constant Data to the lending requests by clicking the drop-down under Apply constant data and selecting your desired Constant Data record.
- Send batches of requests to print queues for Shipping Labels and Book Straps/Stickers by clicking on the corresponding boxes under Options.
- In the request ID field, scan or type the request ID, or click the plus sign (
 ) in the table below to add a request.
 - Based on the batch process you are performing, click Considering, Verifying, Retrieving, Scanning, or Packaging to apply the status to all of the items you entered in the table.
- The requests' statuses are updated and moved to the respective queue.