Notifications
Tipasa offers the ability for libraries to send automated notifications to patrons at various events in the request life span, and also the option to send notices about a specific request at any time while using the staff user interface. Automated notifications to patrons will be sent via email and/or Short Message Service (SMS), depending on the patron's preferences.
A total of 28 event-specific notifications are available in OCLC Service Configuration which can be customized by your library to include your ILL name, department email address, and contact information. In addition to customizing the event-specific "standard" notifications, your library can create as many as 50 "custom" notifications, all of which can be emailed to the desired recipient using the staff user interface.
Notes:
- By default, patrons will receive email messages.
- Text message notifications are turned off by default. To enable the ability to send SMS notifications for patrons, turn on Send SMS for Notifications.
- Enable Send SMS for automated notifications to display text message options to library users in the View Profile section of My Account. Library users will need to opt into SMS notifications from the View Profile screen.
- It is recommended that libraries outside the United States and Canada do not enable SMS notifications.
- Add the Phone field to your Request Forms to allow patrons to receive SMS notifications for their requests. See Request Form fields for more information.
Set up Notifications
Notifications are set up in OCLC Service Configuration. By default, no notifications are turned on. There are 28 event-specific notifications you can configure, in addition to 50 custom notifications.
You can turn SMS notifications off or on by checking the Send SMS for automated notifications box. Enable Send SMS for automated notifications to display text message options to library users in the View Profile section of My Account. Library users will need to opt into SMS notifications from the View Profile screen.
- If Send SMS for automated notifications is not enabled, text message options will not display to library users in My Account.
Note: It is recommended that libraries outside the United States and Canada do not enable SMS notifications.
You can select notifications to appear in the Tipasa interface for manual sending and/or for them to be automatically sent out when an action occurs within the system. Not all notifications allow for automated sending. For a description of all notifications and when automated notifications are sent out, see Notification types. Notifications can be sent to patrons as email and/or SMS messages, depending on what they have selected in My Account.
- Notifications - Image
-

Determine notifications to send
You should review the Notification types and decide which notifications you want to enable before configuring the notifications. You will have to customize each notification with your library's information. There is no way to batch edit notifications.
Libraries using WorldShare Circulation should work with their circulation department to evaluate the library's circulation notification policy and determine whether to use notifications from WorldShare Circulation or from Tipasa. This will prevent patrons from receiving multiple notifications for items about to be due, overdue or available for pickup.
Configure notifications
Once you have decided on the notifications your library will use, you can begin customizing each notification.
To set up notifications:
- Sign in to Service Configuration.
- On the left navigation, click WorldShare ILL > Notifications.
- On the Notifications screen, for every notification you want to turn on:
- In the row of the notification, click Edit.
- Fill in the fields with your library's information. You should customize your notifications in order for your patrons to recognize the notification is coming from your library. See Edit email and SMS notifications for details.
- Click Save All Changes.
- A confirmation message appears. Click Click to edit if you want to make any additional changes.
- Optional. To preview the email and SMS notification, click Preview in the row of the notification you want to preview.
- Optional. To test the email or SMS notification:
- Click Send Test Email or Send Test SMS in the row of the notification you want to test.
- Enter the Recipient Email or Recipient Phone Number, respectively.
- Click Send.
- For every notification you want to turn on, select the Manual sending in WorldShare check box and/or the Automated check box.
- At the bottom of the screen, click Save.
Notification History
Automated notifications for a request are tracked in a Notification Log.
To view the Notification Log:
- Locate the request you need to review in the Borrowing Requests queue.
- Click on the request ID or Title.
- Expand the Request History accordion.
Note: It may take several minutes for the Notification Log to update after a notification is sent.
- Request History - Image
-

Edit and send notifications
Every notification has a default template. You should customize each notification with your library's information in order for your patrons to recognize the notification is coming from your library. On the Edit screen for a notification, you can edit the email and SMS message templates.
Edit email notification template
Follow the instructions below to edit an email notification template.
To edit an email notification:
- In Service Configuration, on the left navigation, click WorldShare ILL > Notifications.
- On the Notifications screen, find the notification you want to edit. See Notification types for more information on the different notifications you can send.
- In the row of the notification, click Edit.
- On the Edit screen, edit the fields. Refer to Email fields below for more information.
- To represent information from the request, use Data Inserts. Place your cursor where you want to add the Data Insert, and click the Data Insert you want to add. For descriptions of all the Data Inserts, see Notification data inserts.
- At the bottom of the screen, click Save All Changes.
- If you are unhappy with your edits, you can revert to the default template at any time by clicking Reset to Standard. Note: This will revert both the email and SMS notification (if applicable).
To create a custom email notification:
- In Service Configuration, on the left navigation, click WorldShare ILL > Notifications.
- Open the Customaccordion and click "Create New Custom Notification".
- In the Create New Template window, type a Template Name.
- (Optional). Add a description of the template in the Template Description text box.
- Select a Recipient type.
- Click Create.
- The new template will now display below the Custom category and can be edited.
Email fields
You can edit the following fields for email notifications:
| Email field | Description |
|---|---|
| From Name | The sender of the email notification. You should enter your library's name, department, or service name (e.g. Bobcat Document Delivery) in this field. You do not have to use the same From Name on each notification. For example, you can use a different from name on your interlibrary loan request notifications than your Document Delivery notifications. |
| Reply To Email |
The email address patrons can reply to if they have any questions about their request or need more information. The OCLC-supplied email in the templates is not a monitored email. If you leave the default OCLC email in the Reply To Email field, patrons that reply to that email will not receive a response. If you want patrons to be able to email your library and receive responses, you should enter a monitored email for your library. |
| Message Subject | The subject of the email notification. |
| Message Body | The body of the email notification. |
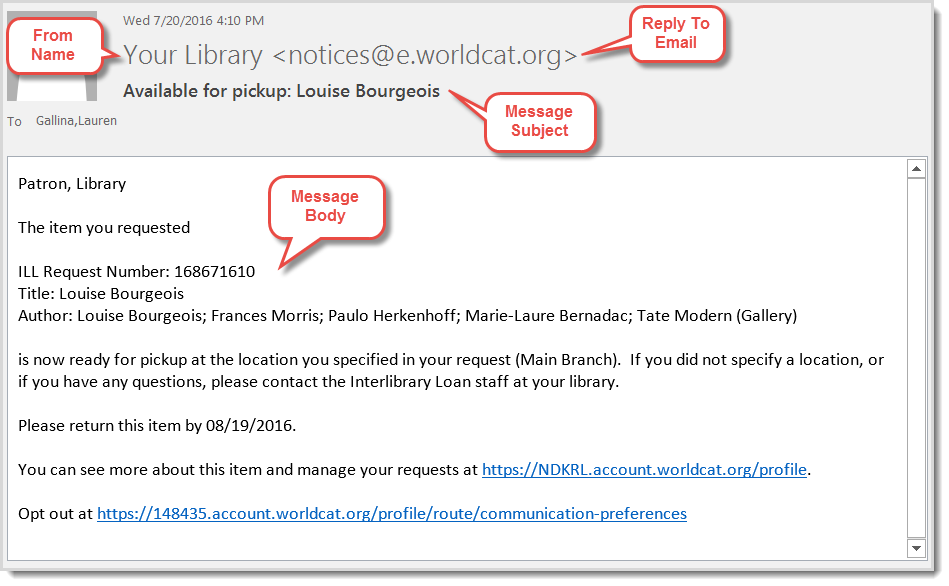
How an email appears to your patrons
The following image depicts how an email notification will appear to patrons:
Edit SMS notification
Follow the instructions below to edit an SMS notification template. Note: Only automated notifications have SMS as an option.
To edit an SMS notification:
- In Service Configuration, on the left navigation, click WorldShare ILL > Notifications.
- On the Notifications screen, find the notification you want to edit. See Notification types for more information on the different notifications you can send.
- In the row of the notification, click Edit.
- On the Edit screen, scroll down to the SMS field.
- Edit the text in the SMS field. OCLC recommends limiting the notification to 160 characters and including the Request ID data insert in the message.
- To represent information from the request, use Data Inserts. Place your cursor where you want to add the Data Insert, and click the Data Insert you want to add. For descriptions of all the Data Inserts, see Notification data inserts.
- At the bottom of the screen, click Save All Changes.
- If you are unhappy with your edits, you can revert to the default template at any time by clicking Reset to Standard. Note: This will revert both the email and SMS notification (if applicable).
Preview your edits
You can preview your edits from the Notifications screen. When you preview a notification, it will show you both the email version and the SMS version.
To preview edits:
- In the row for the notification you want to preview, click Preview.
- The Preview Notification screen opens in a new tab.
The preview notification will include a default data insert for My Account of http://mylib.account.worldcat.org/account. This is not indicative of the link that will appear on real notifications sent from Tipasa, which will include your library's My Account URL.
If you send a test email or test SMS from within Service Configuration, it will include the http://mylib.account.worldcat.org/account URL. If you want to see exactly how your notifications will appear to your patrons, send a notification from within Tipasa.
Send a manual notification
If you have enabled manual notifications, you can send these at any time in the Tipasa interface. Any notifications you have enabled as Manual sending in WorldShare interface will be available to send.
Note: Depending on the request, the list of templates enabled for manual sending will be pre-filtered:
- Borrowing Library to Patron - These notifications are available when viewing an interlibrary request as a Borrower. The To Email defaults to the patron's email.
- Lending Library to Borrowing Library - These notifications are available when viewing an interlibrary loan request as a Lender. The To Email must be entered.
- Document Delivery Library to Patron - These notifications are available when viewing a Document Delivery request. The To Email defaults to the patron's email.
- Other - The Full Request Details (the default Tipasa template) and the Custom notifications are always available. The To Email must be entered.
To send a manual notification:
- In the Tipasa interface, locate the request you want to send a notification about.
- Open the request and click Email.
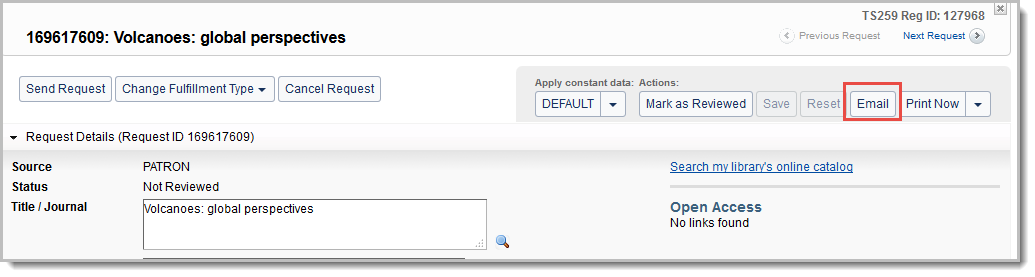
- On the Send Message window, click Choose a template.
- All applicable notifications that you have enabled for Manual sending in the WorldShare interface will appear in the list. Standard notifications appear first (in order of the workflow), followed by custom notifications (in alphabetical order). Select the notification you want to send.
- The message information is populated with the customized data you supplied for the notification in Service Configuration.
- You can edit the message and add any information you want before sending the notification.
- Click Send.
Note: Sending a manual notification will not override automated notifications. If a manual notification is sent to alert the patron of an event, the system will also automatically generate a notification to the patron when the status of the item changes.
Troubleshoot notifications
The notifications that are sent to patrons are collected into the Notification Log that appears in the Request History accordion of a request. The Log records all manual and automated notifications sent about the request, including details on when they were sent, how they were sent, and their status. The notification name is linked to the text of the message that was sent or attempted to be sent. You can resend any of the email notifications listed in the log by clicking Resend. SMS notifications cannot be resent. My Account also shows the notifications that were successfully delivered, but patrons cannot view the content of the notifications that were sent to them. See My Account for more information.
Notification status
The notification status in the Notification Log indicates whether any errors occurred while sending the notification or if it was successfully delivered. The following table includes all statuses that can occur and how to proceed if you see the status in the Notification Log:
| Status | What to do? |
|---|---|
| Duplicate message | The system does not allow more than one message with the exact same content to be sent to the same user within an hour. OCLC recommends that you customize your email and SMS notification templates so that each notification contains unique information (such as the requested item's Title or Request ID). For information on customizing your notification, see Edit email and SMS notifications. |
| Failed to parse the template | Sign in to Service Configuration (WorldShare ILL > Notifications) and preview the notification template. Correct any errors you find. See Edit email and SMS notifications for details. |
| Incomplete contact information for patron | Check the patron's account and notification preferences and verify they have a valid email address and phone number with country code listed. |
| Message delivered | The notification was successfully delivered to the recipient. |
|
Missing or invalid field(s) |
Verify that the required fields are present in the notification and resend the request manually. |
| Outdated message; cancelled |
You may receive this status if you have first enabled overdue notifications and have requests that meet the criteria for the first, second, and third item overdue notices at the same time. In this case, the system will only send out the latest (third overdue) notification. The first and second overdue notifications will not be sent out, and they will appear in the Notification Log as outdated. Additionally, if you were using the second overdue notice, and you turned it off, for example, any notifications that were queued up for future sending would be canceled. For a list of all available notifications, see Notification types. |
| SMS messaging not supported for country | SMS notifications for the country is not supported at this time. Only phone numbers with a country code of +1 (United States and Canada) can receive SMS notifications. |
| A system error has occurred | Depending on why there was a system error, you can attempt to resend the notification. If the problem persists, and occurs on multiple notifications and the notification cannot be resent, contact OCLC Support . |
| Unable to deliver to mail address | Check if the patron has entered a valid email address. You should check: the request, the Delivery Notification section in the patron's account, and the Library Record section in the patron's account. It may also mean that the email was sent to the email domain, but the patron's email address was not found. |
| Unable to deliver: mailbox full | The email domain has responded that the patron's inbox is full. Contact the patron using a method other than email. |
Email notifications delivered to spam or junk folder
If you are using the OCLC-supplied Reply To Email, you may need to whitelist this address to prevent Tipasa notifications from appearing in your patron's spam or junk folder. To do so, please see the information below:
| Data Center | OCLC-supplied email address | IP Address |
|---|---|---|
| United States Data Center | notices@e.worldcat.org | 129.33.239.222 |
| Australia Data Center Canada Data Center Europe Data Center |
notices@e2.worldcat.org | 208.73.7.73 |
Custom notifications
Tipasa libraries can create up to 50 custom email notifications. Custom notifications are used to communicate with patrons, departments within their library or other libraries.
For example, the library might create custom notifications for patrons, to explain why a request has been canceled or to alert them of fines on their account, to suggest that Acquisitions purchase an item requested on ILL, or to notify other libraries about the status of specific requests.
- Custom notifications - Image
-
To create a custom email notification:
After a custom email notification has been added, you will need to sign in to the Tipasa staff interface again for the new notification to appear.
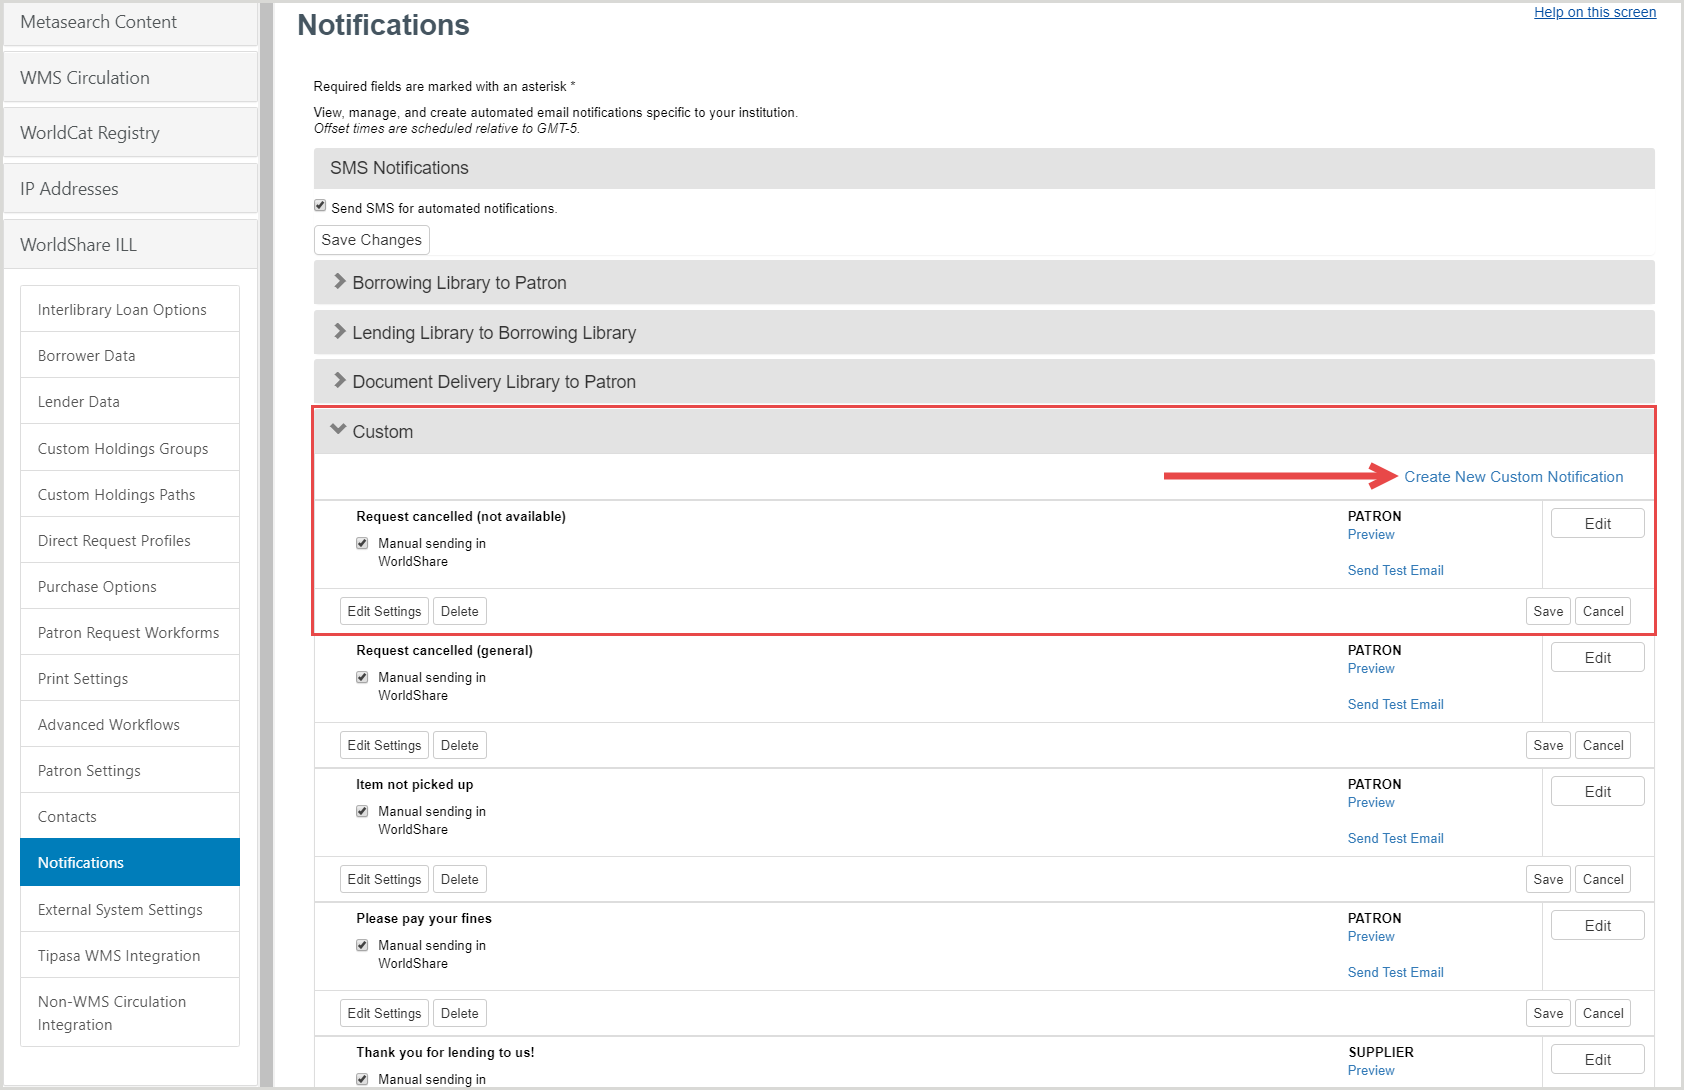
- In Service Configuration, navigate to WorldShare ILL > Notifications.
- Open the Custom accordion and click Create New Custom Notification.
- In the Create New Template window, type a Template Name.
- (Optional). Add a description of the template in the Template Description text box.
- Select a Recipient type. This will indicate to the system from which queues the notification will be available to select:
- ANY: Send to patrons, borrowing libraries and lending libraries
- PATRON: Send to patrons
- REQUESTER: Send to borrowing libraries
- SUPPLIER: Send to lending libraries
- BRANCH: Send to branch locations
- Click Create.
- The new template will now display below the Custom category.
- Check the Manual sending in WorldShare box so that the notification will be available to select in Tipasa.
- Click Edit and provide the information for the following fields:
- From Name: The sender of the email notification. You should enter your library's name, department, or service name (e.g. Bobcat Document Delivery) in this field. You do not have to use the same From Name on each notification. For Example, you can use a different from name on your interlibrary loan request notifications than your Document Delivery notifications.
- Reply to Email: The email address patrons can reply to if they have any questions about their request or need more information. The OCLC-supplied email in the templates (notices@e.worldcat.org) is not a monitored email. If you leave the default OCLC email in the Reply To Email field, patrons that reply to that email will not receive a response. If you want patrons to be able to email your library and receive responses, you should enter a monitored email for your library.
- Message Subject: The subject of the email notification.
- Message Body: The body of the email notification.
Data inserts can be used to customize the message.
SMS messaging is not available for custom notifications. Leave the default message in the SMS box.
- Click Save All Changes. The custom notification is available to send as a manual notification.
- (Optional) Preview your edits.
- Use the Edit Settings button to change the template name, description and recipient type. To delete a custom notification click the Delete button.
Notification types
Use custom notifications that you can set up in Service Configuration:
Borrowing Library to Patron
| Notification type | Description |
Manual sending? (Email only) |
Auto sending? (Email/SMS)
|
Auto message sent out |
|---|---|---|---|---|
| Newly registered user approved |
Patron account has been approved for ILL requesting. This notification only applies if you have patron approval turned on. See Turn on patron approval for more information. |
Ja
|
Ja |
When the patron is approved by a staff member in the Tipasa interface. The patron must be approved from their request in order for the notification to be sent. Note: This notification will not be automatically sent if you approve the patron from their account in the WorldShare Admin module or by using Find Patrons on the left navigation. For more information on approving patrons, see Approve patrons. |
| New request acknowledged | Confirmation to patron that their request was received. |
Ja |
Ja |
When a patron initiated request is assigned a request ID. If staff create a request for a patron in the system, the patron will not receive this notification. |
| Additional information required | Request for the patron to provide more information about their request or the item desired. |
Ja |
Nee | NA |
| Request cancelled confirmation | Confirmation to patron that their request has been canceled. |
Ja |
Ja |
When the request's status becomes Closed (Cancelled). |
| Article available in Article Exchange | Message to patron that item is available in Article Exchange with instructions for retrieval. |
Ja |
Ja |
When a Copy request is fulfilled with an Article Exchange link and is marked as received by the borrowing library. |
| KB link available in user portal |
Message to patron that item is available in the Knowledge Base with instructions for retrieval. The link to the item will be available in My Account. |
Ja |
Nee |
Note: The automated notification cannot be used at this time. When a Copy request is fulfilled with a knowledge base link. |
| Open Access link available in user portal |
Message to patron that item is available on the Open Internet with instructions for retrieval. The link to the item will be available in My Account. |
Ja |
Nee |
Note: The automated notification cannot be used at this time. When a Copy request is fulfilled with an Open Access link. |
| Printed copy available for pickup | Message alerting patron that their item is ready to pickup at their chosen Pickup Location. |
Ja |
Ja |
When a Copy request is fulfilled without a URL link and is marked as received by the borrowing library and the amount of time you selected has passed. You can select for the notification to be sent out up hours, days, or weeks after the item has been received. |
| Loan available for pickup | Message alerting patron that their item is ready to pickup at their chosen Pickup Location. |
Ja |
Ja |
When a Loan request is marked as received by the borrowing library and the amount of time you selected has passed. You can select for the notification to be sent out hours, days, or weeks after the item has been received. |
| Renewal request submitted | Message alerting patron that their renewal request was submitted. |
Ja |
Ja |
If automated delivery is selected, this notification is sent upon submission of the renewal request by either the patron or ILL staff member to the lender. If manual delivery is selected, the ILL staff person can send the notification by using the Email button within the request and selecting the appropriate notification template. |
| Renewal request approved | Message alerting the patron that their renewal request has been approved. |
Ja |
Ja |
If automated delivery is selected, this notification is sent when the lender agrees to renew the loan. If manual delivery is selected, the ILL staff person can send the notification by using the Email button within the request and selecting the appropriate notification template. |
| Renewal request denied | Message alerting the patron that their renewal request has been denied. |
Ja |
Ja |
If automated delivery is selected, this notification is sent if the lender denies the renewal. If manual delivery is selected, the ILL staff person can send the notification by using the Email button within the request and selecting the appropriate notification template. |
| Item about to be due | Reminder to patron that the due date for an item is approaching. |
Ja |
Ja |
When the patron due date is within the amount of time you select. You can select for the notification to be sent out days or weeks before the patron due date. |
| Item overdue - 1st notice | Reminder to patron that an item is overdue. |
Ja |
Ja |
When the patron due date has occurred and the amount of time you selected has passed. You can select for the notification to be sent out days or weeks after the patron due date. |
| Item overdue - 2nd notice | Reminder to patron that an item is very overdue. |
Ja |
Ja |
When the patron due date has occurred and the amount of time you selected has passed. You can select for the notification to be sent out days or weeks after the patron due date. |
| Item overdue - 3rd notice | Reminder to patron that an item is very, very overdue and additional recourse may be necessary. |
Ja |
Ja |
When the patron due date has occurred and the amount of time you selected has passed. You can select for the notification to be sent out days or weeks after the patron due date. |
Lending Library to Borrowing Library
Off-System Automated Messages
| Notification type | Description |
Manual sending? (Email only) |
Auto sending? (Email/SMS) |
Auto message sent out |
|---|---|---|---|---|
| Can you supply? | Message the lending library to inquire if they can supply an item. | Ja | Ja | When a request is sent to an off-system partner via an automation-built lender string. |
| Cancel | Message to the off-system lender that they no longer need to supply the requested item. | Ja | Ja | When the Need Before date or Days to Respond has been reached. |
|
Item overdue
|
Message to the borrowing library when an off-system request moves to the overdue status.
|
Ja |
Ja |
When an off-system borrowing request moves to the overdue status at 14 days overdue. |
Document Delivery Library to Patron
Notification data inserts
Data inserts represent information that is pulled from the request. For example, if you include ${Title!} and ${RequestId!} in the body of a notification, the title and request ID of the request will be substituted in the data inserts' place. The following table describes the Data Inserts that can be added to email and SMS notifications: