OCLC
Relais ILL can be used to search OCLC WorldCat and send requests to OCLC WorldCat Resource Sharing as well as receive requests from OCLC.
Relais interoperates with OCLC in two ways.
- Sending and receiving requests and related messages is handled by the ILL Message Handler via ISO ILL TCP/IP. Note that in most other cases ISO communication is handled via email (=SMTP).
- Searching OCLC WorldCat is done via Z39.50.
Please note you can enable either requesting only or supplying only. Be sure to let OCLC know your preference so that it is configured correctly in OCLC.
Prepare to use OCLC WorldCat with Relais
Note: Please ensure all the following steps are completed.
Step 1.
If you haven’t already done so, register with OCLC to use OCLC WorldCat Resource Sharing / OCLC WorldShare ILL. OCLC will send a an authorization and password. Once you have received this information, set up your defaults and constant data for borrowing and lending and enter your policy information in OCLC.
Step 2. Update your home library record (OCLC info section)
- Login to Library Registration.
- Retrieve your home library record.
- Click Statistics.
- Enter the information as described in the following table.
- Click Update.
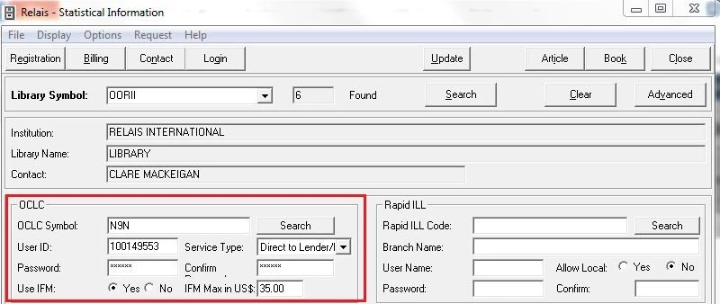
| Field | Characters | Description |
|---|---|---|
| OCLC Symbol | Enter your OCLC symbol as assigned by OCLC. | |
| User ID | Enter your authorization number as assigned by OCLC. Hyphens can be included but are not required, For example 100149553 and 100-149-553 are both acceptable. | |
| Password | Enter your password as assigned by OCLC. | |
| Confirm | Enter your password again. | |
| Service Type | Specify your preference for sending request to OCLC. There are 3 options from which to choose.
Caution: When using either Direct to Profile or Direct to Review requests are sent via ISO but OCLC does not send any updates to Relais. All processing must be done in OCLC. The default is Direct to Lender.Irrespective of what is set in the home library record, the OCLC Service Type can be changed on a request by request basis. |
|
| Use IFM | Select Yes or No, i.e., whether or not to specify IFM (ILL Fee Management) is to be used when sending a request. Contact OCLC for more information regarding IFM. The default is No. Irrespective of what is set in the home library record, the use of IFM can be changed on a request by request basis. |
|
| IFM Max in US$ | If Use IFM is set to Yes, specify the maximum amount (in US$) to include in requests sent to OCLC. Irrespective of what is set in the home library record, the amount can be changed on a request by request basis. |
Step 3. Update the OCLC supplier record
- Login to Library Registration (or Supplier Registration).
- Retrieve the OCLC supplier record. (If no OCLC supplier record exists contact OCLC Support)
- Update the information as described in the following table.
- Click Update.
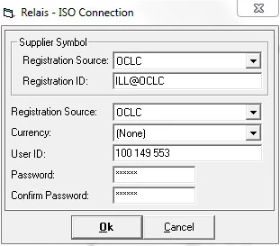
- Click Connection.
- Enter the information as described in the following table.
- Click Ok.
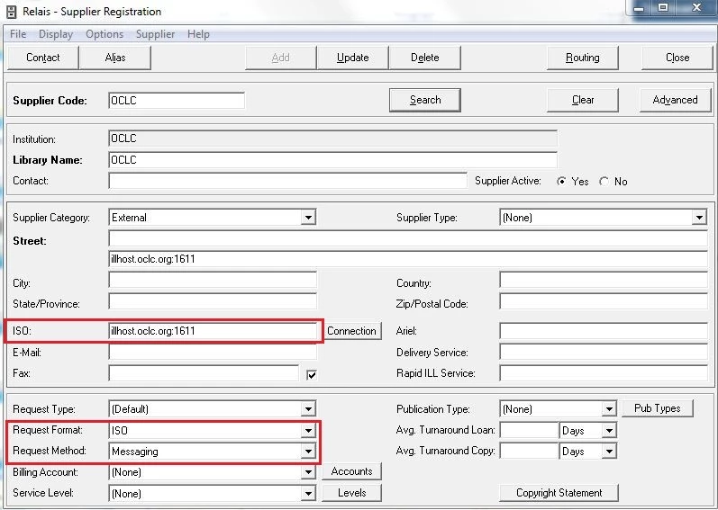
| Field | Characters | Description |
|---|---|---|
| ISO | Enter illhost.oclc.org:1611 This is the TCPIP address the ILL Message Handler uses when sending requests and message to OCLC. |
|
| Request Format | Select ISO | |
| Request Method | Select Messaging | |
| Connection | ||
| Supplier Symbol: | ||
| Registration Source | Select OCLC | |
| Registration ID | Enter ILL@OCLC | |
| Registration Source | Select OCLC | |
| User ID | Enter your authorization ID as assigned by OCLC | |
| Password | Enter your password as assigned by OCLC | |
| Confirm Password | Re-enter your password as assigned by OCLC |
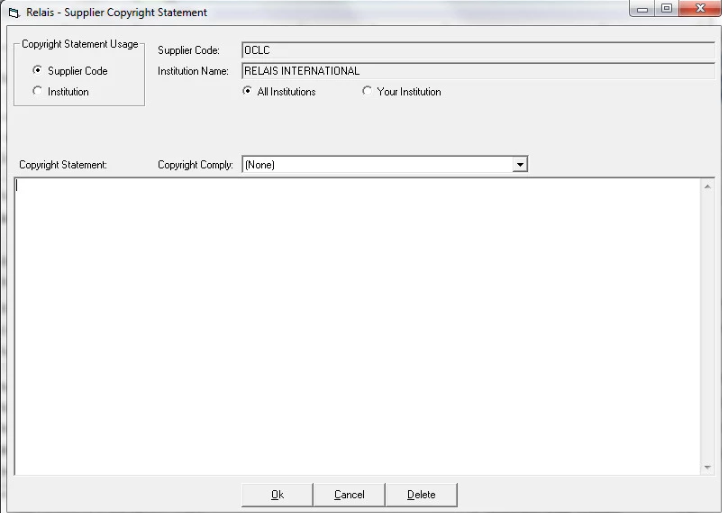
Step 4. Add a copyright statement to be included on all requests sent to OCLC.
- Login to Library Registration (or Supplier Registration).
- Retrieve the OCLC supplier record. (If no OCLC supplier record exists contact OCLC Support).
- Click Copyright Statement (lower right of screen).
- In the Copyright Statement box, enter Copyright Compliance: CCL or CCG.
- Click Ok.
Step 5. Configure OCLC WorldCat as a searchable catalogue
- Login to Administer Settings.
- Select the Catalog Configuration tab.
- Highlight WorldCat in the list of Catalogs. If WorldCat does not display as an option contact OCLC Support.
- Enter the information as described in the following table.
- Click Update.
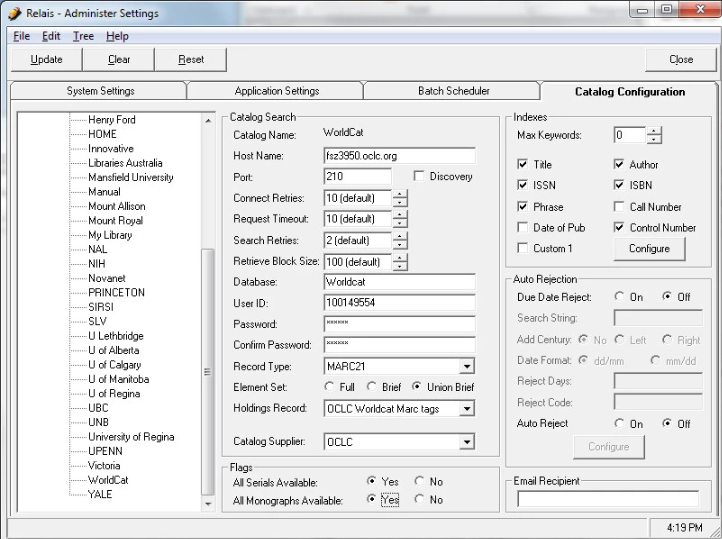
| Field | Characters | Description |
|---|---|---|
| Host Name | Enter the Z39.50 address for WorldCat (via First Search). | |
| Port | Enter 210, the Z39.50 port number. | |
| Database | Enter Worldcat, the name of the database. | |
| User ID | Enter your authorization ID as assigned by OCLC. | |
| Password | Enter your password as assigned by OCLC. | |
| Confirm Password | Re-enter your password as assigned by OCLC. | |
| Record Type | Select MARC21. | |
| Element Set | Select Union Brief. | |
| Holdings Record | Select OCLC Worldcat Marc tags. | |
| Catalog Supplier | Select OCLC. |
Step 5a. Configure the indexes for OCLC WorldCat (if not already done)
Once Step 5 above is complete:
- On the Catalog Configuration tab, click Indexes - Configure.
- On the Phrase tab, select Use = 4 and check Manual.
- On the Title tab, select Use = 4 and check Manual.
- On the Author tab, select Use = 1003.
- On the ISSN tab, select Use = 8.
- On the ISBN tab, select Use = 7.
- On the Control Num tab, select Use = 1007.
- Click OK.

Step 6. Add WorldCat to Search Manual - Requesting
- Login to Administer Settings.
- Select the Application Settings tab.
- Open the Pre-processing section.
- Open the Search Manual section.
- Highlight Search Manual - Requesting.
- Click Edit Extended Settings.
- Click Catalogs.
- From the Catalogs dropdown, select WorldCat.
- Click Add.
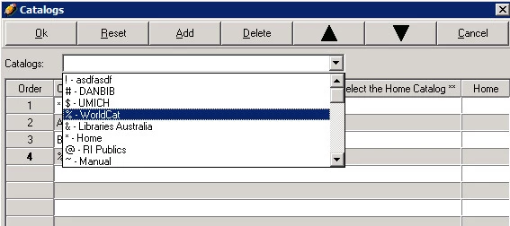
Caution: WorldCat should not be included in the list of catalogs for Search Auto and so should be at the bottom of the list for Search Manual - if necessary use the up/down arrows to move it to the bottom of the list.
Step 7. Enable OCLC Number and OCLC Record Number as searchable fields in Query
- Login to Administer Settings.
- Select the Application Settings tab.
- Open the Processing section.
- Open the Login section.
- Highlight the instance of Login to be updated.
- Click Edit Extended Settings to display Extended Login Settings.
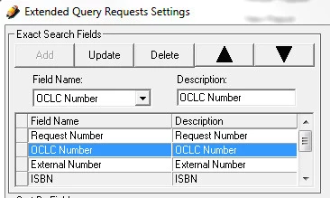
- Click Query Request to display Extended Query Requests Settings.
- In the Exact Search Fields setting select:
- OCLC Number and update the description (optional), then click Add.
- OCLC Record Number and update the description (optional), then click Add.
- These entries are added to the bottom of the list. Use the Up and Down arrows to adjust the order of the Exact Search fields as they display in Query Request.
- Click Ok (lower right of the screen).
- Close Login in order for the settings to take effect.
- This process must be repeated for each instance of Login that requires the changes.
Step 8. Configure the ILL Message Handler
Customers using the Relais Hosted Service should contact OCLC Support.
Step 9. Contact OCLC to arrange testing and to update your OCLC profile
Send the following information to ISOILL_Interop@oclc.org:
- Institution:
- Institution symbol:
- Role(s): Requestor or Supplier or both
- Software & Version:
- Domain: *
- Port: *
- Contact:
- Phone no.:
- Email address:
- Profile date:
Note: For Hosted Service customers contact OCLC Support for the domain and port information.
When a Renewal Request is received via OCLC it is displayed in Review Alerts.
Note: No Reply Yes/No button is displayed for OCLC Requests for Renewal. Use Loan Tracking to update the request as a Renewal indicating the new due date or select Renewal Refused. The information is sent back to OCLC.