Search preferences
Discover how to set search preferences to enable, disable, and sort the data types, scopes, and indexes that appear when you perform basic and advanced searches in WorldShare Record Manager.
Use search preferences to enable, disable, and sort the data types, scopes, and indexes that appear when you search for records. Search preferences also allow you to select the editor in which you wish to view records.
Note: After setting preferences in Searching - Advanced, Searching - Basic, or Working with Records:
- Click Reset Form to restore original default settings.
- Click Discard Page Changes to discard the changes you made and retain your previous settings. A confirmation dialog displays to confirm the discardment. Click Discard to confirm and discard your changes.
Set search preferences for advanced searches
- Searching - Advanced accordion - Image
-
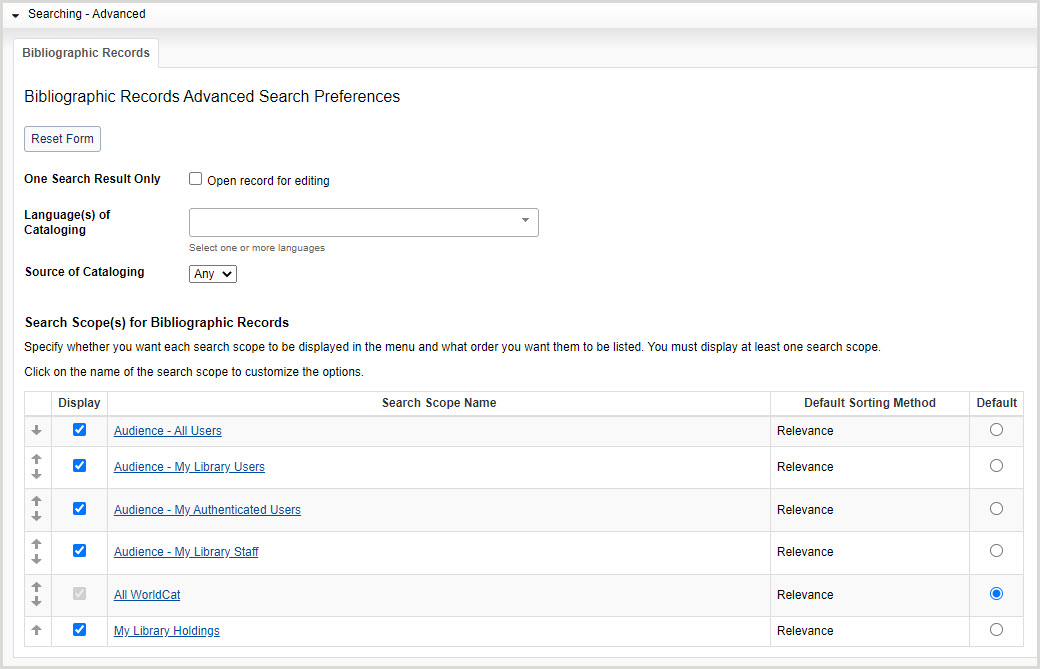
- In the left navigation, click User Preferences.
- From the User Preferences screen, click Searching - Advanced.
- For One Search Result Only, enable Open record for editing to bypass the results list and go directly to the record editor when a search returns one result.
- For Language(s) of Cataloging, select the language(s) used for the description of the item.
- For Source of Cataloging, select the code used to designate the institution that is primarily responsible for the content of the catalog record.
- Any (default)
- DLC (Library of Congress)
- For Search Scope(s) for Bibliographic Records:
- Select which search scopes appear in the Scope drop-down list. By default, all search scopes are selected.
- To disable a search scope, deselect it in the Display column.
- Select the default search scope. Some search scope options differ between WMS and non-WMS libraries.
- Available search scopes for WMS and non-WMS libraries - Table
-
Search scope name Non-WMS libraries WMS libraries only Audience - All Users x Audience - My Library Users x Audience - My Authenticated Users x Audience - My Library Staff x All WorldCat x x My Library Holdings x x
- Determine the order in which the search scopes appear in the Scope drop-down list.
- Click the up arrow to move a search scope up and the down arrow to move a search scope down in the list.
- Select which search scopes appear in the Scope drop-down list. By default, all search scopes are selected.
- For the first enabled search scope, click the search scope name and then select the following:
- For Default Sorting Method, select how your search results are sorted.
- Available default sorting methods
-
- Author (Ascending)
- Author (Descending)
- Date (Newest First)
- Date (Oldest First)
- Library Count (Highest First)
- Library Count (Lowest First)
- Relevance (default)
- Title (Ascending)
- Title (Descending)
- For Index Display Order:
- Select which indexes appear in the Index drop-down list. By default, all indexes are selected.
- To disable an index, deselect it in the Display column.
- Select the default index by enabling the Default radio button for the index. By default, Keyword is selected.
- Determine the order in which the indexes appear in the Index drop-down list.
- Click the up arrow to move an index up and the down arrow to move an index down in the list.
- Click Back to Search Scopes and repeat steps 1-3 for the remaining search scope(s).
- Select which indexes appear in the Index drop-down list. By default, all indexes are selected.
- For Default Sorting Method, select how your search results are sorted.
- Click Save.
Set search preferences for basic searches
- In the left navigation, click User Preferences.
- From the User Preferences screen, click Searching - Basic.
Note: After setting preferences in Data Type Options, Authority Records, Bibliographic Records, Local Bibliographic Data Records, and Local Holdings Records, click Reset Form to restore original default settings.
Set data type preferences
- Searching - Basic accordion: Data Type Options - Image
-

- Click Data Type Options.
- Select which data types appear in the Data Type drop-down list. By default, all data types are selected.
- To disable a data type, deselect it in the Display column.
- Select the default data type by enabling the Default radio button for the data type. By default, Bibliographic Record is selected.
- Determine the order in which the data types appear in the Data Type drop-down list.
- Click the up arrow to move a data type up and the down arrow to move a data type down in the list.
- Click Save.
Set authority record preferences
- Searching - Basic accordion: Authority Records tab - Image
-
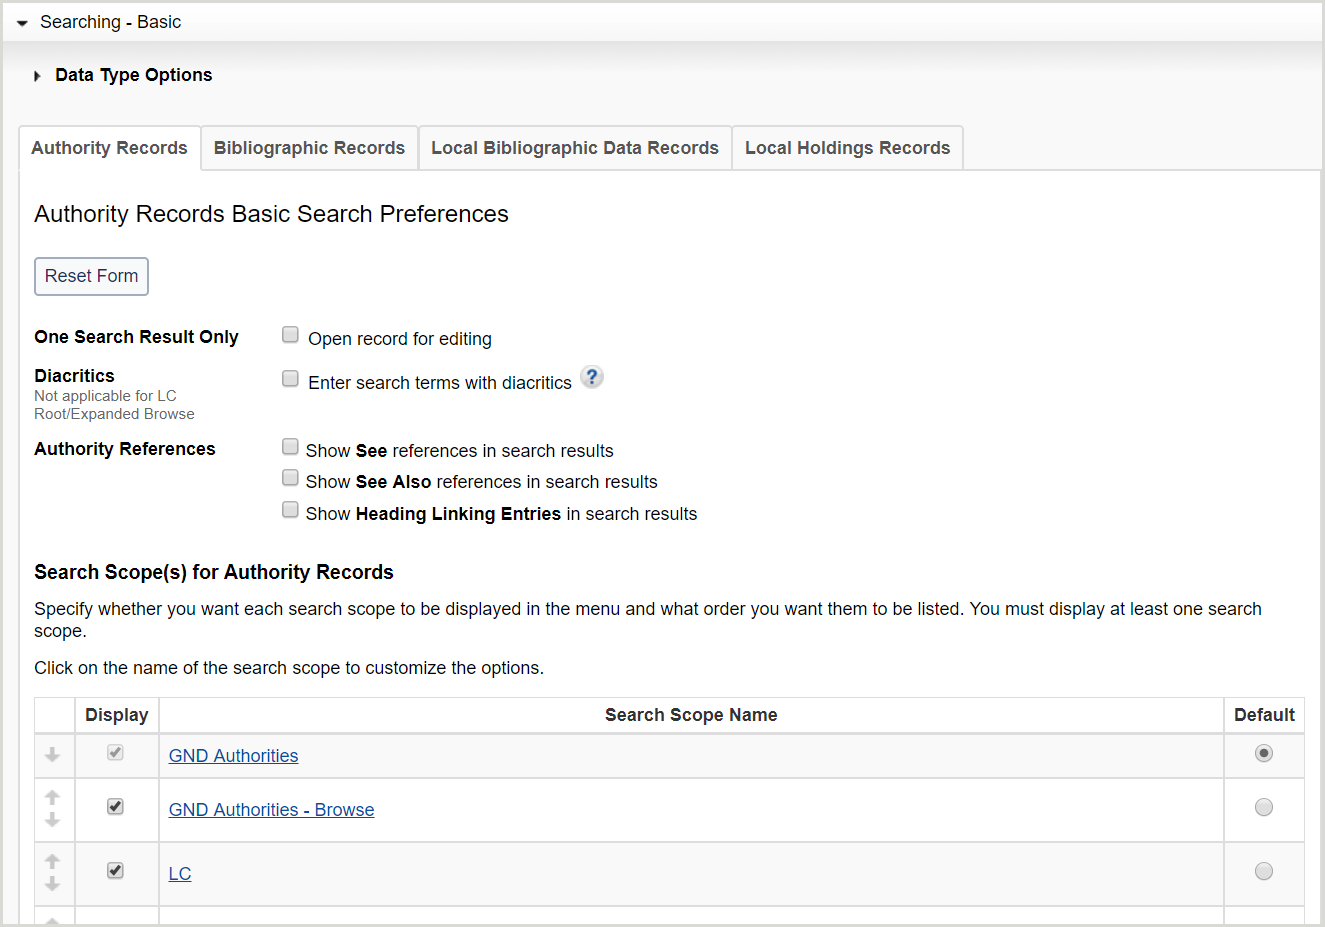
- Click the Authority Records tab.
- For One Search Result Only, enable Open record for editing to bypass the results list and go directly to the record editor when a search returns one result.
- For Diacritics, enable Enter search terms with diacritics to enter diacritic characters when performing a basic or expert search.
Note: When diacritics are enabled, the LC - Root/Expanded Browse search scope becomes unavailable for selection.
- For Authority References, enable Show See references in search results, Show See Also references in search results, and/or Show Heading Linking Entries in search results to view See references, See Also references, and/or 7xx links in authority record search result lists if present in the records.
- For Search Scope(s) for Authority Records:
- Select which search scopes appear in the Scope drop-down list. By default, all search scopes are selected.
- To disable a search scope, deselect it in the Display column.
- Select the default search scope by enabling the Default radio button for the search scope. By default, GND Authorities is selected.
- Determine the order in which the search scopes appear in the Scope drop-down list.
- Click the up arrow to move a search scope up and the down arrow to move a search scope down in the list.
- Select which search scopes appear in the Scope drop-down list. By default, all search scopes are selected.
- For the first enabled search scope, click the search scope name and then select the following:
- Select which indexes appear in the Index drop-down list. By default, all indexes are selected.
- To disable an index, deselect it in the Display column.
- See Record Manager Authorities Guide for a list of available authority files and indexes.
- Select the default index by enabling the Default radio button for the index. By default, the following indexes are selected:
- GND Authorities: Keyword
- GND Authorities - Browse: Corporate/Conference Name
- LC: Agency Control Number
- LC - Browse: Corporate/Conference Name Phrase
- Maori Subject Headings: Cataloging Source
- MeSH Authorities: Control Number
- MeSH Authorities - Browse: Geographics Phrase
- NTA Names: Control Number
- NTA Names - Browse: Established Heading Linking Entry Phrase: Personal Name
- Determine the order in which the indexes appear in the Index drop-down list.
- Click the up arrow to move an index up and the down arrow to move an index down in the list.
- Click Back to Search Scopes and repeat steps a-c for the remaining search scope(s).
- Select which indexes appear in the Index drop-down list. By default, all indexes are selected.
- Click Save.
Set bibliographic record preferences (default)
- Searching - Basic accordion: Bibliographic Records tab - Image
-
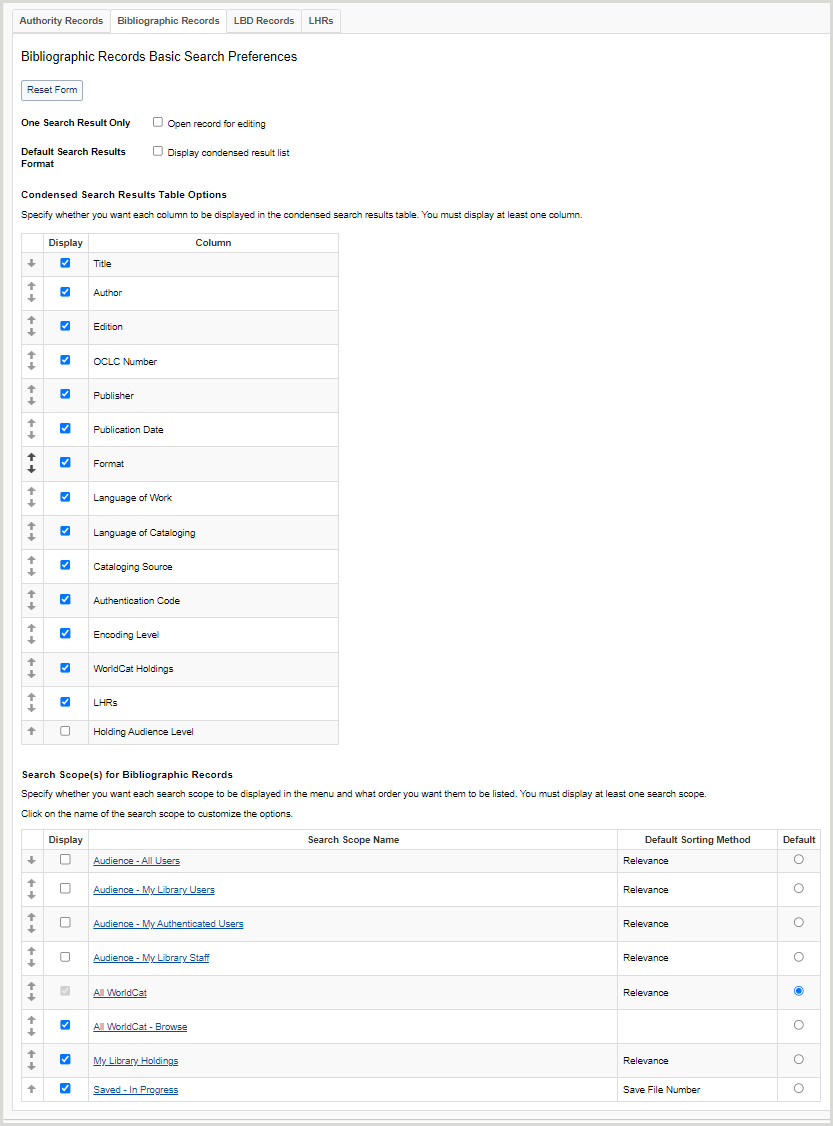
- For One Search Result Only, enable Open record for editing to bypass the results list and go directly to the record editor when a search returns one result.
- For Default Search Results Format, enable Display condensed result list to set the default search results format to condensed. By default, the search results format is enhanced.
- For Condensed Search Results Table Options:
- Select which columns appear in the condensed search results list table. You must enable at least one column.
- To remove a column, deselect it in the Display column.
-
- Available condensed search results table columns
-
- Title
- Author
- OCLC Number
- Publisher
- Publication Date
- Format
- Language of Work
- Language of Cataloging
- Cataloging Source
- Authentication Code
- Encoding Level
- Held
- WorldCat Holdings
- Group Holdings
- Holding Audience Level
Note: Holding Audience Level is available for WorldShare Management Services libraries only.
- Determine the order in which the columns appear in the condensed search results list table.
- Click the up arrow to move a column up and the down arrow to move a column down in the list.
- Select which columns appear in the condensed search results list table. You must enable at least one column.
- For Search Scope(s) for Bibliographic Records:
- Select which search scopes appear in the Scope drop-down list. By default, all search scopes are selected.
- To disable a search scope, deselect it in the Display column.
- Select the default search scope by enabling the Default radio button for the search scope. Some search scope options differ between WMS and non-WMS libraries. By default, All WorldCat is selected.
- Available search scopes for WMS and non-WMS libraries - Table
-
Search scope name Non-WMS libraries option WMS libraries option Audience - All Users x Audience - My Library Users x Audience - My Authenticated Users x Audience - My Library Staff x All WorldCat x x All WorldCat - Browse x x My Library Holdings x x Saved - In Progress x x
- Determine the order in which the search scopes appear in the Scope drop-down list.
- Click the up arrow to move a search scope up and the down arrow to move a search scope down in the list.
- Select which search scopes appear in the Scope drop-down list. By default, all search scopes are selected.
- For the first enabled search scope, click the search scope name and then select the following:
- For Default Sorting Method, select how your search results are sorted (not applicable for All WorldCat - Browse).
- All WorldCat, My Library Holdings and WorldCat Holdings Audience Level default sorting methods
-
- Author (Ascending)
- Author (Descending)
- Date (Newest First)
- Date (Oldest First)
- Library Count (Highest First)
- Library Count (Lowest First)
- Relevance (default)
- Title (Ascending)
- Title (Descending)
- Saved - In Progress default sorting methods
-
- Save File Number (default)
- Title
- Descending Date
- Ascending Date
- For Index Display Order:
- Select which indexes appear in the Index drop-down list. By default, all indexes are selected.
- To disable an index, deselect it in the Display column.
- See Bibliographic record indexes for a list of available bibliographic indexes.
- Select the default index by enabling the Default radio button for the index. By default, the following indexes are selected:
- All WorldCat: Author
- All WorldCat - Browse: Corp./Conf. - Whole Phrase
- My Library Holdings: Keyword
- Saved - In Progress: My Status
- Determine the order in which the indexes appear in the Index drop-down list.
- Click the up arrow to move an index up and the down arrow to move an index down in the list.
- Click Back to Search Scopes and repeat steps 1-3 for the remaining search scope(s).
- Select which indexes appear in the Index drop-down list. By default, all indexes are selected.
- For Default Sorting Method, select how your search results are sorted (not applicable for All WorldCat - Browse).
- Click Save.
Set local bibliographic data record preferences
- Searching - Basic accordion: Local Bibliographic Data Records tab - Image
-
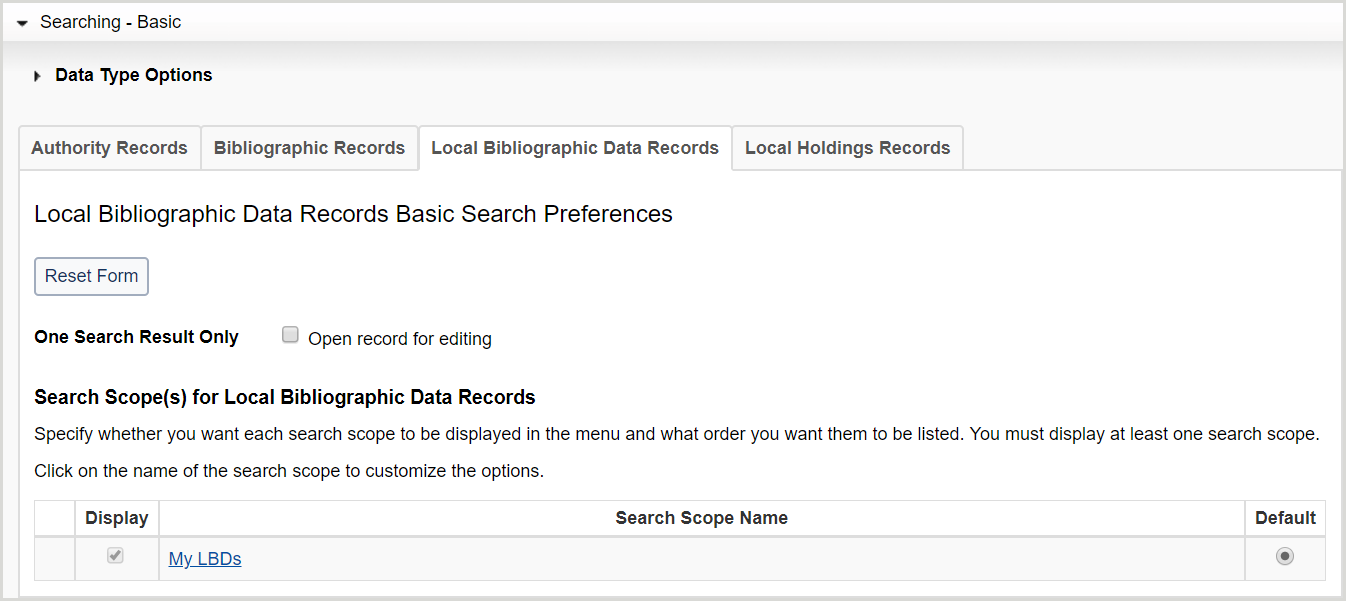
- Click the Local Bibliographic Data Records tab.
- For One Search Result Only, enable Open record for editing to bypass the results list and go directly to the record editor when a search returns one result.
- For Search Scope(s) for Local Bibliographic Data Records:
- Click My LBDs and then:
- Select which indexes appear in the Index drop-down list. By default, all indexes are selected.
- To disable an index, deselect it in the Display column.
- See Local bibliographic data record indexes A-Z for a list of available LBD indexes.
- Select the default index by enabling the Default radio button for the index. By default, Keyword is selected.
- Determine the order in which the indexes appear in the Index drop-down list.
- Click the up arrow to move a data type up and the down arrow to move a data type down in the list.
- Select which indexes appear in the Index drop-down list. By default, all indexes are selected.
- Click My LBDs and then:
- Click Save.
Set local holdings record preferences
- Searching - Basic accordion: Local Holdings Records tab - Image
-
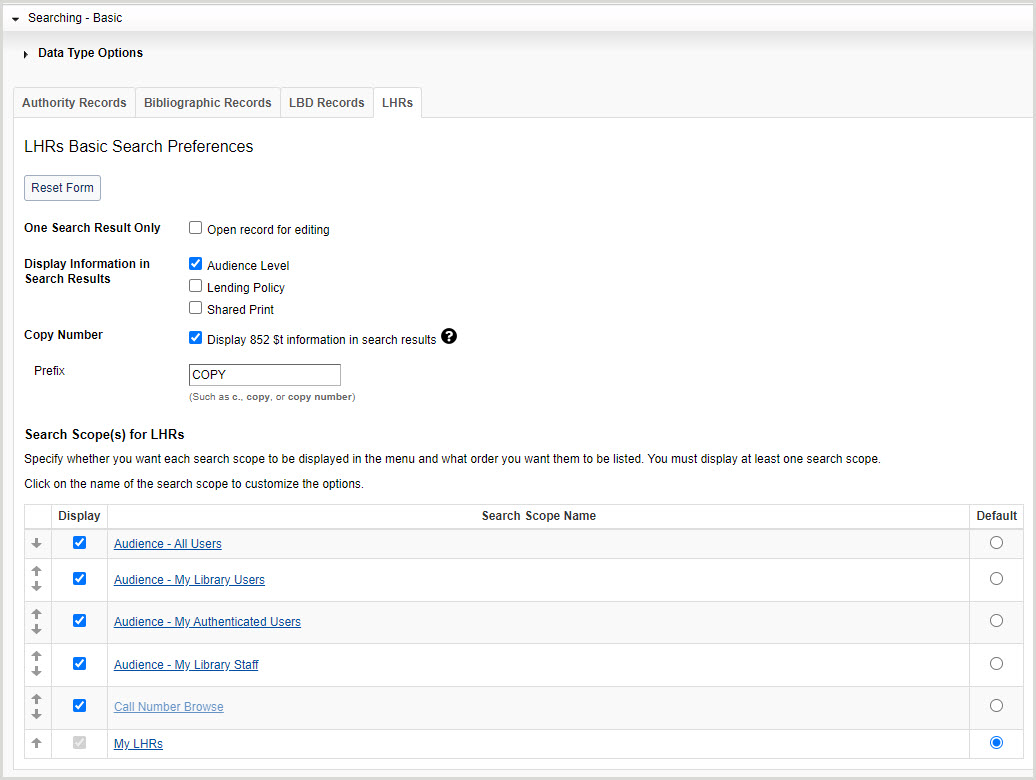
- Click the Local Holdings Records tab.
- For One Search Result Only, enable Open record for editing to bypass the results list and go directly to the record editor when a search returns one result.
- For Display Information in Search Results, enable or disable the display of Audience Level, Shared Print and/or Lending Policy columns in the LHR result list. By default the Audience Level Shared Print and Lending Policy columns do not display. Audience Level can be enabled by WorldShare Management Services (WMS) libraries. Shared Print and Lending Policy can be enabled if your library participates in either the Shared Print program or Interlibrary Loan.
- For Copy Number, enable Display 852 $t information in search results to display 852 $t (Copy Number) in your search results.
- If you enable this preference, enter a prefix for this information in the Prefix form field (e.g., c., copy, copy number, etc.).
- For Search Scope(s) for Local Holdings Records:
- Select which search scopes appear in the Scope drop-down list. By default, all search scopes are selected.
- To disable a search scope, deselect it in the Display column.
- Select the default search scope. Some search scope options differ between WMS and non-WMS libraries.
- Available search scopes for WMS and non-WMS libraries - Table
-
Search scope name Non-WMS libraries option WMS libraries option Audience - All Users x Audience - My Library Users x Audience - My Authenticated Users x Audience - My Library Staff x Call Number Browse (default) x x My LHRs x x
- Determine the order in which the search scopes appear in the Scope drop-down list.
- Click the up arrow to move a search scope up and the down arrow to move a search scope down in the list.
- Select which search scopes appear in the Scope drop-down list. By default, all search scopes are selected.
- Click My LHRs. For Index Display Order:
- Select which indexes appear in the Index drop-down list. By default, all indexes are selected.
- To disable an index, deselect it in the Display column.
- See Local holdings record indexes A-Z for a list of available LHR indexes.
- Select the default index by enabling the Default radio button for the index. By default, the Action Note index is selected.
- Determine the order in which the indexes appear in the Index drop-down list.
- Click the up arrow to move an index up and the down arrow to move an index down in the list.
- Select which indexes appear in the Index drop-down list. By default, all indexes are selected.
- Click Save.
Set bibliographic record editor preference
- In the left navigation, click User Preferences.
- From the User Preferences screen, click Working with Records.
- Select a default editor.
- MARC 21 View (default)
- Text View
- Click Save.