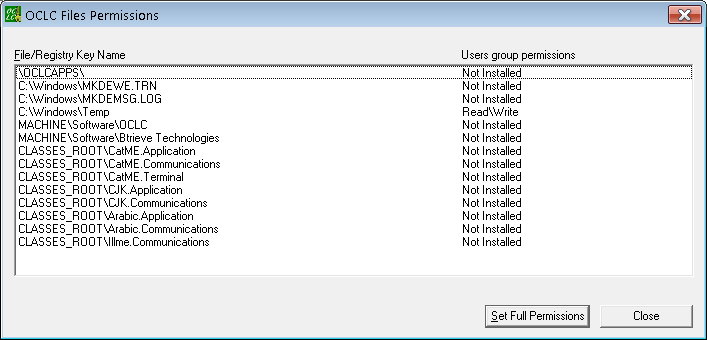
OCLCPermissions shows Not Installed
Symptom
- I ran OCLCPermissions (as administrator) because the Label program shuts down when I attempt to print labels. Also, the top six lines say Not Installed instead of Read or Read-Write.

Applies to
- OCLC Cataloging Label program
Resolution
Step 1: Verify all files and registry keys are present.
- Right-mouse click the Label program icon.
- Choose Run as administrator. If you're prompted for an administrator password or confirmation, type the password or provide confirmation.
- After the Label program starts, close it; this step creates any missing files or registry keys.
- Rerun (as administrator) OCLCPermissions.
If the top six lines still say Not Installed (which is rare), proceed to Step 2 to set permissions manually.
Step 2: Manually set permissions
Three file permissions and two registry key permissions must be changed.
The following process requires administrator Privileges.
File and folder permissions
- Navigate to C:.
- Right click the OCLCApps folder and select Properties.
- Click the Security tab.
- Click Edit.
- Select Users in the Group or user names list.
- Click Allow for full control.
- OK out.
There are two files in the C:\Windows folder that start with MKDE that need to be changed:
C:\Windows\MKDEMSG.LOG
C:\Windows\MKDEWE.TRN
For each of these files:
- Right click the MKDE file and select Properties.
- Click the Security tab.
- Click Edit.
- Select Users in the Group or user names list.
- Click Allow for full control.
- OK out.
If you don't see the MKDE files in the Windows folder, Windows 10 has moved them to its virtual store and permissions will be set automatically.
Registry permissions; open Regedit
Navigate to these two keys:
HKEY_LOCAL_MACHINE\SOFTWARE\Wow6432Node\Btrieve Technologies
HKEY_LOCAL_MACHINE\SOFTWARE\Wow6432Node\OCLC
Give each key above full control.
Page ID
13925