Toolbars
About toolbars
When you install the Connexion client, default toolbars are already set up and displayed at the top of the client main window:
- Default client toolbar - Contains selected toolbar buttons for some of the most often used client commands (see list below). Toolbar buttons provide a single-click alternative to clicking menus and commands.
To see a definition of a toolbar button on the toolbar, place the cursor over the button without clicking. A pop-up ToolTip names the menu and command.
Example: The definition of is CatalogingSearchWorldCat.
 - Quick tools
- WorldCat quick search tool for command line searching:

- Text strings list and Manage command to open the Text Strings window:

- User tools list and Manage command to open the User Tools window:

- WorldCat quick search tool for command line searching:
Note: For purposes of displaying or hiding and/or repositioning, the text strings and user tools quick tools are a single unit.
Default main client toolbar
The following table lists the default selection of buttons on the client toolbar, in default order, and gives available keystroke shortcut alternatives.
- To see all available toolbar buttons, click Tools > Toolbar Editor and scroll the list.
- To reset the toolbar to the default buttons, click Tools > Toolbar Editor, and then click Reset.
- Default main client toolbar buttons - Table
-
Toolbar
buttonMenu > submenu > command Function key
shortcutAccess key (hot key) shortcut equivalent 
Cataloging > Search > WorldCat <F2> <Alt><C><S><W> 
Cataloging > Browse > WorldCat <Ctrl><F2> <Alt><C><B><W> 
Cataloging > Search > Online Save File <Ctrl><F3> <Alt><C><S><S> 
Cataloging > Search > Local Save File <F3> <Alt><C><S><L> 
Authorities > Search > Online Save File <Alt><F3> <Alt><U><S><S> 
File > Log On <Ctrl><F1> <Alt><F><L> 
File > Log Off <Alt><F1> <Alt><F><G> 
Edit > Reformat <Ctrl><R> <Alt><E><R> 
Edit > Validate <Shift><F5> <Alt><E><V> 
Action > Holdings > Update Holdings <F8> <Alt><A><U> 
Action > Holdings > Produce and Update Holdings <Shift><F7> <Alt><A><P> 
Action > Holdings > Delete Holdings <Shift><F8> <Alt><A><D> 
Edit > Control Headings Single <F11> <Alt><E><H><S> 
Action > Export <F5> <Alt><A><X> 
File > Print <Ctrl><P>
Or
<F12>
Or
<Ctrl><F8><Alt><F><P> 
Edit > Cut Copy Paste > Cut <Ctrl><X>
Or
<Shift><Delete><Alt><E><T> 
Edit > Cut Copy Paste > Copy <Ctrl><C>
Or
<Ctrl><Insert><Alt><E><C> 
Edit > Cut Copy Paste > Paste <Ctrl><V>
Or
<Shift><Insert><Alt><E><P> 
Edit > Find/Replace <Ctrl><F> <Alt><E><F> 
Edit > Enter Diacritics <Ctrl><E> <Alt><E><N> 
Action > Delete Record <Ctrl><Alt><D> <Alt><A><E> 
View > Label <F10> <Alt><V><L> 
View > Navigate Records and Lists > Back <Shift><F9> <Alt><V><B> 
View > Navigate Records and Lists > Forward <F9> <Alt><V><F> 
Help > MARC Field Help <Shift><F1> <Alt><H><M> 
Help > Client Help <F1> <Alt><H><H>
Caution: If the default client toolbar contains new buttons when you upgrade to a later version, the new default button is not added to your toolbar. You can reset the toolbar to the default (Tools > Toolbar, click Reset), or use the toolbar editor to add new default buttons.
Check Update Connexion client whenever you upgrade for a list of client changes from the last version.
Quick tools
By default, the client also displays a WorldCat quick search box and quick tools for text strings and user tools, along with the main client toolbar.
WorldCat quick search box
To use the WorldCat quick search box:
- (Optional) Log on to the system.
- Click to place the cursor inside the WorldCat quick search box, and enter a command line search or browse.
Or
Click the arrow directly to the right of the search button () within the quick search box to select from a search history list (or click Clear WorldCat Search History to clear the search history).
- Note: The client keeps a list of all searches (not limited to the last 10), but does not retain them after you close the client.
- Click the search button (), or press <Enter> to send the search.
Note: If you did not log on before sending the search, the client prompts you to log on. - (Optional) To clear the search history list, click the arrow directly to the right of the search button () and then click Clear WorldCat Search History. The client retains only the most recent search you typed in the quick search box. When you close and re-open the client, all searches are cleared from the quick search box.
Text strings quick tool
To use the text strings quick tool:
- Click the arrow on the right, and in the list, select the text string you want to insert at the cursor location in the current record. Text strings are listed by the descriptions you assign when you create them.
- (Optional) Click the Text Strings quick tool (), or click Manage in the list to open the Text Strings window, where you can assign or unassign text strings or view or print text string assignments. See Create custom text strings for more information.
User tools quick tool
- Click the arrow to the right, and in the list, select the user tool you want to apply.
- (Optional) Click the User Tools quick tool (), or click Manage in the list to open the User Tools window to assign or unassign user tools or to view or print user tool assignments. See Assign custom user tools for more information.
Show or hide toolbars
To use the user tools quick tool:
- Navigate to View > Toolbars.
- Select which toolbar(s) you want to display. A check mark indicates which toolbars are displayed.
- Client
- WorldCat Quick Search
- Quick Tools
Note: For purposes of displaying or hiding, the text strings and user tools quick tools are a single unit.
Show the main client toolbar on one line or two
- Click the arrow on the main client toolbar (located at the right end if toolbar is horizontal or on bottom if toolbar is vertical). The drop-down shows any overflow toolbar buttons and provides a command to toggle between showing the main toolbar on one row or two:
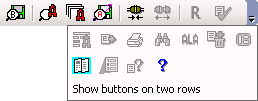
- Click Show buttons on two rows (default: the client displays the toolbar on one row).
Or
If you previously displayed the toolbar in two rows, click Show buttons on one row to switch back.
The client keeps your setting each time you re-open the program or upgrade to another version.
Reposition toolbars
Use drag and drop to reposition toolbars:
- Position horizontally at the top or bottom (above the status bar, if displayed), or position vertically at the right or left of the client window
Default: Top - In relation to each other within the top, bottom, right, or left location.
-
Move the cursor over the grab bar of a toolbar. The grab bar appears as a series of dots on the left if the toolbar is horizontal (
 ) or at the top if the toolbar is vertical (
 ).
). -
When the cursor becomes a large arrow (
 ), click and hold the grab bar, and drag and drop the toolbar to a different position. The client keeps the positions of toolbars each time you close and reopen the program or upgrade to a new version.
Note: You cannot reposition toolbars if the toolbar editor is open (Tools > Toolbar Editor).