Replace single items in a collection
Replace a single file within a collection using the Project Client Find in Collection tab to locate and add an item to your Project Client project. Then, replace the item with a selected item, retaining the original metadata. When you have finished working with an item it must be uploaded to the pending queue for approval to then be added to the collection database.
Use the Replace Item function to replace one or a few files within a collection. Use the Metadata Templates to add or replace metadata. Metadata from the original item is retained, but can be edited, unless it is within fields that are altered using the Metadata Templates.
Note: The replace operation does not support compound objects, nor does it replace any files you have added to archival volumes. Any files in archival volumes must be replaced manually.
When you are replacing a single file, the file that you wish to replace must be in the project spreadsheet. If you have more than one item to replace, see Replace multiple items in a collection.
Note: You cannot replace individual pages of PDF compound objects or PDF compound objects. To replace individual pages of PDF compound objects, you must delete the compound object from the collection, replace the pages in the original PDF file, and import the file again.
Replace an item in the Project tab
When you begin this procedure, the file that you wish to replace must be in the project spreadsheet. For more information, see Edit items in a collection.
- From the project spreadsheet, select the item by checking the checkbox in the item row.
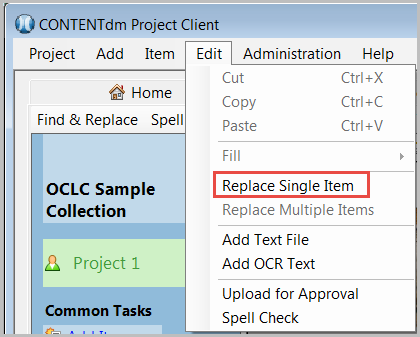
- From the Edit menu, click Replace Single Item. Or right-click on the image thumbnail and click Replace Item. The Replace Item dialog displays.
- Browse and select the file that will replace the current item.
- To replace the information in the current metadata fields with a metadata template, select Apply Metadata Template to replacement item.
- Optional. Select Create Display Image to generate a display-quality image.
- Click OK to replace the original item with the selected item. If you have selected the option to apply Metadata Templates settings, existing metadata associated with the item is overwritten.
- The new item displays in the spreadsheet. If you have selected the checkbox to replace metadata with Metadata Templates settings, all fields containing that metadata will also have changed. Fields that did not have entries in the Metadata Templates remain unchanged.
- Edit the metadata to make any additional changes.
- Select the item and click Upload for Approval under Item Tasks to add the item in the spreadsheet to the pending queue. The item must be approved by an administrator who will add it to the collection and build the text index.
For information on approving and indexing items see Approving Items and Building text index.
Replace an item in the Item Editing tab
When you begin this procedure, the file that you wish to replace must be in the project spreadsheet and open in a new tab. You can open the item in the Item Editing tab by double-clicking the item thumbnail in the Project Spreadsheet (or by right-clicking the thumbnail and selecting Open in New Tab).
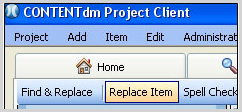
- From the Item Editing tab, click the Replace Item button in the toolbar
- Browse and select the file that will replace the current item.
- To replace the information in the current metadata fields with a metadata template, select Apply Metadata Template to replacement item.
- Optional. Select Create Display Image to generate a display-quality image.
- Click OK to replace the original item with the selected item. If you have selected the option to apply Metadata Templates settings, existing metadata associated with the item is overwritten.
- The new item displays in the item editor. If you have selected the checkbox to replace metadata with Metadata Templates settings, all fields containing that metadata will also have changed. Fields that did not have entries in the Metadata Templates remain unchanged.
- Edit the metadata to make any additional changes.
- When you have finished, click Save.
- Close the tab by clicking the Close button on the far-right. The Project tab displays the replaced item.
- Select the item and click Upload for Approval under Item Tasks to add the item in the spreadsheet to the pending queue. The item must be approved by an administrator who will add it to the collection and build the text index.