Collections
Collections are the basic components of a CONTENTdm site. A collection consists of the digital files and their associated metadata that have been uploaded to the server and approved. Before end users can view them, the collections must also be indexed.
A collection must be added to the server administration. When you create a new project in the Project Client to upload files or edit metadata, you need to associate this project with a particular collection.
Note: For information about configuring a collection, please see Access and edit collection configuration.
Add a new collection
When a new collection is added, CONTENTdm creates a data structure that enables the import of digital items, the storage of metadata, and the creation of an index.
We recommend that you not exceed 500 collections to ensure performance, but we do not set an upper limit on the collection count.
Add a new collection
- Open CONTENTdm Administration and select the server tab.
- Click collections.

Existing collections are listed in the order of creation unless they have been re-ordered. -
Click add collection.
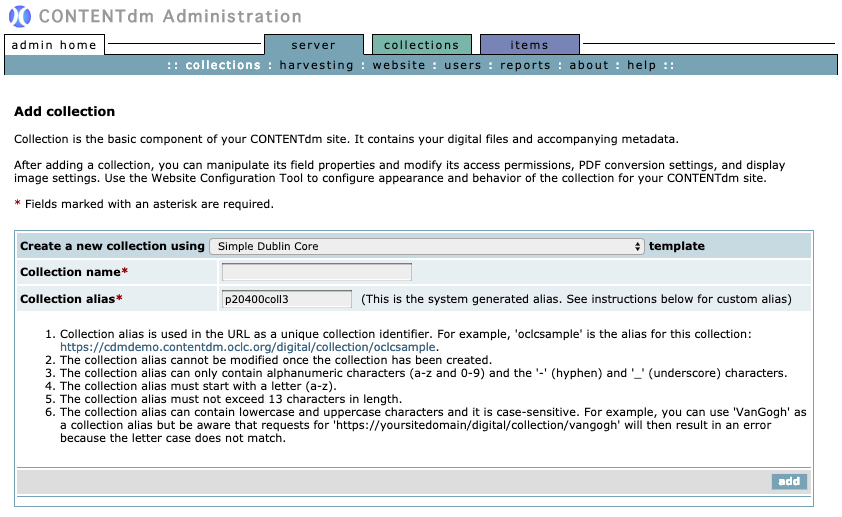
- From the drop-down menu for Create a new collection using, choose the collection template you want to use (for example, Simple Dublin Core).
- Enter Collection name.
- The Collection alias field is pre-filled with a system-generated alias. Leave it be or pick your own custom alias. If you choose to use a custom alias, pay attention to the on-screen instructions:
- Collection alias is used in the URL as a unique collection identifier. For example, 'oclcsample' is the alias for this collection: https://cdmdemo.contentdm.oclc.org/digital/collection/oclcsample.
- The collection alias cannot be modified once the collection has been created.
- The collection alias can only contain alphanumeric characters (a-z and 0-9) and the '-' (hyphen) and '_' (underscore) characters.
- The collection alias must start with a letter (a-z).
- The collection alias must not exceed 13 characters in length.
- The collection alias can contain lowercase and uppercase characters and it is case-sensitive. For example, you can use 'VanGogh' as a collection alias but be aware that requests for 'https://yoursitedomain/digital/collection/vangogh' will then result in an error because the letter case does not match.
Note: Please read and Change collection aliases retroactively before contacting OCLC Support about changing an existing collection alias.
- Click add.
The new collection will appear in the Collections list.
Delete a Collection
Deleting a collection cannot be undone. If you deleted a collection by mistake, contact OCLC Support to see if the collection can be recovered.
Delete a collection
- Open CONTENTdm Administration and select the server tab.
- Click collections.
- Find the row that contains the collection that you wish to delete and click delete. A confirmation message appears.
- Click OK.
The collection will be removed from the collections list.
Collection display order
The collections are listed in order of creation unless they have been rearranged.
The display order of the collections are reflected on the following pages:
- Home page: Collection List
- Search & Browse page: Collection list in the left navigation pane
Reorder a collection
- Open CONTENTdm Administration and select the server tab.
- Click collections.
- Use the move to drop-down list beside each collection to select the new position.
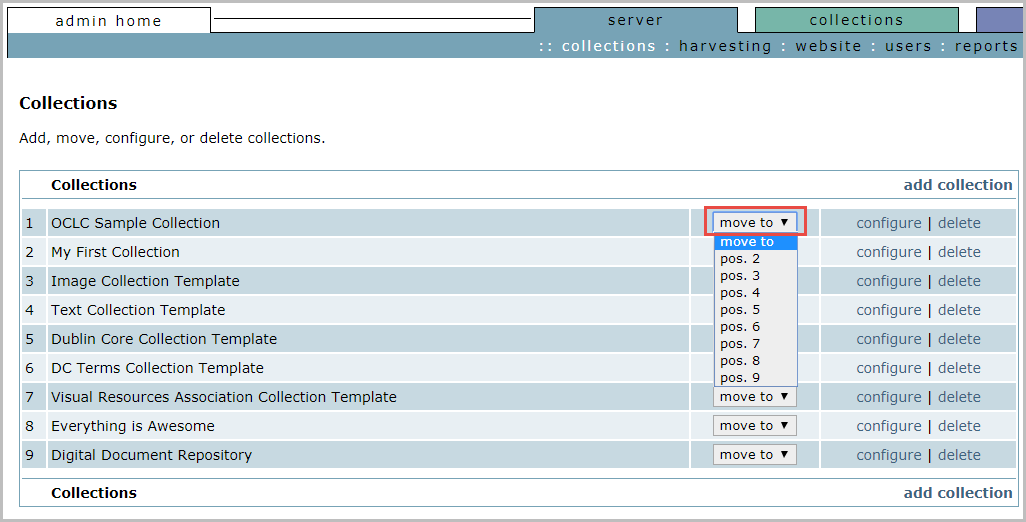
The list immediately changes to reflect the new positioning.