WorldShare Acquisitions Release Notes, September 2022
Release Date: September 22, 2022
Introduction
This release of WorldShare Acquisitions provides 8 new features and enhancements in addition to numerous bug fixes. These features will help you manage more complex workflows, including:
- Entering taxes by amount on invoice - WILL BE RELEASED ON SEPTEMBER 30
- Importing taxes by amount when there are taxes on service charges in an EDIFACT invoice item - WILL BE RELEASED ON SEPTEMBER 30
- Entering service charges by total amount on invoice - WILL BE RELEASED ON SEPTEMBER 30
- Importing service charges accurately when quantity is greater than one - WILL BE RELEASED ON SEPTEMBER 30
- Sending vendor notifications in the Arabic language
- Not changing the status of the order when vendor message fails to send
- Saving the order before opening the order item
- Improving handling of notification settings
Many of these enhancements are the direct result of your feedback.
Recommended actions
For this release, we recommend that you review the following checklists and complete the relevant tasks so that you can adjust your policies and workflows and train your staff. These checklists identify updates that we have determined as significant for most institutions. We encourage you to review all of the items in the release notes to determine whether other items might require additional action or follow-up by your institution.
Administrative actions
These items require immediate action or decisions.
| Action |
|---|
|
None at this time. |
Follow-up actions
In an effort to keep your staff informed of new features and changes, you may also want to consider these items.
| Action |
|---|
|
Train staff and update documentation related to entering taxes on the invoice when a percentage is not provided or is not accurate. |
| Train staff and update documentation related to entering service charges on the invoice when a per-unit amount is not provided and the quantity is greater than 1. |
New features and enhancements
Enter taxes by amount on the invoice
Note: Due to a technical complication, this feature will not be released until September 30th.
You can now enter the Tax 1 and Tax 2 values for an invoice item by entering an amount for the entire line item. This saves you time calculating the appropriate percentage for Tax 1 or Tax 2 when not provided by the vendor, or when the vendor provides multiple tax percentages for different parts of the item costs. Previously, you were only able to enter taxes by entering a percentage. Because of this, if the vendor did not provide a percentage or if they provided multiple percentages for different parts of the total item cost, you had to calculate the percentage yourself before entering. Now, you can simply enter the tax as a "total" for the entire line-item, rather than as a percentage.
To enter taxes by the amount on the invoice:
- Open an invoice that has items. (Invoices > Invoices > Search for invoice > Click on invoice number to retrieve invoice.)
- For one of the items, change the dropdown below Tax 1 or Tax 2 from "Percentage" to "Total".
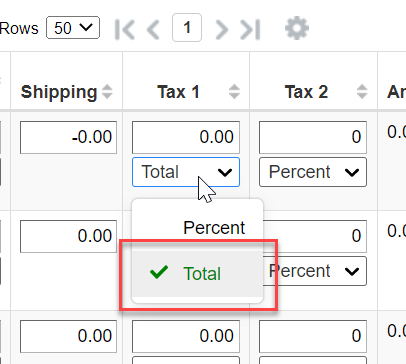
- Enter the total value of the tax for the entire line item in the Tax 1 number entry box.
- Save the invoice.
- Note that the value entered for Tax 1 was directly added to the Calculated Total, rather than using the Tax 1 value as a percentage to calculate the Tax 1.
- Same functionality is available for Tax 2.
- If you select the Tax Handling method of "Include taxes in costs" and enter a tax amount greater than the discounted unit cost, you will receive an error on payment of the invoice. (This is because when taxes are included in costs, the tax amount cannot exceed the discounted unit price.)
Import taxes by amount when there are taxes on service charges in an EDIFACT invoice item
Note: Due to a technical complication, this feature will not be released until September 30th.
When importing EDIFACT invoices that have non-zero taxes on the service charges (separate from any taxes for the line item itself), the system now calculates the tax amount for the entire line-item and imports the tax as a total line-item amount. This saves you the time of manually fixing the tax values on an invoice when importing EDIFACT invoices with taxes on service charges. (Libraries in some regions have their service charges taxed at a different rate than the item cost itself. This causes significant problems now, in that multiple percentages for a single tax are not supported in WMS.) Previously, you had to either calculate the effective tax rate of the item yourself or enter a separate line item with the taxes on the service charges. Both methods required manual effort and still resulted in less-than-desirable data in the system. Now, the system will calculate the total amount of taxes on the line item (including taxes on service charges) and enter that as a line-item-level total on the invoice.
To import EDIFACT invoices with taxes on service charges:
- Upload the EDIFACT invoice as normal for the vendor using the "Upload" button under Partner Exchange Services.
- If the invoice contains taxes on service charges that are greater than 0.00, the system will:
- Read the total tax value (MOA+124) for the line item from the EDIFACT file.
- Read any tax values (MOA+124) for any service charges from the EDIFACT file.
- Add all these tax values together.
- Set the Tax 1 setting to "Total."
- Enter this total tax as the value of Tax 1.
- Note: Percentage is still the preferred option when importing EDIFACT invoices. Percentage is used unless there are taxes on service charges, but we will definitely entertain other use cases when it would be desirable to import taxes using a line-item-level amount rather than a percentage.
- If only a percentage is provided for a service charge tax, the effective tax amount is calculated based on the percentage and then added to the other provided tax values to calculate the total Tax 1 amount.
Enter service charges on invoice by total amount
Note: Due to a technical complication, this feature will not be released until September 30th.
You can now enter service charges on an invoice using the total amount on the line item. This saves time when entering service charges on an item with a quantity greater than one when only the total service charges for the line-item is provided. This is especially helpful when the total service charges for the line item cannot be divided evenly by the quantity of the invoice item. Previously, if the quantity of an invoice item was greater than one and only the total service charges were provided by the vendor, then you had to calculate the per-unit service charges for the invoice item and enter than on the invoice. Additionally, if the total service charges were not evenly divisible by the quantity, you would have to enter a separate line item with the remainder on the invoice. These were time-consuming processes. Now you can simply set the service charges to "Total" and enter the total line-item amount for the service charges on the invoice.
To enter service charges as a total line-item amount on the invoice:
- Open an invoice that has items. (Invoices > Invoices > Search for invoice > Click on invoice number to retrieve invoice.)
- For one of the items, change the dropdown below Service Charges from "Per-Unit" to "Total".
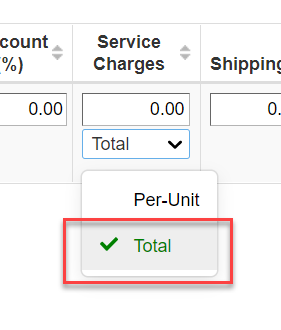
- Enter the total value of the Service Charges for the entire line item in the Service Charges number entry box.
- Save the invoice.
- Note that the value entered for Service Charges was directly added to the Calculated Total, rather than multiplying the Service Charges per-unit amount by the quantity to calculate the total Service Charges for the line item.
Import service charges accurately for items with quantity greater than one
Note: Due to a technical complication, this feature will not be released until September 30th.
When importing EDIFACT invoices, you can now import the service charges accurately even when the quantity of the item is greater than one and/or the service charges are not evenly divisible by the quantity. This saves you the time and effort of correcting the service charges on the invoice when this is the case. Previously, when importing service charges for items with a quantity greater than one, the system would import the service charges as a per-unit amount even though the vendor had provided a line-item total and a warning would be provided to the user that this occurred. The user would then have to correct the service charges on the invoice by dividing the total service charges by the quantity to get the accurate per-unit amount. If the service charges were not evenly divisible by the quantity, the user would have to create a separate line item for the service charges' remainder. Now, if the quantity is greater than one, Acquisitions will attempt to calculate the per-unit amount for the service charges by dividing the total by the quantity. If this amount is not evenly divisible by the quantity, Acquisitions will set the Service Charges setting to "Total" and enter the entire line-item amount for Service Charges.
To import service charges when the quantity is greater than one and/or the service charges are not evenly divisible by the quantity:
- Upload the EDIFACT invoice as normal for the vendor using the "Upload" button under Partner Exchange Services.
- If the invoice item has Service Charges and a quantity greater than one, Acquisitions will:
- Attempt to calculate the per-unit service charges by dividing the total service charges by the quantity.
- If evenly divisible, it will enter this as the per-unit service charges.
- If not evenly divisible, it will set the Service Charges to Total and enter the total line-item amount in the Service Charges field.
- Note: Per-unit is still the preferred option when importing EDIFACT invoices. Per-unit is used unless the service charge total is not evenly divisible by the quantity, but we will definitely entertain other use cases when it would be desirable to import service charges using a line-item-level amount rather than a per-unit value.
Send vendor notifications in the Arabic language
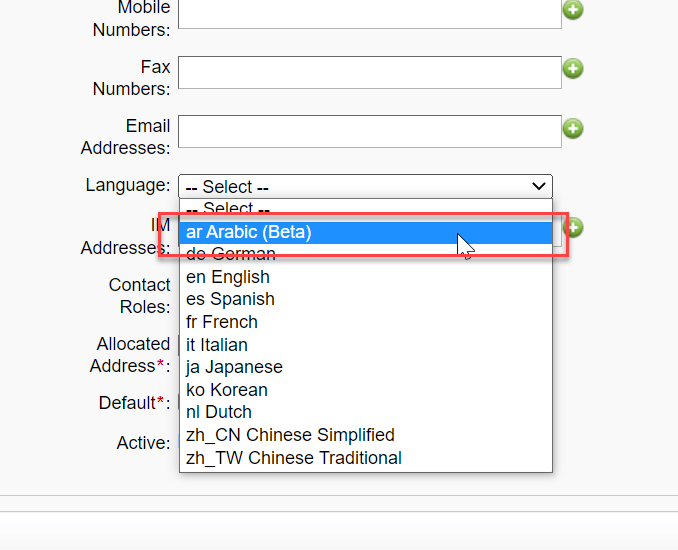
You can now send vendor notification messages in the Arabic language. This allows you to communicate with Arabic vendors in their native language when ordering, claiming, canceling, or requesting a quote via Acquisitions. This will aid libraries in all regions but especially in the Middle East who often communicate with vendors in Arabic. Previously, when selecting a language for a vendor contact, Arabic was not available for selection. Now it is, and when a message is sent to a vendor contact with Arabic as their language, the vendor message is transmitted in Arabic. This includes displaying the text in the message in right-to-left format, as Arabic requires.
To send a message in Arabic:
- On the vendor page, for a contact, set the language of the contact to "Arabic (beta)." (The "beta" will be removed in the next release after users have tested this functionality.)
- Set the specific notification settings for the action and vendor contact you have selected under Acquisitions Settings on the vendor page.

- When ordering, claiming, canceling or requesting a quote, select "Notify vendor" and then confirm the vendor contact with the Arabic language.
- Message will be sent to the Vendor in the Arabic language. Information in the message will be displayed from right to left. This includes the placement of formatted content. (Content on the left will be displayed on the right, and vice versa.)
- The only information not displayed in the language of the vendor contact is:
- Information copied directly from the Registry or Vendor page (e.g. an address entered in the Registry or vendor page in another language)
- The country of the From/To address. This is displayed in the language of the institution, so that the institution can copy and paste these addresses on an envelope if required.
Do not change order status when vendor message fails to send
When placing orders, you can now rely on the order status not changing if the place order notification fails to be sent to the vendor. This helps to ensure that users know when an order has been communicated to the vendor. Previously, if you placed an order and the message failed to be sent to the vendor or failed to be uploaded to the vendor site, then the order would still be set to Placed. However, now in addition to displaying an error message, the order would remain in status Open, further indicating to the user that the order has not been communicated to the vendor.
Note: Messages sent via e-mail will only "fail" when there is a problem communicating with the outgoing e-mail server. If the e-mail address is wrong, this cannot be detected by the outgoing mail server and will still result in the order status being set to Placed. It is encouraged to consider switching to FTP delivery of EDIFACT messages to ensure delivery of messages.
Save order before opening order item from order page
When opening an order item from the order page, Acquisitions will now save the order - and all order items - first before opening the selected order item. This ensures that when making changes to the selected order item these changes can be saved and do not cause a concurrent user error. Previously, if the user first made a change to an order item from the order screen and did not save their changes and then subsequently clicked on the title to open the order item itself, sometimes the order item would open with a version of the order item data without the previously-made changes. Then, when the user made additional changes on the order item details page, these changes could not be saved, and a concurrent user error would display. Now, when you click on a title link on an order screen, the order and all its order items are completely saved before opening the order item in question in a new tab. This ensures that the order item has the most recent data and will be able to be saved later.
Improved handling of notification settings
When setting the specific notification settings of a vendor, Acquisitions will now require a specific notification setting to be "complete" before it is used by the system. This saves you the time and effort of trying to figure out how default values are being set when notifying a vendor. It also improves the accuracy of the notification settings used for automated claiming by ensuring that automated claiming only uses specific notification settings and not default values. Previously, when setting the default values used when notifying a vendor, Acquisitions would use partial values provided in the specific notification settings of the vendor. This made it difficult to understand how these default values were being set and how to troubleshoot problems with them. Now, only if the specific notification settings for a vendor action are "complete" will they be used to set the default values for the Notify vendor dialog. Additionally, previously when sending automated claims for serial issues, if there was not a specific notification setting for serials claiming, the default delivery method and contact were used, even if they were completely not applicable for serials claiming. Now, automated claiming jobs will only use specific notificationg settings such as "Claiming serial issues" and "Claiming" to select the notification settings for an automated claim, rather than using the default notification settings.
Bug fixes
Cannot receive serial issue when new 853 is required
You can now receive issues even when the new issue requires the creation of a new 853 line in the LHR. A new 853 line is created when the enumeration or chronology of the issues change from what they were previously. When this happened and you attempted to receive the issue, the system would give you an error and would not receive the issue or add the holding to the LHR. This was due to an underlying problem in Record Manager, which was fixed on September 16.
Cannot add supplemental invoice item when invoice has local resource invoice items
You can now add supplemental invoice items to invoices, even if the invoice contains local resource invoice items. This was temporarily not working, but now, it is fixed, and you can add supplemental invoice items to an invoice, as long as the order item being invoiced is 100% invoiced already.
Cannot invoice the same copy twice on the same invoice
You are now prevented from being able to invoice the same copy twice on the same invoice. Temporarily, the user could add a copy to the same invoice twice. This resulted in an invoice item with a quantity greater than the quantity of unique copies invoiced. In some cases, this even resulted in the quantity of the invoice item being greater than the quantity of the order item being invoiced. However, this problem has been fixed, and now when you have invoiced a copy of an order item the system will not allow you to invoice the copy again on the same invoice. Instead, you must pay the invoice in question first, and then you can invoice the copy on a new invoice.
Receive and invoice screen returns correct number of results even when using a blank search
You can now see the correct number of results on the receive and invoice screen even when using a blank search and when using the "Use most recent call number" feature. Previously, if the user had enabled the "Use most recent call number feature" and conducted a search with a large number of results and the Receipt Status or Purchase Status set to something other than "All", then they could possibly get the incorrect number of results or even no results. This usually happened when a user conducted a search with a blank text, since these return a large number of items. This no longer occurs, and even when using the "Use most recent call number" feature, the correct results display on the Receive and Invoice screen.
Preferred ISBN kept when updating an order item via the platform
You can now update an order item via the platform without losing the preferred ISBN of the item. Previously, updates via the platform would deselect the preferred ISBN, even if the field(s) being updated were not the preferred ISBN. This no longer occurs, and now, no data is lost when updating an item via the platform.
Important links
Support website(s)
Support information for this product and related products can be found at: