WorldShare Acquisitions Release Notes, April 2021
Release Date: April 22, 2021
Introduction
This release of WorldShare Acquisitions provides 2 new features and enhancements in addition to numerous bug fixes. These features will help you manage more complex workflows, including:
- Enhancements to the bulk subscription renewal process
- Support for administering institution configuration for Acquisitions
Many of these enhancements are the direct result of your feedback.
Recommended actions
For this release, we recommend that you review the following checklists and complete the relevant tasks so that you can adjust your policies and workflows and train your staff. These checklists identify updates that we have determined as significant for most institutions. We encourage you to review all of the items in the release notes to determine whether there are other items that might require additional action or follow up by your institution.
Administrative actions
These items require immediate action or decisions.
| Action |
|---|
|
None at this time. |
Follow-up actions
In an effort to keep your staff informed of new features and changes, you may also want to consider these items.
| Action |
|---|
|
None at this time. |
New features and enhancements
Enhancements to the bulk subscription renewal process
There are a number of features this release that enhance the bulk subscription renewal process. Please use these features to more easily renew subscriptions that are ready for renewal.
Add items to a single order
When renewing a renewal list, you can now add all new items to a single order you created, rather than having the system create orders automatically based on the orders used by the order items being renewed. This provides more flexibility when renewing items and allows you to duplicate the workflow that is used as part of the old renewal functionality. Previously, when renewing a renewal list, you could only create orders based on the orders used for the order items being renewed. Now, you can choose instead to select a single order on which to place renewed items.
To add items to a single order upon renewal:
- Open the renewal list in question (Orders > Renewal Lists)
- In the Renewal List Setting accordion, select "Add all items to one order" under Order Creation.
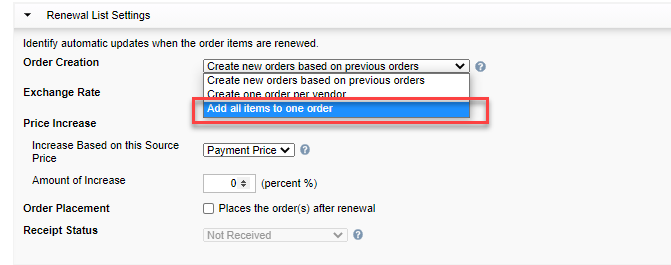
- The Select Order button will appear.
- Click Select Order.

- A dialog will appear with a list of orders.
- Search for and select the order you want to use using the radio button or click New Order at the top of the dialog.
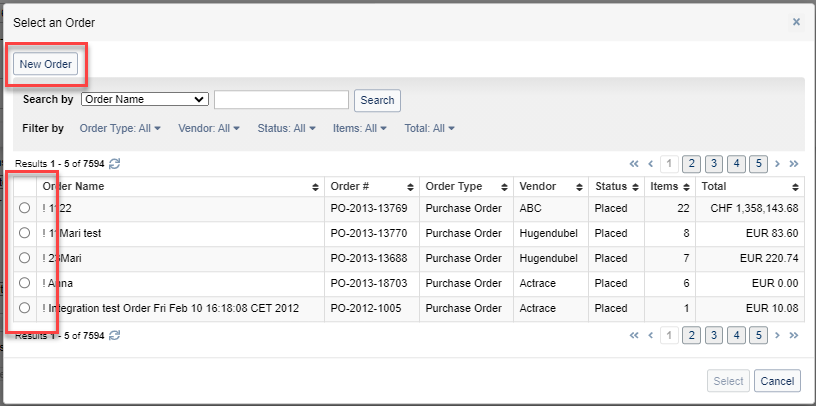
- If you click New Order, you will need to enter the details of the New Order in the resulting dialog.

- Click Select if selecting an existing order. Click Save if creating a new order.
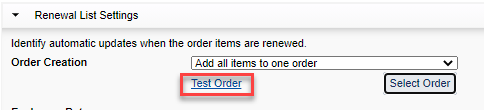
- The order will be saved and appear below the Order Creation drop-down menu as a link.
- Save the renewal list by clicking on the Save button at the top of the page.
- When you renew the renewal list, it will place all new order items on this order.
Note: Please be careful when using this option, especially if items on the renewal list are from multiple vendors. All new items will be placed on a single order for a single vendor.
Add items to one order per vendor
Note: The following feature had to be postponed due to a last-minute problem. This feature will appear in the next release.
When renewing a renewal list, you can now add all new items to a single order per vendor. This enables you to group items by another method besides grouping them all in one order (see above) or using the same order structure as the order items being renewed. With this option, the system creates one order per vendor during renewal, naming each order Subscription order - [Vendor Name] - [Date]. Previously, you could add items from the renewal list to orders that mirrored the orders being renewed, but you could not add them to one order per vendor. Now, you can.
To add items to one order per vendor during renewal:
- Open the renewal list in question (Orders > Renewal Lists)
- In the Renewal List Setting accordion, select "One order per vendor" under Order Creation.
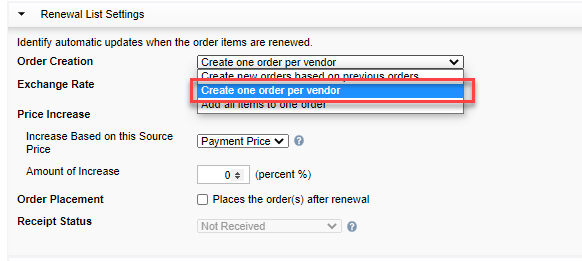
- Save the renewal list by clicking on the Save button at the top of the page.
- When you renew the renewal list, it will place all new order items in one new order per vendor.
Set receipt status of new order items
You can now set the receipt status of new order items when renewing items. This allows you to save time setting the receipt status of items after renewal. You can set the receipt status of the items to any valid status, or you can have the system set the status based on the receipt status of the order items being renewed. Previously, you could renew items, but you had to set the receipt status of the items afterward as a separate step. Now, you can set the receipt status of the items during the renewal process.
To set the receipt status of the new order items during renewal:
- Open the renewal list in question (Orders > Renewal Lists)
- In the Renewal List Setting accordion, select the Order Placement option to "Place orders upon renewal." (The receipt status option only applies if the system is automatically placing the orders upon renewal.)
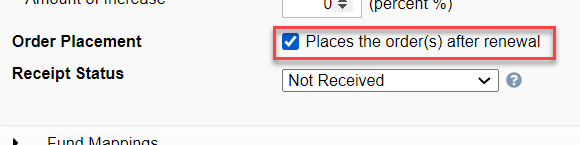
- Then, set the receipt status you want the new items to inherit under the Receipt Status option. The available options are:
- Inherit from Previous Item - This sets the receipt status of the item to the same status as the item being renewed.
- Not Received
- Not Tracked
- Partially Received
- Received
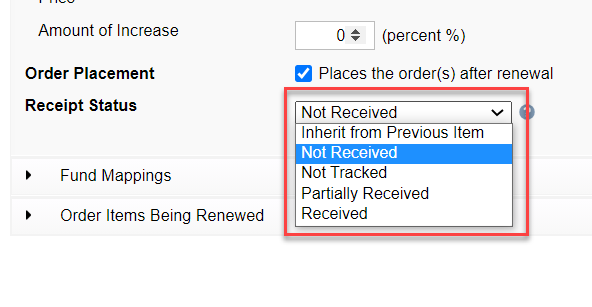
- Save the renewal list by clicking on the Save button at the top of the page.
- When you renew the renewal list, it will set the receipt status of the items created to the receipt status selected above.
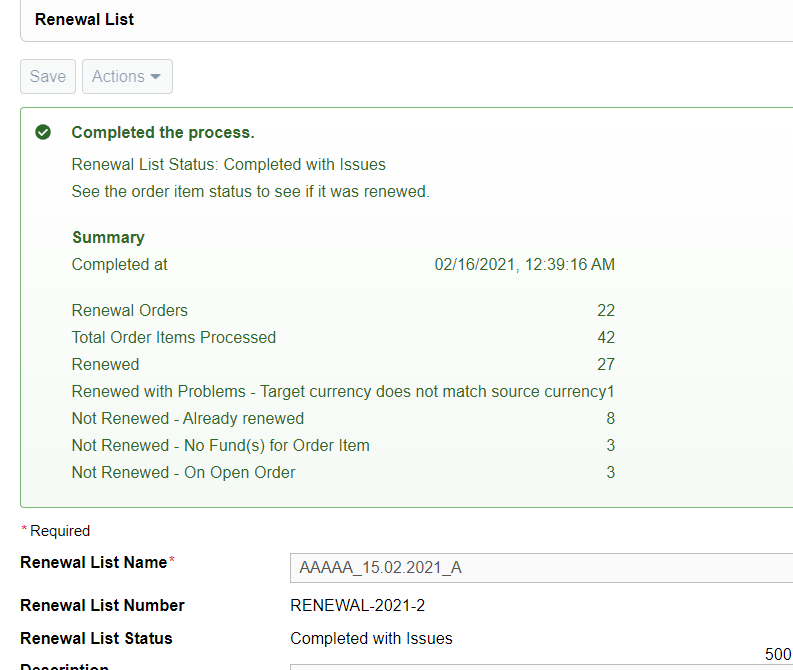
View confirmation summary screen when renewal is completed
You can now view a summary confirmation panel when the renewal of a renewal list is completed. This allows you to view a summary of the renewal job, including the number of items renewed as well as the number of items that could not be renewed and the reasons. Previously, you had to review the Order Items Being Renewed table to see how many items were renewed, how many items were renewed with problems, and how many items were not renewed. Now, you can review a summary of this information at the top of the renewal list page.
To view the confirmation summary screen when it is renewed, simply renew the renewal list. The screen will appear when the renewal process is completed. It will display:
- The date and time the renewal was completed.
- The total number of renewal orders used.
- The total number of order items processed.
- The number of order items renewed.
- The number of order items renewed with problems along with the reason.
- The number of order items not renewed along with the reason.
Search order items being renewed by title, status reason, and vendor
You can now search for order items being renewed by title, status reason, and vendor. This will allow you to review your order items being renewed more easily, especially being able to check on items with specific status reasons more easily. Previously, you could search order items being renewed by their Processing Status but no other fields. Now, you can search by all four of these fields.
To search order items being renewed by title, status reason, and vendor:
- Open a renewal list containing items (Orders > Renewal Lists)
- Open the Order Items Being Renewed accordion.
- In the table below, search or filter using one of the fields below:
- Title - Type words from the title in the search box
- Vendor - Select a vendor by typing the first few letters or words of the vendor's name.
- Status Reason - Select from the dropdown the status reason(s) you want to search by.
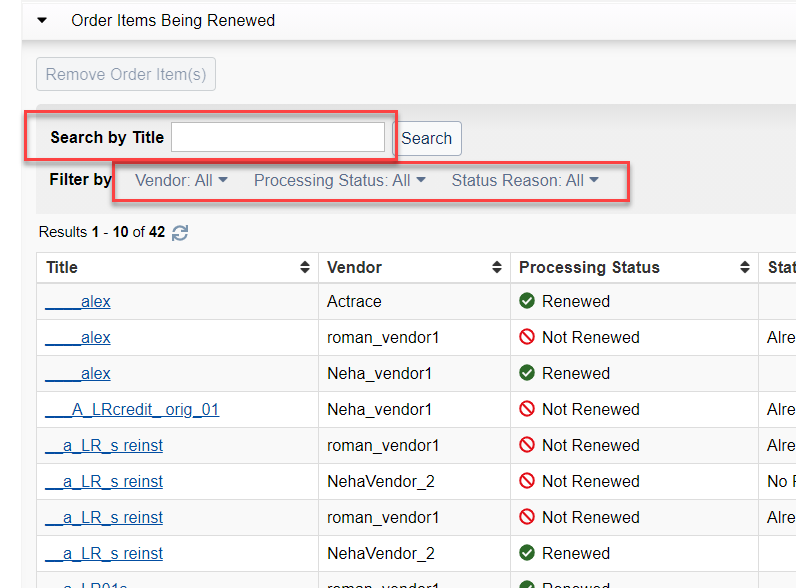
-
Results will be filtered by the criteria chosen and shown to the user.
Show number of items to remove
When removing order items from a renewal list, you can now see how many items you are about to remove. This is helpful in ensuring that you are removing the right number of items. Previously, when removing items from a renewal list, the number of items you were removing did not display. Now, it displays within the remove button.
To see the number of items that you are removing from a renewal list:
- Open a renewal list (Orders > Renewal Lists)
- Open the Order Items Being Renewed accordion.
- Select the items you want to remove using the checkbox(es) to the left of the order items.
- The Remove button at the top of the page will display the number of item(s) selected.
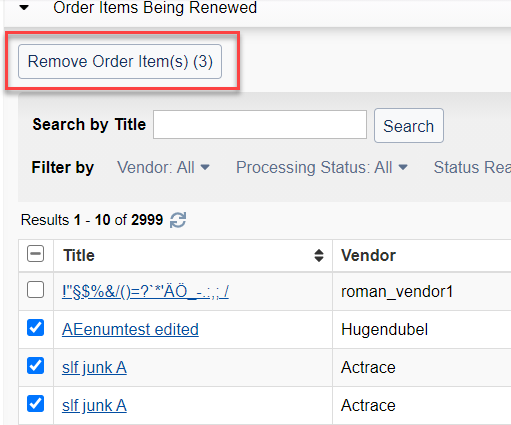
- Click Remove to remove the items.
Support for administering institution configuration for Acquisitions
You can now administer your institution configuration for WorldShare Acquisitions yourself. This saves you the time and effort of asking customer support to change these settings for you. Previously, these settings were only available to OCLC staff, and so you had to contact OCLC to change one of these settings. Now, you can change them yourself, saving yourself time and effort.
Note: You should refresh the browser and wait 5-10 minutes for any changes to take effect. If they do not take effect after this time period, please refresh the browser again.
To administer your institution configuration settings:
- Click on Settings > Administration
- Open the Budget and Pricing accordion.
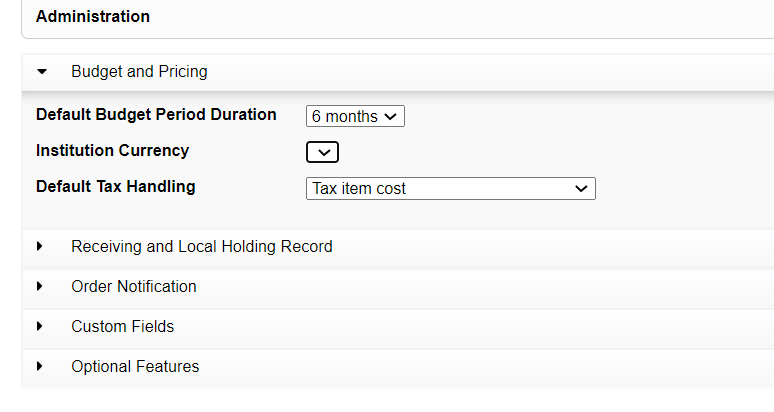
- Modify the fields in the Budget and Pricing Accordion:
- Default Budget Period Duration: This sets the default duration of new budget periods created; however, currently, this field is not working as designed. We recommend not using it for now to set the default budget period duration. Options in the future will include:
- 6 months
- 1 year
- 2 years
- Institution Currency: This sets the currency of the institution. This is for institutions that have not yet started to use Acquisitions and are setting up their system. It cannot be changed once a budget has been created with that currency. (Also note: Currently, there is a problem where the currency sometimes does not display once set. This will be fixed in an upcoming release.)
- Default Tax Handling: This sets the default tax handling to be used on new orders and new invoices. It can be manually overridden on the order or invoice, but it determines the default setting for new orders and new invoices. Options include:
- Tax item cost - Tax is calculated based only on the item cost, rather than the sum of the item price with service charges and shipping.
- Tax item, shipping, and service costs - Tax is calculated based on a percentage of the sum of the item price along with the service charges and shipping costs. Use when service charges and shipping costs are also taxed.
- Include taxes in costs - Tax is included in the unit price of the item itself.
- Default Budget Period Duration: This sets the default duration of new budget periods created; however, currently, this field is not working as designed. We recommend not using it for now to set the default budget period duration. Options in the future will include:
- Open the Receiving and Local Holding Record accordion.
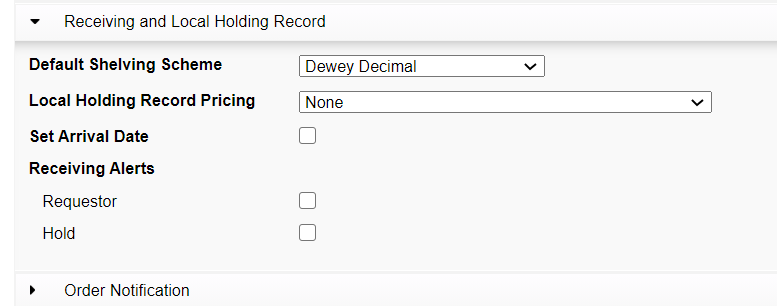
- Modify the fields in the Receiving and Local Holding Record accordion:
- Default Shelving Scheme: This determines which shelving scheme to use for new local holding records created by Acquisitions during receiving. It also determines which call number from the bibliographic record to pull into the Receiving and Invoicing screen in Acquisitions. The options include:
- Dewey Decimal - Also pulls in the Dewey Decimal call number from the bibliographic record into the Receive and Invoice screen.
- Library of Congress - Also pulls in the Library of Congress call number from the bibliographic record into the Receive and Invoice screen.
- MARC Code
- National Library of Medicine - Also pulls in the NLM call number from the bibliographic record into the Receive and Invoice screen
- Other
- Shelved Separately
- Shelving Control Number
- Superintendent of Documents
- Title
- Unknown
- Local Holding Record Pricing: This determines how the price of any local holding records created by Acquisitions is calculated. It includes the following options:
- None - No price is set when creating the Local Holding Record.
- Unit Price, plus Taxes, Shipping, and Service Charges - Sets the price of the Local Holding Record based on the total price of the order item, including unit price, taxes, shipping, and service charges.
- Unit Price - Sets the price of the Local Holding Record based only on the unit price of the order item.
- Set Arrival Date: This determines whether the user is displayed the dialog to set the arrival date after receiving an item.
- Receiving Alerts:
- Holds: This determines whether the user is alerted when an item being received has a hold on it.
- Requestor: This determines whether the user is alerted when an item being received has a requestor.
- Default Shelving Scheme: This determines which shelving scheme to use for new local holding records created by Acquisitions during receiving. It also determines which call number from the bibliographic record to pull into the Receiving and Invoicing screen in Acquisitions. The options include:
- Open the Custom Fields accordion.
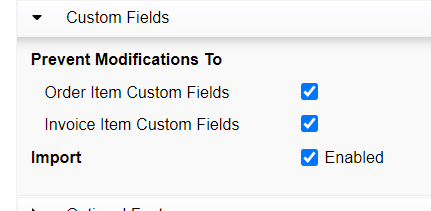
- Modify the Custom Fields accordion fields:
- Prevent modifications to:
- Order Item Custom Fields: Prevents the user from modifying Fields 11-20 of the order item custom fields.
- Invoice Item Custom Fields: Prevents the user from modifying Fields 11-20 of the invoice item custom fields.
- Import: Enables import of custom field data into Acquisitions.
- Prevent modifications to:
- Open the Optional Features accordion.
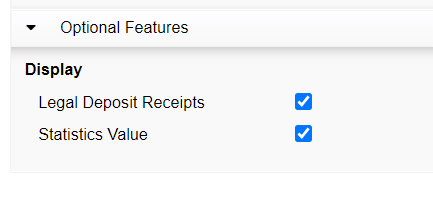
- Modify the Optional Features accordion fields:
- Legal Deposit Receipts: Enables viewing of Legal Deposit Receipts in the left-hand menu.
- Statistics Value: Enables the Statistics Value field on the order item.
- Refresh the browser. Wait 5-10 minutes. The changes should appear. If they do not, then refresh the browser again.
Bug fixes
Renewal list not renewed due to system error
You can now renew a renewal list, even if some of the vendors lack a Local Vendor Identifier. Previously, if a vendor for one of the items being renewed lacked a Local Vendor Identifier, the renewal would fail with a system error. Now, even if a vendor used on a renewal lacks a local vendor identifier, the system will still renew the items. Additionally, we are also investigating why some In-use vendors lack a Local Vendor Identifier.
Not tracked status preventing local resource subscription items from being saved
You can now mark the receipt status of a local resource subscription item as "Not Tracked" without causing problems with saving the order item. Previously, if you set the receipt status of a local resource subscription item to Not Tracked, the system would consider this status invalid and prevent any further updates to the item. Now, you can set the receipt status of a local resource subscription item to Not Tracked with no impact on the validity of the item or the possibility of saving updates.
Known issues
Default budget period duration field not applying
The default budget period duration field under Administration settings is not supplying a default budget period duration when creating new budgets. This will be addressed in an upcoming release.
Important links
Support website(s)
Support information for this product and related products can be found at: