General
Configurable Sorting
A facility has been included to configure sort rules for different domains, with options to specify various rules such as case sensitivity, character and string replacement, and left-padding numbers with zeros. For example, when sorting a set of bibliographic records by title, numbers spelled out as words (e.g. Nineteen eighty-four) can be “unspelled”, i.e. replaced by the number itself, so that the records sort consistently by number regardless of whether they are entered as numbers or as spelled-out numbers.
It is possible to specify sorting rule sets for:
- Titles
- Authors
- Classmarks
- Shelfmarks.
For classmarks, some predefined rules are provided, e.g. DDC, UDC have been predefined for Classmarks and Shelfmarks. However, different rule sets can be defined for different classification schemes. These classification scheme-specific rule sets can also be extended to shelfmarks, specifically to improve the usability of the stocktaking module for libraries which use an alphanumeric scheme such as UDC or the Wessex Classification Scheme created by WRLIN from the NLM schedules rather than the Dewey Decimal Classification system, which generally sorts correctly without requiring special processing.
In order to use the Words To Numbers facility, the language of cataloguing must be assigned to the title record. This can be defaulted at system level or from the cataloguer’s location for new titles.
Sorting Rules Domain
A new sorting rules domain is now included to apply sorting rules to Titles, Authors, Classmarks and Shelfmarks. The Sorting Rules domain can be found in menu under System Administration and is supplied with 6 predefined rule sets: System Administration> Sorting Rules

These rules cannot be deleted or modified. Apart from Title rules, they are not enabled by default (NULL is the same as Enabled=No).
When you select a record using the check box, there are 4 Actions supplied with the Sorting Rules domain:

Apply to applicable records
This action will enable the rule and commence the update of the appropriate records in the background.
Title and Authors rules will be applied to all titles and authors.
For Shelfmark rules this will be applied to all Copies for the Locations associated with the rule or, if no locations are specified, for locations that are not associated with another enabled shelfmark rule. In order to amend this for more specific Copies, there is a new action available in the Copies domain.
For Classmarks, the rule will be applied to all classmarks of the select type.
Example: apply sorting rules to classmarks (DDC)
- In System Administration> Sorting Rules, carry out a wildcard search.
- To apply the default rules, check the box for Classmark sorting rules for DDC.
- In Other Actions select Apply to Applicable Records.
- OLIB responds with the following message:

Once complete, the Applied Since field will be set to the date and time that the background task has completed.
Create Close Copy
This action creates a copy of the selected rule(s), adding an asterisk (*) to the end of the description. These rules can be modified as required. Use this action to create a new rule set of your own. The new rule will be disabled, even if the rule that was copied was enabled.
Example: create a new shelfmark (DDC) rules set
- In System Administration> Sorting Rules, carry out a wildcard search.
- To create your new rules record, check the box to select Shelfmark sorting rules for DDC based shelfmarks.
- In Other Actions select Create Close Copy.
OLIB creates the new record in the hitlist with a positive Sort Rule Number. (Predefined records have a Sort Rule Number with a minus sign).

- Open the record in modify mode and edit as required (field details below).
Disable / Enable
These actions disable or enable the selected rule(s).
This would be the only way to enable a predefined rule in the absence of the ability to modify them. When you enable a set of rules, it applies those sorting rules to hitlists, and to configurable Sorting, from this point onwards.
Modifying a Sorting Rule
Pre-defined records cannot be modified – modifying applies only to new records.
At the top of the record is a section which describes and specifies the applicability of this rule.

|
Rule Type |
This determines whether the rule is applied to Authors, Classmarks, Shelfmarks or Titles. |
|---|---|
|
Class Type |
For Classmark rules, this specifies the Class Type to which the rule applies. |
|
Locations |
This is a drop-down list of locations which can be used to add the Location Codes to the field below, specifying the locations which utilise this sort rule for their shelving. |
|
(below) |
This is a list of the applicable location codes, separated by semicolons (;).To apply this rule to all locations which do not have their own rule, leave this field completely empty. |
|
Enabled |
This Yes/No field specifies whether or not the rule is used. |
|
Applied Since |
This is populated with the date and time when the Apply to applicable records action has completed the background processing. |

|
Field |
Description |
|---|---|
|
Specific Replacements |
The two fields in this section allow for the specific replacement of characters or sequences of characters. These are the first rules to be applied when generating a sort key. They will therefore be processed as case sensitive. Further information on the content of the first field can be found below. |
|
Words To Numbers? |
This defaults to No. Setting it to Yes will “unspell” a number that is expressed in words, i.e. it will convert the spelled out number to its numeric equivalent. For example, “one” will be converted to “1”. Only “known words” are unspelled. “Known words” are defined in the language record. Refer to the Languages Reference Data section below for a description of how to configure a language’s list of known words and their numeric equivalents. When generating a title sort key, the language record that is referenced is the language of cataloguing that is set in the title record. If the title record does not have a language of cataloguing, spelled out numbers will not be unspelled. The unspelling facility is currently only available for titles |
|
Use Base Letter? |
This defaults to No, but is set to Yes in the predefined rule set for titles. This will convert diacritic marks to their base letters. For example, “ë” will become “e”. This is applied after Words To Numbers if Words To Numbers is set to Yes. For example, “una” is Spanish for “1” … “uña” (Spanish for “nail”) will not be converted to “1” because the “ñ” does not become “n” until after the Words To Numbers processing. Note that enabling the base letter option will also enforce case insensitivity and therefore auto-upper case the entire sort key, regardless of whether the Case Sensitive field is set to Yes. This means that you cannot use both base letter conversion and case sensitive sort key generation. |
|
Case Sensitive? |
This defaults to No and will convert all letters to upper case before sorting. If it is set to Yes, lower case letters will be sorted after upper case letters, e.g. “alphabet” will be sorted after “Zoo” |
|
Treat 1000-2999 As Years? |
Whether to keep groups of four consecutive digits, starting with a 1 or a 2 separate from other numeric sorting. For example:
- 1984 The default is No if the field is not set to anything. So you should only set the field to Yes if you want to implement this option. Note, however, that it is set to Yes by default in the predefined Authors rule set as it provides better readability when viewing the date portion of the sort key for an author. |
|
Convert Roman Numerals? |
Whether to convert Roman numerals to “normal” numbers, e.g. “vii” becomes “7”. This may subsequently by padded to the left with zeros if the Left-Pad To value stipulates more digits than are generated from the numeral |
|
Thousands Separator |
The character that is normally used as the thousands separator in numbers larger than 999. In English, this is usually a comma (,). This field has no default as a comma may be used for other purposes in classmarks or shelfmarks. |
|
Decimal Point Character |
The character normally used as the decimal separator. In English, this is usually a full stop (.) and this will be used as the default. |
|
Left-Pad To |
The number of digits that a number must include. Numbers with fewer than the specified number of digits will be left-padded with zeros until the requisite number of digits is reached. This facilitates sorting by number in alphanumeric sort keys. For example, if Left-Pad To is set to 8, 6 will be left-padded with 7 zeros so that it becomes 00000006, and 500 will be left-padded with 5 zeros so that it becomes 00000500. Thus, 6 will sort before 500, whereas without the left-padded zeros 6 would sort after 500. Please note that this rule is not applied to numbers that are immediately preceded by the character specified in the Decimal Point Character field (see above) |
|
Sort Numbers After Letters? |
Whether to sort numbers after letters. This facility may be the preferred option in the following languages: Arabic, Czech, Danish, Dutch, Finnish, French, German, Greek, Hebrew, Hungarian, Italian, Latin, Lithuanian, Norwegian, Russian, Slovak, Spanish, Swedish and Turkish. |
|
Sort Before Numbers |
A free text field for providing characters that should sort before numbers. For example, to sort <, = and > before numbers instead of between numbers and letters simply enter “<=>” into this field and do not enter any of these characters in the next two fields. |
|
Sort Between Numbers And Letters |
A free text field for providing characters that should sort after numbers and before letters. For example, to sort {, | and } before numbers instead of between numbers and letters simply enter “{|}” into this field and do not enter any of these characters in the previous or next field. |
|
Sort After Letters |
A free text field for providing characters that should sort after letters. For example, to sort <, = and > after letters instead of between numbers and letters simply enter “<=>” into this field and do not enter any of these characters in the previous two fields. |
The two fields in this section allow for specific replacement of characters or sequences of characters with others. These are the first rules to be applied to a sort process and will thus be processed as case sensitive.
Each line in the field on the left is comprised of the following:
|
Element |
Example |
Description |
|---|---|---|
|
Occurrence , space |
1 |
This is an optional portion of the line providing a single digit and a space to indicate which of the occurrences of the regular expression should be replaced. In the predefined rules the line described in this table indicates that the first dot should be replaced with a greater than symbol (>). In order to replace a digit and a space with something, you can start the line with “* “ (or “0 “) to indicate that all occurrences of that expression should be replaced. |
|
Regular Expression |
\. |
This specifies an expression to identify what should be replaced. For additional visual clarity and to avoid issues with copy/paste, an underscore (_) will be treated as a space. The hover text for this field lists the characters which must be preceded by a ‘\’ to be treated literally as used by the predefined UDC rule. These are: $ ( ) * + [ ] \ ^_ | . Detailed information on regular expressions can be found in the Oracle documentation at: https://docs.oracle.com/cloud/latest/db112/SQLRF/ap_posix.htm#SQ LRF020 |
|
Equals |
= |
This is used to separate the “what to replace” from the “to be replaced with” elements of the line. When examining the line for this character, the first character (after any occurrence portion) is ignored, allowing the user to specify a replacement for an equals sign by entering “==eq” to replace “=” with “eq”. |
|
Replacement |
> |
Except for replacing an underscore with a space, this portion of the line is read literally as the replacement to use in the resulting sort key. To remove the expression from the sort key completely, simply leave this portion empty. |
The field on the right is a manually entered, free text line by line description of the replacement rules stated in the field on the left. This can be useful when trying to interpret replacement lines which look odd at a glance – for example: “$=$”.
Below these fields is a list of ASCII characters in sequence. This is provided for reference to facilitate selection of a suitable character to place before or after a specific other character.

Re-sort Examples
The final field on this layout allows the System Administrator to test the rules with examples of their own. In this field, simply enter one value, line by line, and click ‘Resort Examples’. This will then apply the rule and refresh the page with the lines in the Examples field sorted according to the rule. Once sorted, a second column in this field will provide the sort key that was generated in order to place the value in that position with respect to the others.
Language
In order to sort the examples, the new sorting will use the language of cataloguing at the “PC location” level or, if not set there, at the system level. (The same logic which applies to the default for the language of cataloguing). This also allows the System Administrator to change their Location (using the OLIB Web location drop-down, just under the Logout link) to one with a different default cataloguing language, and re-sort the examples accordingly, e.g.:

Note that the columnisation used here is not supported by Internet Explorer. Copying and pasting the value into Excel will present the data in columns should this make the result clearer.
Stocktaking
On the Stocktaking project record is a new field to select the sorting rule. This field is applied to the Shelfmark range fields in order to advise the stocktaking process of the range of shelfmarks which are included in the project. The misfiled report will be based on the rules associated with the copy records themselves (if any).
Note: the Misfiled report will now take account of the configured sorting rules for the shelfmarks involved in the stocktaking project.
New Action for Copies
When at least one Shelfmark rule is enabled a new action is available in the Copies domain:
Update shelfmark sorting rules:

This action presents an option to apply to the selected copies:

|
Option |
Purpose |
|---|---|
| (a sorting rule description is given) | This will assign the selected sorting rule to the selected copies. This assignment will be overridden if another Shelfmark sorting rule is applied from the Sorting Rules domain to all copies at their location(s). |
|
Remove Configured Sorting |
This will remove the assignment of a sorting rule from the selected copy records. The sort key will be removed, returning the sorting of the selected copies to the default – UPPER(shelfmark). |
|
Set Sorting To Automatic |
This will set the Override Generated Sort? Setting to NULL, assuring that the generated sort value is effective. |
|
Set Sorting To Manual |
This will set the Override Generated Sort? Setting to Yes, preventing any further automatic updates of the generated sort value. |
Ye thorny iʃsue with ethels
In older publications, there may be English titles which use characters such as an old style long S, for example “Paradiʃe loʃt”. With the Sorting Rules configuration these can be placed as equivalent to an “s” in the hitlist.
Title Sorting and Languages Reference Data
When enabled in the sorting rule set (by setting Words To Numbers to Yes), the language of cataloguing specified in the title record will be used to determine which words will be changed to numbers (before being padded with zeros). If the language of cataloguing is not specified (either by default or manually), then this conversion will not occur.
In support of this, the Number Words sheet has been added to the Cataloguing Reference Data
/ Languages layout:

This new sheet is used to maintain the list of translations from a number as a word to a numeric value. English numbers 1 – 100 (cardinal and ordinal) have been added as predefined to the standard “ENG” language record.
The Input field is used to list, line by line, a “word=number” conversion, as shown on the saved list to the right. Once entered, the Save Input button can be used to add the items in the Input field to the saved list.
The Input field may contain spaces in front of the equals sign (e.g. “one hundredth=100”). The matching will only be applied for entire words (or phrases). For example, “twofold” will not be converted to “2fold”.
Items that have just been added to the saved list can be removed immediately by clicking the Remove Input button.
Items can be removed from the saved list by selecting them and using the Delete option. Alternatively, use the Remove For Edit action to delete the selected items from the saved list and place them into the Input field. They can then be modified before being re-added to the saved lists using the Save Input button. This provides a quick way to modify an item without having to delete it and re-enter it from scratch, or to copy an item easily.
Special cases may need to be considered. For example, without adding a special Words for Numbers rule in the English language record, “Nineteen eighty-four” will be converted to “19 84” and will therefore be sorted between “19” and “20”. Users may expect this to appear between “1983” and “two thousand”. Thus, you may want to consider adding the following in Words For Numbers:
nineteen eighty-four=1984
Manual Sorting
If a sorting rule set is enabled for a domain (Titles, Names, Classmarks or Shelfmarks (in Copies)), a sort key is automatically generated for each record in that domain. It is possible to modify this sort key manually if the configurable rules do not get it quite right. If a sort key is modified manually, you must also set the respective Manual Sort Key? field to Yes. If you leave this field blank or set it to No, your manual edits will be lost the next time the record is saved.
Each domain includes a pair of attributes to enable you to set the sort key manually for a record in that domain:
- Sort Key This is the “internal” value used to place the record in the hitlist in relation to other records. It can be modified manually but will, by default, be updated automatically.
- Annual Sort Key? This Yes/No field will, if set to Yes, stop any further automatic changes to the sort key.
Flagging a title as a “super title”
Using the manual sorting facility, it is now possible to flag a title record as a “super title”, one that is sorted above other records in a hitlist. This can be done simply by adding an exclamation mark (!) at the beginning of the record’s sort key and setting the Manual Sort Key flag to Yes.
Leading Articles
Leading articles in titles and authors will be removed from the start of the sort key. This is done automatically and cannot be switched off in the Sorting Rules configuration.
Reporting
To take advantage of the new sorting methods in Reports, the SQL must be changed to use the new sort keys.
In titles this will be “ORDER BY sort_title_main_key”. This value should always be populated and there is no longer a need to consider non_file_chars when using this value as it is already accounted for.
For copies sorted by Shelfmark, this will be “ORDER BY NVL(sort_shelfmark_key, shelfmark)”. For classes this will be “ORDER BY NVL(sort_key, classmark)”.
For classes this will be “ORDER BY NVL(sort_key, classmark)”.
For authors this will be “ORDER BY f_sname”, once the appropriate sorting rule has been applied.
Reports in the repository can be updated accordingly once all Service Pack 11 customers have upgraded to Service Pack 12.
Enhancements to Print Layouts
A number of enhancements have been made to control the layouts available from the Print Dialogue window.
Configurable Print Layouts
It is now possible to specify that a layout is not to be included in the list of layouts available in the Print dialog window. It is also possible to specify a preferred print layout.
A new Print Preference option has been added to Layouts. Search for a layout from the Admin Client Configuration > Layouts search.
On the Main sheet, the print preference for this layout can be selected from the drop-down options:

This can be set to:
- Preferred
- Not preferred
- Excluded

Layouts marked Preferred will be listed alphabetically at the top of the Print Layout field when making a print selection of records.
If the default layout for the domain is offered, this will be displayed at the top of the print list.
Layouts for which there is no preference specified will be listed next. Finally, layouts that have been marked as Not preferred will be listed.

Layouts marked Excluded, will not be offered in the Print Selection list.
Selection of Print Layouts
OLIB Web will not allow the selection of a layout for printing that is not associated with all of the infotypes of all the records that have been selected for printing.
Here the following layouts only are associated with both the media type Games and E-Books:

If there is no single layout suitable for all of records selected a message will advise this:

Retention of data in Audit Trail Tables
A library can now specify for how long data is stored in the Audit Trail tables for all audited domains.
The following additional fields have been added to the OLIB Defaults screen on the Funds/Acq/Serials sheet:
- Orders Audit Retention Period
- Order Items Audit Retention Period
- Invoices Audit Retention Period
- Invoice Items Audit Retention Period

A new field is also available on the Daystart sheet:
- Days To Keep User Audit Records

In all cases, enter a number to specify the number of days to retain the audit trail data for.
Alternatively, enter a negative number to specify the number of audit trail records to retain per order, order item, invoice, invoice item or user record.
If left blank the audit trail data will be kept indefinitely as before.
Privacy Policy Compliance Messaging
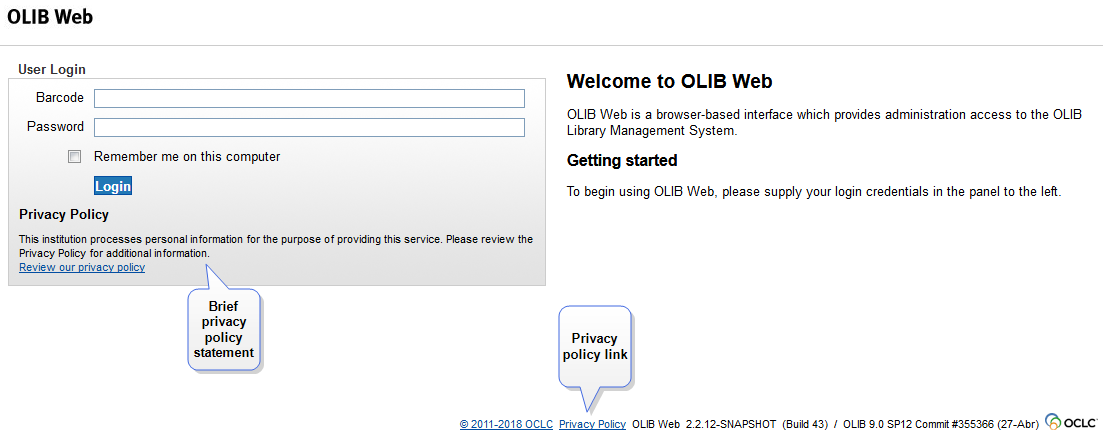
To comply with the General Data Protection Regulation (GDPR) OLIB can be configured so that it presents a brief privacy policy statement to your library staff and your end users, together with a link to your organisation’s full privacy policy statement.
The brief privacy policy statement can be displayed on the login screen in OLIB Web and on the login form in Folio and WebView. The link to your organisation’s full privacy policy statement can be displayed both in the brief privacy policy statement and as a link in the footer in OLIB Web, Folio and WebView.
Brief Privacy Policy Statement and Privacy Policy Link in OLIB Web:
Brief Privacy Policy Statement and Privacy Policy Link in Folio:
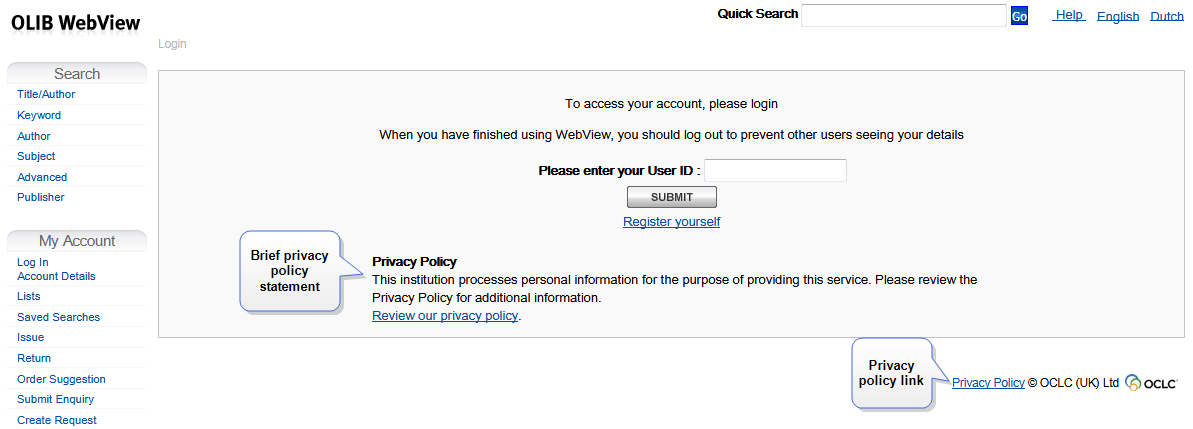
Brief Privacy Policy Statement and Privacy Policy Link in WebView:
Configuration
When configuring hover text, please note that Internet Explorer imposes a 512-character limit on hover text. If you enter a message in a hover text setting that is longer than 512 characters, it will be automatically truncated to 512 characters when it is displayed in Internet Explorer.
OLIB Web
The configuration required to enable the display of the brief privacy policy statement and privacy link in OLIB Web is done in the Admin Client Settings domain (in System Administration, logged into OLIB Web as a system administrator).
This domain includes a series of settings that will need to be configured as follows:
|
Setting Name |
Description |
Usage |
|---|---|---|
|
PrivacyBrief |
A summary privacy policy statement, displayed immediately underneath the Login button on the login screen. The first line is displayed in bold, as a heading. This setting is also used as the hover text for the privacy policy link in the OLIB Web footer. |
Enter the text you would like to be used as the brief privacy policy statement on the login screen. |
|
PrivacyBriefLinkText |
The text to use as the name of the link to your organisation’s full privacy policy page that is displayed immediately below the brief privacy policy statement on the login screen. |
Enter the text you would like to be used as the text of the link to your organisation’s full privacy policy page. In the example above, this has been set to “Review our privacy policy”. |
|
PrivacyLink |
The URL of your organisation’s privacy policy page. |
Enter your organisation’s privacy policy page’s URL. |
|
PrivacyBriefLinkHover |
The hover text that is displayed when you hover over the privacy policy link on the login screen. |
Enter the text you would like to be used as the hover text for the privacy policy link on the login screen. |
|
PrivacyFooterLinkText |
The text to use as the name of the link to your organisation’s full privacy policy page that is displayed in the footer. As mentioned above, the text of the PrivacyBrief setting is used as the hover text for this link. |
Enter the text you would like to be used as the text of the privacy policy link in the footer. |
Once these settings have been configured, an OLIB Web rebuild must be completed in order to implement them.
Folio
The brief privacy policy statement and privacy link are enabled in Folio by modifying or including two OPAC configuration settings and adding a new one, as follows:
| Setting Name | Description | Usage | ||||||||
|---|---|---|---|---|---|---|---|---|---|---|
|
l_privacyPolicyMessage in login.ini |
Whatever is included in the Value field of this setting is displayed as the brief privacy policy statement on the Folio Login form, immediately below the Login button. |
An example l_privacyPolicyMessage setting is delivered as part of the RSD. So to display the brief privacy policy statement on the Login form, simply retrieve the setting (using the WebView Configuration Settings by Setting search rather than the Folio Configuration Settings by Setting search), modify the example statement in the Value field so that it matches your organisation’s prescribed brief statement, set Include to Yes, and save your changes. |
||||||||
|
footerDisplayText in gno_startup |
The HTML for the link to your organisation’s full privacy policy page can be added to the end of this setting to display the link immediately to the right of the copyright statement in the footer. |
At the end of the Value field, just before the closing double quote mark, add a space followed by the HTML code for the link to your organisation’s full privacy policy page. An example HTML portion to add is shown below: <A HREF='http://www.myorg.org' target='new' TITLE='My Organisation processes your personal information for the purposes of providing this service and to allow your institution to manage your account, complete requested transactions and contact you...'>Privacy Policy</A>
These should all be set to the values prescribed by your organisation. |
||||||||
|
external_css in gno_startup |
Add this setting to ensure that the footer is not overlaid with the sidebar. Without this setting, the Privacy Policy link will not be live. |
Add a new setting in gno_startup with Setting=external_css and Value="<STYLE>#footer { z- index: 1; }</STYLE>". Please note that your system may already include an external_css setting. This facility to process the external_css setting was included in SP7, under OLB- 8542, and you may have added an external_css setting to implement it. If your system does already include an external_css setting, simply add the above <STYLE>…</STYLE> HTML to the end of it. |
WebView
The brief privacy policy statement and privacy link are enabled in WebView by modifying or including two OPAC configuration settings, as follows:
|
Setting Name |
Description |
Usage |
||||||||
|---|---|---|---|---|---|---|---|---|---|---|
|
l_privacyPolicyMessage in login.ini |
Whatever is included in the Value field of this setting is displayed as the brief privacy policy statement on the WebView Login form, immediately below the Submit button. |
An example l_privacyPolicyMessage setting is delivered as part of the RSD. So to display the brief privacy policy statement on the Login form, simply retrieve the setting, modify the example statement in the Value field so that it matches your organisation’s prescribed brief statement, set Include to Yes, and save your changes. |
||||||||
|
footerPrivacyPolicy in setup.ini |
The HTML for the link to your organisation’s full privacy policy page that is displayed immediately to the left of the copyright statement in the footer. |
An example footerPrivacyPolicy setting is delivered as part of the RSD. So to display the privacy policy link in the footer, simply retrieve the setting, modify the example HTML in the Value field to make it specific to your organisation, set Include to Yes, and save your changes. The example setting includes the following in the Value field: <A HREF='http://www.oclc.org' target='new' TITLE='My Organisation processes your personal information for the purposes of providing this service and to allow your institution to manage your account, complete requested transactions and contact you...'>Privacy Policy</A>
These should all be changed to the values prescribed by your organisation. |
Automatic archiving
Using OLIB, catalogue and user records can be archived. Archiving moves Titles and Copies records and User records into domains in the Archiving section of the menu:


It is now possible for this to happen automatically for Titles, Copies and Users records. There are 3 new folders available in the Folders tab:


These folders are accessible only to the system administrator. Permissions can be given to other users on these Folders as required.
The main advantage of batch archiving is in speed of operation, as you can select multiple records at once and assign them to the Auto-Archiving folder. Putting items in these folders is the same process as for any other folders – the difference is that the items will be automatically archived overnight by the Daystart process.
1. In the Titles or Copies domain, search for the items for archiving.
2. Check the box for the e.g. Title for deletion and click Add to Folder.

3. Select the Folder e.g. Titles for Auto-Archiving.

The Daystart process will archive those records when it next runs.
Re-sizing of Columns in List Boxes
The columns in a list box can now be manually resized using the drag feature at the bottom right of a list box
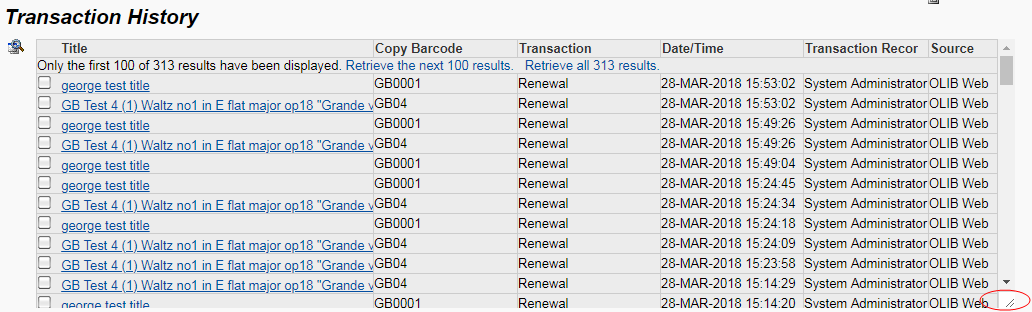
The size will persist in the browser for the display of this list box on this record (whether in edit or display mode) for the duration of the browser session – even if the user logs out of OLIB Web and logs back in again.
Help Links
The Help Link and the Login options are no longer displayed in the top right corner on the OLIB Web Login screen.

The Help Index link is only displayed once the user has logged in

Keyword Indexing Enhanced
It is now possible to configure a Titles keyword index so that an attached object’s title, locator and other fields can be made to be searchable in a keyword search in Titles.
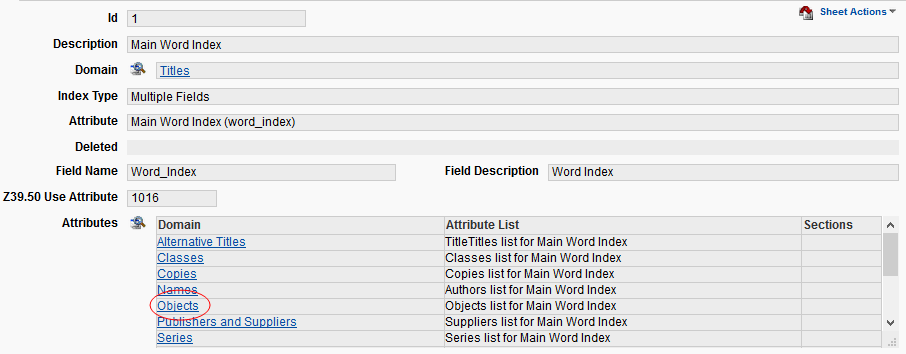
The Objects attributes will have to be added to the Main Word Index. To configure go to System Administration> Keyword Indexes.
From the hit list open Main Word Index to view the details above. Modify the record and click New

Select the Objects domain and Attribute List and save and close the record.

For the changes to take effect, the keyword index will have to be rebuilt once SP12 has been installed.