Groups
The Group directive allows you to create groups of resources, define users of these groups, and assign users access to those resource groups. For example, you can create student, faculty, and alumni groups, and assign access to different resources for each of these groups—students can access a certain set of resources, faculty a different set, and alumni, still a different set. Additionally, you can allow students and faculty to access certain resources while restricting alumni access.
In its default configuration, EZproxy allows all users defined in user.txt to access all databases defined in config.txt. In some instances, it may be necessary to restrict users' access to certain databases. Using the groups configuration allows EZproxy administrators to create groups of resources and define which types of users can access those resources.
Setting up Groups in EZproxy requires configuration changes to the config.txt file to create resource groups. It also requires changes to the user.txt file to add users to the groups named in the config.txt file.
Before getting started with a group configuration, it is important that you understand how EZproxy processes resources in the config.txt file. For more information, review the following documentation:
- An Introduction to config.txt Directives
- Understanding URLs and Database Stanzas
- Starting Point URL
- Starting Point URLs and config.txt
Group Restrictions
After you understand how the config.txt file works, it is important to understand some general group restrictions. There may be ways to workaround these restrictions, but the configuration will be more complex.
Groups Operate at the Origin Level
Because EZproxy reads the origin in a resource's URL to determine how to proxy that resource, the origin also determines whether access to a particular resource can be restricted with groups. Consider the following two examples.
Example 1: Groups Could NOT Be Used to Restrict Access to Resources
The fictional database provider, Science Database at www.sciencedb.com, has two journals at the following URLs:
- Astronomy Journal: http://www.sciencedb.com/astronomy
- Chemistry Journal: http://www.sciencedb.com/chemistry
You would like to limit access to the Astronomy Journal to only astronomy grad students and the Chemistry Journal to only chemistry grad students. However, EZproxy cannot securely enforce this distinction because EZproxy reads only the origin (http://www.sciencedb.com), and ignores the paths (/astronomy or /chemistry). EZproxy reads these two URLs as the same.
Based on the URL construction of this database provider and its resources, you will not be able to prevent access via groups to the Astronomy and Chemistry journals using only the Group directive and database stanzas. Both URLs begin with the same origin, http://www.sciencedb.com, and this means groups can either access all or none of the Science Database resources.
Example 2: Groups COULD Be Used to Restrict Access to Resources
If instead the URLs for these two resources are constructed as follows:
- Astronomy Journal: http://astronomy.sciencedb.com
- Chemistry Journal: http://chemistry.sciencedb.com
You would be able to create an Astronomy group with permission to access the Astronomy Journal and a Chemistry group with permission to access the Chemistry Journal by creating separate stanzas for each resource and assigning group access accordingly. The origins of these resource URLs, http://astronomy.sciencedb.com and http://chemistry.sciencedb.com are different and can be configured in two separate stanzas.
For more information about how EZproxy reads and processes URLs, please see Understanding URLs and Database Stanzas and Starting Point URLs and config.txt.
All Groups Work from One IP Address by Default
If EZproxy is configured with one IP address, the default, all groups are registered to access content with that IP address. You can configure EZproxy servers with multiple IP addresses, but this is a complex workflow.
Note: The Hosted EZproxy environment does not support servers with more than 1 IP address.
With One IP Address, Content Providers Will Not Be Able to Track Group Usage
Most content providers cannot differentiate between EZproxy groups. So, if you need to collect statistics about group usage, you will need to add group-specific parameters to your logging directives. For more details, please see Audit and LogFormat.
Authentication Is More Complex
In example 2 above, the two groups—Astronomy students and Chemistry students—must be defined in the EZproxy user.txt file so that EZproxy can apply the appropriate permissions and restrictions to individual resources. This means that whatever authentication method you select, you must have sufficient information from the authentication method to determine what group the authenticated user belongs to.
Examples
A Command before You Start
Before enabling group access, you should issue one of the following two commands depending on the system you are using to run EZproxy:
Linux: ./ezproxy -mg
Windows: ezproxy -mg
This command creates the file logup.htm in the /docs subdirectory where all of your website html files are saved. If a user tries to access a database, but is not authorized to do so, the /logup webpage will be displayed. In its default form, this page appears as a login page with a brief message at the top of the screen explaining that the user does not have the proper group membership to access the resource.
Once the file has been created, editing the logup screen to include a detailed message instructing the user to try different credentials can be useful if users have multiple logins (e.g. multiple library cards with differing access). Depending on your Group setup however, you may want to remove the login form from this file and state that the user does not have access to the database.
Sample Configuration
The following sample configuration provides an example of a group configuration in both config.txt and user.txt when the authentication method is text file. The syntax in the config.txt file will vary depending on the authentication method you are using for your site, but it will be similar to this example.
If you are using Shibboleth authentication, your groups will be configured in your shibuser.txt file. For additional details about how to configure groups with your authentication method, see Authenticate Users (user.txt).
No matter what authentication method you use, OCLC suggests that you place the least restrictive groups first and then add groups and resources that apply to fewer individuals.
config.txt
- Edit your config.txt file to create and name resource groups by entering the Group directive followed by the group name. Your existing authentication method may provide some attributes to distinguish between different types of users—for example, students, faculty, and alumni. You may want to use these existing groups as a basis for your EZproxy groups, or you may want to create new groups.
- Below the Group statement, add the database stanzas for the resources these group members are allowed to access. All the database stanzas following a Group statement will be available to that group until a new Group statement ends access and starts access to separate resources for a new group or set of groups.
Replace the group names with your group names, and replace the database stanzas with stanzas for your resources. The commented-out lines provide details about what each group setting means.
Group General
# All resources in this group are available to everyone because every group defined
# in config.txt has access to the General group, and this group of resources is
# first in the config.txt
Title Research Database
URL http://www.researchdb.com
DJ researchdb.com
Title Study Database
URL http://www.studydb.com
DJ studydb.com
Group GradStudent+Faculty
# All resources in this group can be accessed by individuals from the GradStudent and Faculty groups
Title Academic Database
URL http://www.academicdb.com
DJ academicdb.com
Group GradStudent
# All resources in this group are only available to grad students.
Title Student Database
URL http://www.studentdb.com
DJ studentdb.com
Group Faculty
# All resources in this group are only available to faculty.
Title Professor Database
URL http://www.professordb.com
DJ professordb.com
Group Alumni
#All resources in this group are only available to alumni.
Title Alumni Database
URL http://www.alumni.com
DJ alumnidb.com
user.txt
Once you have named groups in config.txt, define the members of each group in your user.txt file.
The sample text below can be entered in your user.txt file to configure groups using text file authentication. The text that has been commented out has been entered to describe the purpose of the directive that follows.
# Allow the following admin user to access all resources and groups
::group=General+GradStudent+Faculty+Alumni
rdoe:secret:admin
# Add the undergraduate users in the general.txt file to the group named General. They
# will be in the General group but no other groups, so these users will be blocked from
# databases following any group besides General in config.txt.
::group=General
::file=general.txt
# Add the graduate student users in the gradstudent.txt file to both the General and
# GradStudent groups, so these users have access to all the General and GradStudent resources
::group=General+GradStudent
::file=gradstudent.txt
# Add the faculty users in the faculty.txt file to both the General and Faculty
# groups, so these users have access to all the General and Faculty resources.
::group=General+Faculty
::file=faculty.txt
# Add the alumni users in the alumni.txt file only to the Alumni group, so these users can
# only access Alumni resources
::group=Alumni
::file=alumni.txt
Testing
In the example configuration, rdoe has been added as an administrative user to help diagnose this configuration. If you have not done so, add your admin credentials to all groups as shown in the example tab. Then proceed to test your group configuration. To test your group configurations:
- Log in to your administrative page at:
http://ezproxy.yourlib.org/admin - After you have logged in, manually change /admin to /groups as shown below, and press enter:
http://ezproxy.yourlib.org/groups - The Groups page shows the databases available to each group. Note that the Default group exists in all EZproxy configurations, but since the sample configuration never assigned any databases into the Default group, no database appears in the Default group. For the sample configuration, you would see a table that looks similar to the following if you log in as an admin user:
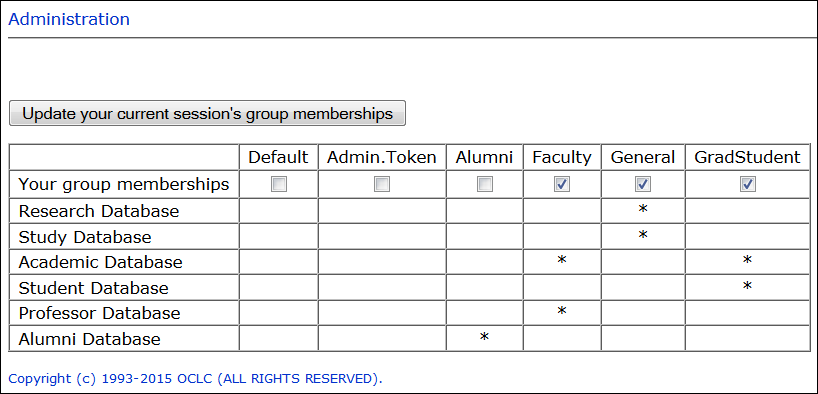
The checked boxes in the table indicate that you are a member of the following groups and have access to all databases assigned to these groups in config.txt:
General
GradStudent
Faculty - Attempt to access resources available to each of the groups defined in config.txt by clicking directly on the resources from your Menu page or manually constructing starting point URLs to each resource and entering them in the browser.
- To test user access to individual groups, navigate back to:
http://ezproxy.yourlib.org/groups
Uncheck boxes in the Your group memberships row so that only a single group column is selected. For example, leave only the Faculty box checked. - Click Update your current session's group memberships. The page will refresh and you will only see the box you selected checked.
- Attempt to access resources available to the selected group using the Menu page or starting point URLs to make sure your configuration has allowed you access. Attempt to access resources not available to the selected group to make sure your configuration has limited access.
- Repeat steps 5-7 for additional groups to ensure that your configuration has allowed and restricted the appropriate access.
Additional resources
The use of groups is one of the most advanced EZproxy concepts. If you know how you want to vary access among your users, but this information does not provide enough detail for you to proceed, please send e-mail to support@oclc.org and describe the databases involved, how you plan to authenticate your users (e.g. LDAP, Shibboleth, etc.), and how you will distinguish between various groups of users.